When you click on links to various merchants on this site and make a purchase, this can result in this site earning a commission. Affiliate programs and affiliations include, but are not limited to, the eBay Partner Network.
I have a mount designed for the MSD Digital 6 to sit to the right of the K&N intake. I am just waiting on a band saw blade so I can make a clean cut. 12x12x.125" aluminum plates on Amazon are cheap!
The lined areas will be removed, and there will be 2 bends. The left side will bend 90 degrees towards us an screw down to the radiator support. The right side will bend up and out a bit then screw down to the bottom of the fuse box mount.
In other news, I have a proper steering column on order from Hawks (from the break in I replaced the column with an automatic column, not realizing there was a difference). I also have a new rear hatch lock at the locksmith to re-key it to the be the same as the doors. I am also planning to make a small plate from the scrap from the mount to fix one of screw mounts from below the dash where the thieves pried off the kick panel.
Pick-a-Part charges $83 for steering columns and have plenty of fourth gen cars in 2 Las Vegas locations if have trouble locating one.
I have been looking at the Henderson yard in each of my visits, and usually find automatics. The manuals that I have seen have been junk. I have only been to the north location once, but was quoted $200 for a column. At that point, I found Hawks and have just been waiting for the right time to buy.
Originally Posted by cardo0
Don't forget to add a bend radius to your fab work for your mount or the sides maybe a little short.
This is my first attempt on anything remotely like this. I made a temple out of cardboard, then copied that to the aluminum. I am sure the bend will take slightly more material, but I would imagine that it will be close as the cardboard was a bit thicker than the plate. I also have not drilled holes in the car yet, and have plenty of play on where the fuse box side will mount.
Originally Posted by cardo0
Nice progress.
Thanks! Since you know about Pick-a-Part, are you local to Vegas?
Is there any room on the block off plate that covers the hole where the K&N CAI passes thru to the filter? I had a standard MSD 6AL mounted there on the plate that came with my Moroso CAI.
Is there any room on the block off plate that covers the hole where the K&N CAI passes thru to the filter? I had a standard MSD 6AL mounted there on the plate that came with my Moroso CAI.
There is a bit of room, but not quite enough. I also measured where the K&N filter is, near the cruise control box and no dice. I think the mount will work well, so long as I cut and bend well!
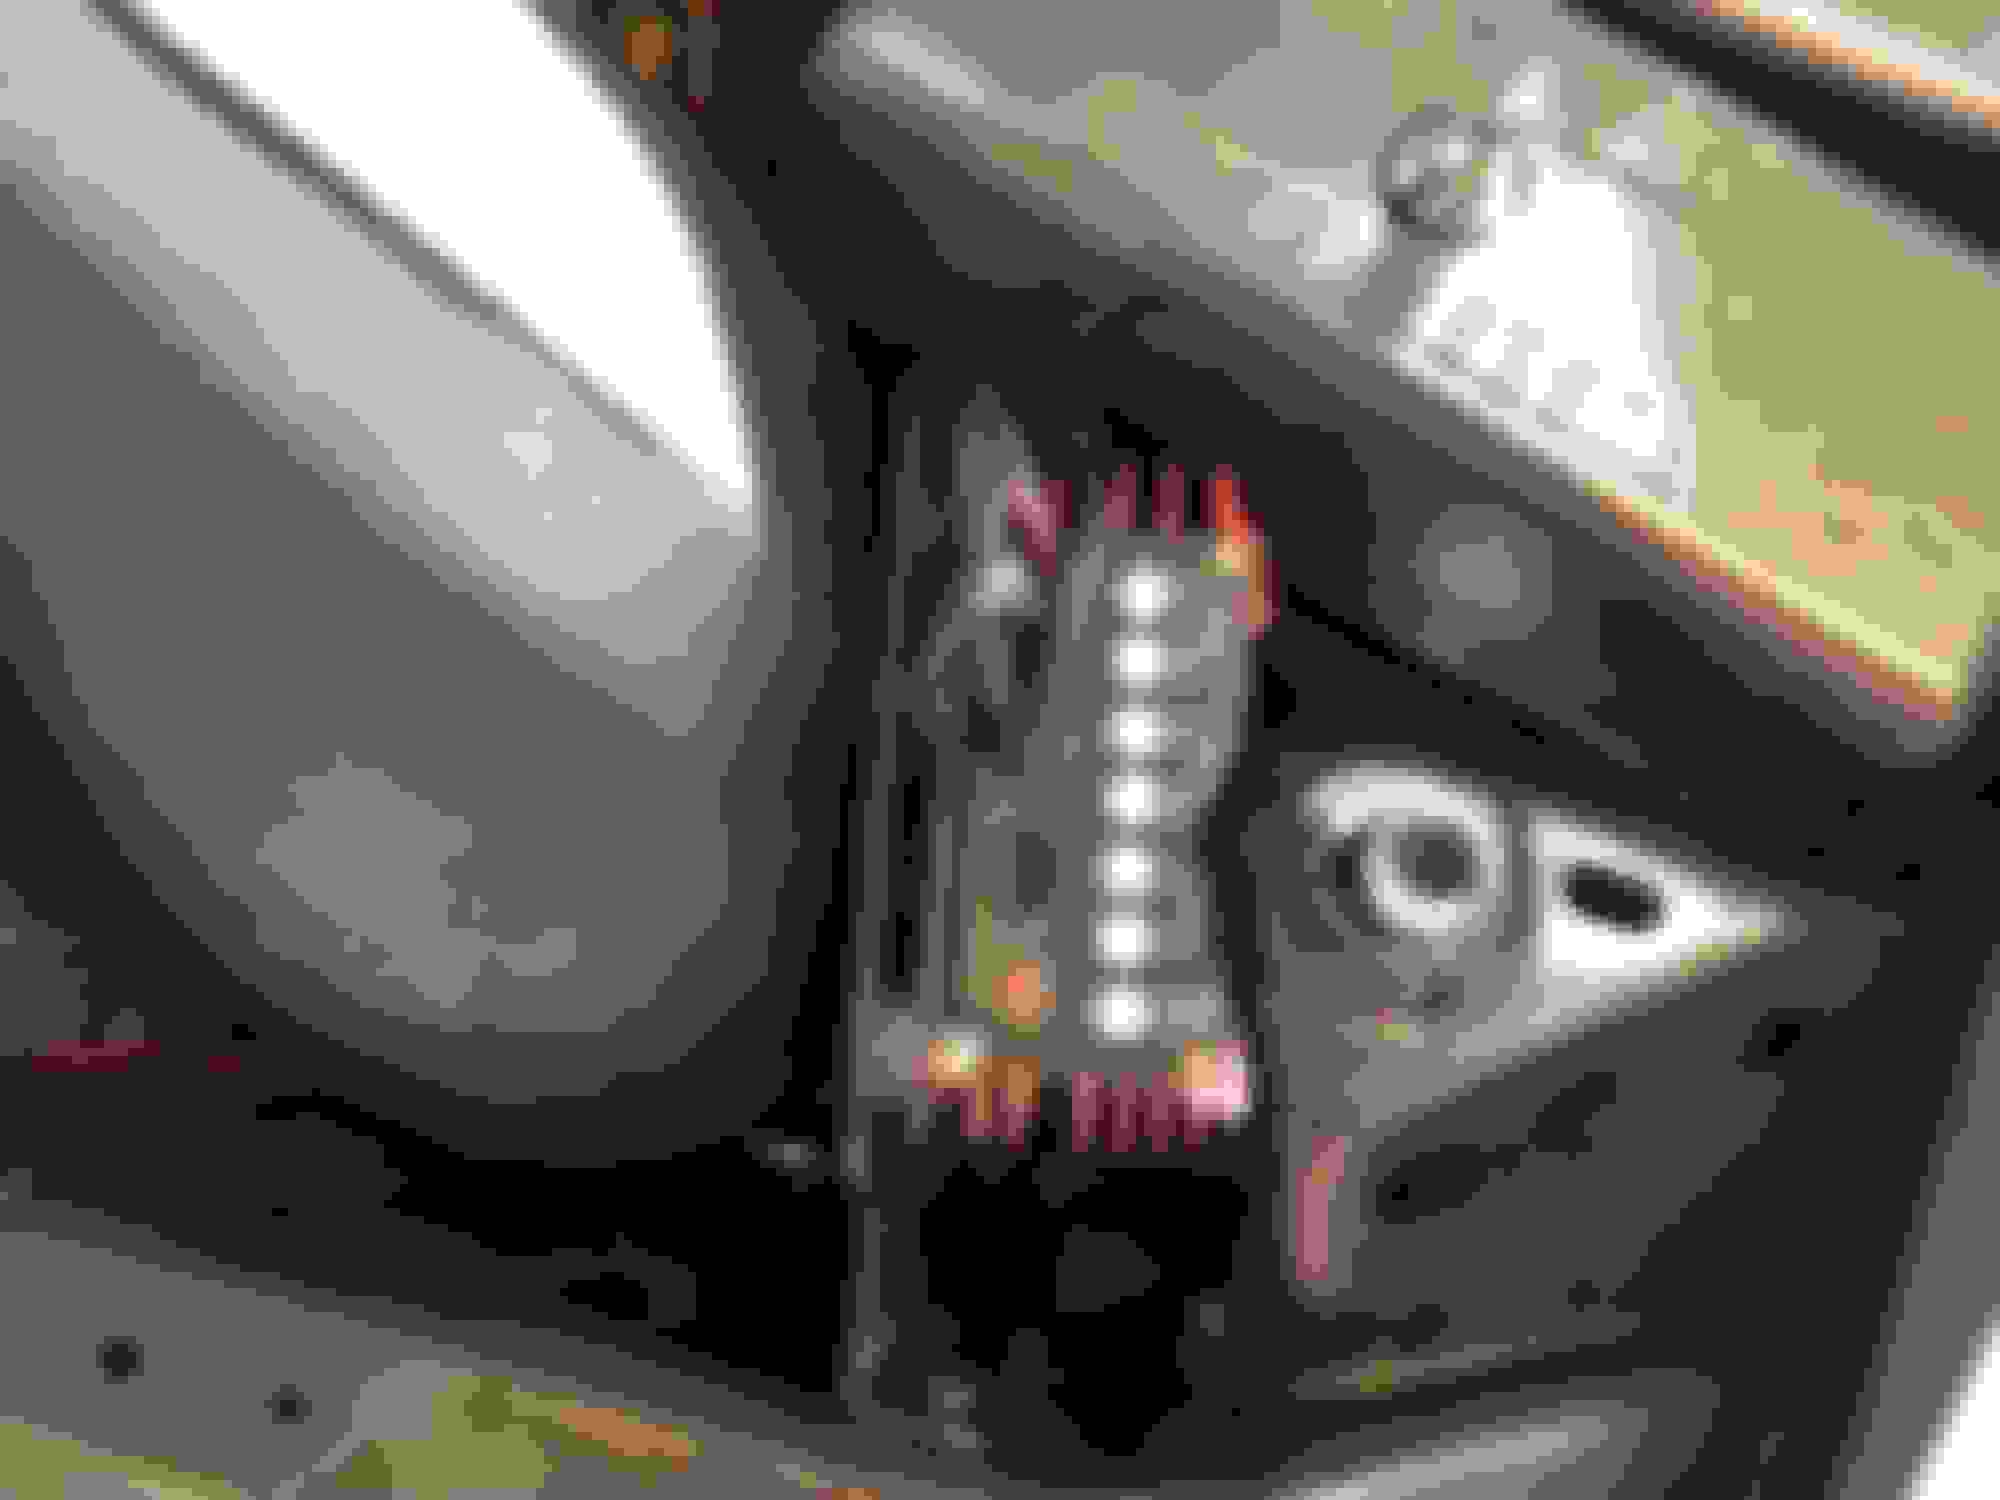
Loads more work done this weekend. Here is a pic of where the dash was damaged when the would be thieves pried the kick panel from below the steering wheel. I failed at snapping a pick of the fix, but I used extra material from the ignition system mount to make a small square hole for the screw mount.
They also tried to get in the trunk. I have the new lock in after getting it re-keyed
Last edited by DrewHMS97SS; Jan 22, 2018 at 04:27 PM.
Reason: Add pic
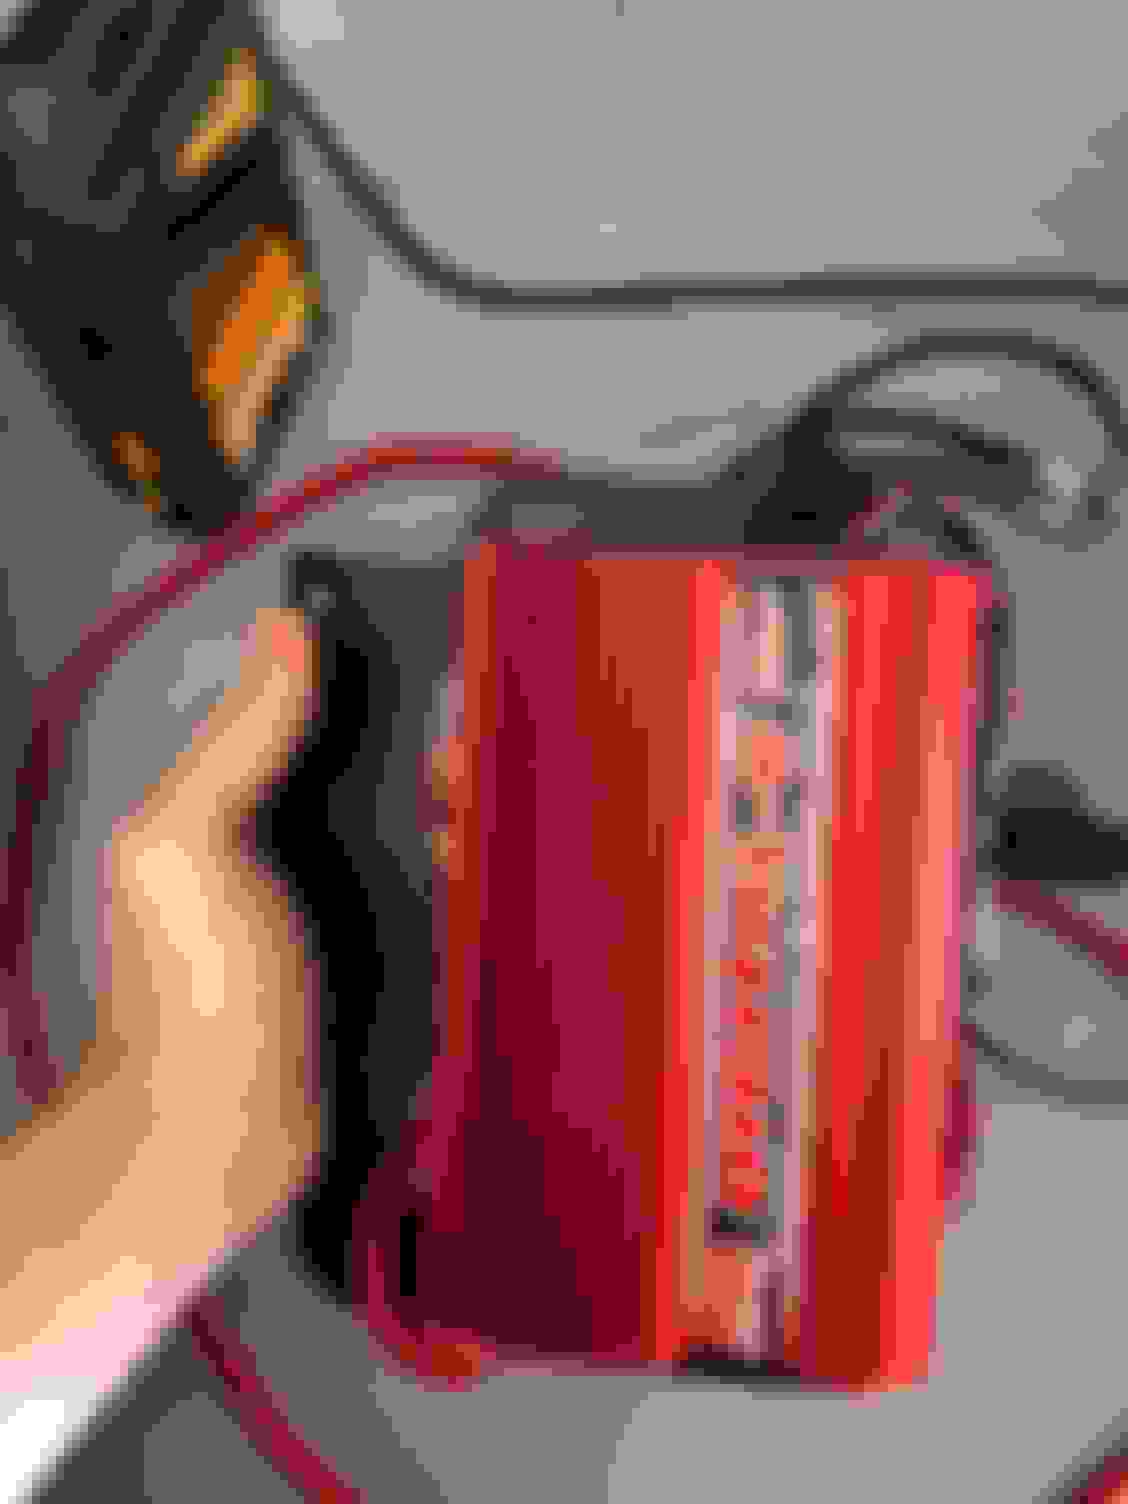
I am extremely pleased with how the ignition system mount turned out; let me know what you think. The mount locks between the radiator mount and the fuse box. The fuse box had a hole drilled and with a counter sunk screw/washer and nylock nut. The raditor is a 5/16 bolt threaded in the radiator mount.
The main reasons I went with the digital 6 plus over other MSD models were the builtin retard for the nitrous and the easy adjustable of the rev limiter without a PC. As for over the stock ignition, a rev limiter that pulls spark instead of fuel and better fuel burn. Passed that, it was really just about a nicer ignition.
Last edited by DrewHMS97SS; Jan 22, 2018 at 04:28 PM.
I feel like I am getting really close. This weekend I did some wanted work, fixing and troubleshooting.
For the fun stuff, I pulled off the EGR and exhaust tube in exchange for aluminum plates from Hawks. I had already pulled off the air system, and hadn't gotten around to this. I also bled the brakes, and adjusted the parking brake. I need to get it on an incline to see if the adjustment was sufficient, but the hand brake feels way better than it did. For the adventurous, I found a centipede under the differential when I was pulling off the rear wheels. I was luck enough to get it before it got me.
I also removed the rag joint out of the intermediate steering shaft. The factory studs were a pain to remove, but overall I am happy I did it. I am surprised how much play the rag joint afforded the steering.
For troubleshooting, my Autometer fuel pressure gauge shows 80ish PSI. I purchased an inexpensive test kit and showed 40 PSI at the schrader valve. I need to do some testing, but I believe the transducer for the gauge is most likely faulty. I need to relocate the transducer so I can see if there is an issue with the reading from the Aeromotive regulator, or the transducer is wrong.
With all of that said and the brakes finished, I buttoned up the front of the car and have it on the ground. I hope to get it aligned this week.
Check out the insane dust on the windshield! If you look really hard, you can see where the wiper blades used to sit with the switch in the steering column not working.
Just pulled my 95 out of the garage where it's been sitting since 06. I'm enjoying following along on your build while I look at all of the mistakes and half *** work my early 20's self did on mine!
WTF where we thinking back then? haha I'm really glad to find that there's at least one other person in the world working on an lt1
EDIT: this is my first post since probably 06 and I just saw my sig pic...... ridiculous
There were definitely some really ugly things that I did just to get it done, or because I thought it was an upgrade.
I had the car out on the road after an alignment, and I realize how much I missed it. It is a super rough right after the poly conversion, and maybe exaggerated as the daily driver is an Acura TLX. About an hour into driving, the fuel pump started whining, and then cut out over 3k RPM.
Got it home, and after a few choice words, I decided to pull the tank. 5 hours later, a heap of choice words were spewed after discovering the tank was full of rust, and the bad gas had eaten away the entire fuel sock, and had badly deteriorated the bucket.
I found a 99 with a plastic tank for $55 complete in North Vegas. It took me about 2 hours to pull, but only because of the rusted suspension in the donor car.
I did a fair amount of research first, and understand the difference in the fuel level sender. I found a great resource in the 3rd gen area, and have a fuel sender from a 97 Grand Prix that will be a direct replacement with the 0-90 ohm sender. I am trying to decide if I want to worry about the evap system, or just remove it entirely. I am leaning towards figuring it out. Ill post pictures when I get a chance.
After the alignment, I was told they were only able to get it close. Upper a-arms were needed, for extra adjustment, which I wanted to buy anyways, but wasn't ready to lay down the cash. Anyhow, they are here, awaiting installation after being inspected.
For updates the adjustment on the parking brake did work, and can now hold the car on an incline. The rear end is back in the car minus the pan hard rod, and I did a test fit of the plastic tank. After experiencing the removal of the metal tank, and the ease of the plastic tank, I move that whatever engineer decided to have a 2 1/2' long solid filler neck be released from employment. The plastic tank will still require the exhaust and pan hard rod to be removed, but passed that, it just falls straight out with the rear end hanging.
There were a few other things that happened on the initial day out:
The speedometer didn't work, no movement on the odometer either. I verified that the VSS was sending info to the PCM with a scanner. When I had first changed to 4.10 gears in my 10 bolt rear, I used a Granitelli speedometer adjuster that wired inline with the speedometer. The splices for this device were near the BCM, so my thought was that these wires were pulled apart when I struggled with the BCM. They looked okay, but decided to cut off the crimp connections and soldered the wires. This did fix the speedometer.
The window didn't roll up at the car wash. It went up most of the way and stopped. I gave it a minute, then tried again and got it up all the way. I understand that this is most likely the motor, and have a replacement in hand. I hope to get to this over the weekend. Both sides were slow, but I will start with the driver side to see how bad the job is.
Thinking to the car firing up after all the work, and having the fuel pour from the fuel regulator, I decided to put a fire extinguisher in the car. I bought a bracket from Amazon, and while it did fit without any modifications, the seat could not move all the way forward before hitting the bracket. I ended up cutting a lot off the bracket, and was able to get it to mount to the rail that the seat sits on, no binding at any position. I probably won't ever need it, but I think it's better safe than sorry.