
Some "engine out the bottom" removal pictures


Thread Starter
Registered User
Joined: Mar 2001
Posts: 2,521
From: Costa Mesa, CA
Some "engine out the bottom" removal pictures
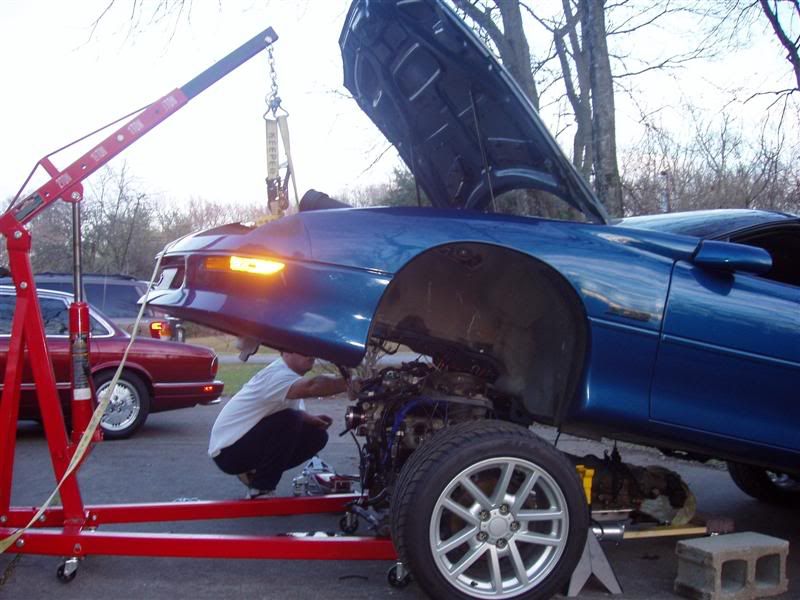
I've seen a few "how to" guides on this sort of thing showing some blocks, or wooden platform looking things used to support the jackstands on and get a little extra heighth out of them. After doing this again I realized that I didn't need that. Maybe I'm using taller jackstands, I don't know, but all I needed to do this was of course a set of standard/metric tools and other common hand tools, two furniture dollies, a pair of jackstands you can get from Sears, engine hoist and at the end two cinder blocks to rest the car on once the subframe is out.


This would be sooooooooooo much easier with a lift........ After doing this a few times recently I can give a few pointers.
One thing that I think would commonly confuse people is the wiring harness. It's easiest to disconnect the harness in a few places, and leave it all connected on the motor. Go ahead and remove the PCM, and when it's out of the way you'll see a part of the engine harness that runs down, through the firewall and into the kick panel area inside the car. In there are three or four plugs that you can disconnect and pull this part of the harness back through the firewall and lay it on top of the motor. There are also two plugs on the passenger side shock tower that need to be disconnected to free up that harness. There are two ABS connectors, one on each side of the engine bay- the top of the plug is the chassis wiring, the bottom of the plug stays with the subframe and will hang if you don't disconnect.
Another possible stumbling block is the front brake lines. Once you locate them and are ready to remove the flare nuts that go to the ABS module, you'll realize that these are a humongous pain in the ***. I had to use vice-grips on mine, and in the process chewed up the nut pretty bad. I tried flare nut wrenches- didn't work, even tried putting a C-clamp on the end of the flare nut wrench to keep it from deflecting- that didn't work either.
There are six 18 mm bolts that hold the front subframe to the chassis. Make sure your furniture dolly(s) are under the subframe before taking these off, as the subframe will want to drop due to the suspension load on them.
Total things you have to remove to get the subframe free of the body-
(4) front bolts that hold the sway bar to the body
(2) brake lines
(2) trans cooler lines, if auto
(4) bolts holding the trans crossmember to the body
(6) bolts holding the subframe to the body
(2) bolts on the steering shaft, and remove it
(1) bolt and (1) plastic clip holding the PS reservoir on. Reservoir goes w/subframe
(2), one on each side ABS connectors
(2) bolts and (2) nuts per side which hold the suspension to the shock tower
(4) bolts holding the driveshaft to the rear end then remove
(4) total fasteners holding the torque arm to the rear end/tailshaft of trans
(3) bolts holding the A/C pump to the bracket (1) bolt holding the lines on the back
(2) bolts holding the transmission shifter linkage on (automatic)
(2) bolts holding the throttle cable bracket assembly to the intake manifold
(2) fuel lines- you'll need a disconnect tool- can get it at Sears
*also, disconnect the exhaust behind the catalytic converter (if you have one )
)
Hope this helps someone....... If you have any questions you had better ask while this is still fresh in my mind!!
This would be sooooooooooo much easier with a lift........ After doing this a few times recently I can give a few pointers.
One thing that I think would commonly confuse people is the wiring harness. It's easiest to disconnect the harness in a few places, and leave it all connected on the motor. Go ahead and remove the PCM, and when it's out of the way you'll see a part of the engine harness that runs down, through the firewall and into the kick panel area inside the car. In there are three or four plugs that you can disconnect and pull this part of the harness back through the firewall and lay it on top of the motor. There are also two plugs on the passenger side shock tower that need to be disconnected to free up that harness. There are two ABS connectors, one on each side of the engine bay- the top of the plug is the chassis wiring, the bottom of the plug stays with the subframe and will hang if you don't disconnect.
Another possible stumbling block is the front brake lines. Once you locate them and are ready to remove the flare nuts that go to the ABS module, you'll realize that these are a humongous pain in the ***. I had to use vice-grips on mine, and in the process chewed up the nut pretty bad. I tried flare nut wrenches- didn't work, even tried putting a C-clamp on the end of the flare nut wrench to keep it from deflecting- that didn't work either.
There are six 18 mm bolts that hold the front subframe to the chassis. Make sure your furniture dolly(s) are under the subframe before taking these off, as the subframe will want to drop due to the suspension load on them.
Total things you have to remove to get the subframe free of the body-
(4) front bolts that hold the sway bar to the body
(2) brake lines
(2) trans cooler lines, if auto
(4) bolts holding the trans crossmember to the body
(6) bolts holding the subframe to the body
(2) bolts on the steering shaft, and remove it
(1) bolt and (1) plastic clip holding the PS reservoir on. Reservoir goes w/subframe
(2), one on each side ABS connectors
(2) bolts and (2) nuts per side which hold the suspension to the shock tower
(4) bolts holding the driveshaft to the rear end then remove
(4) total fasteners holding the torque arm to the rear end/tailshaft of trans
(3) bolts holding the A/C pump to the bracket (1) bolt holding the lines on the back
(2) bolts holding the transmission shifter linkage on (automatic)
(2) bolts holding the throttle cable bracket assembly to the intake manifold
(2) fuel lines- you'll need a disconnect tool- can get it at Sears
*also, disconnect the exhaust behind the catalytic converter (if you have one
)Hope this helps someone....... If you have any questions you had better ask while this is still fresh in my mind!!
Last edited by FastZinTennessee; Dec 28, 2005 at 06:58 AM.
Registered User
Joined: Feb 2004
Posts: 1,010
From: North Iowa
Re: Some "engine out the bottom" removal pictures
How long did this take you to do? i am curious, because i will have a new engine rebuilt when i go home and i want to minimize my downtime.... this looks a bit easier than pullin the motor out thru the top if only for the fact that you can have the entire engine built and on the k-member and have very little underhood installation.
Thread Starter
Registered User
Joined: Mar 2001
Posts: 2,521
From: Costa Mesa, CA
Re: Some "engine out the bottom" removal pictures
I took my time with this. I'll spend a whole day just disconnecting things, prepping the car, getting the garage cleared out and make room for the subframe assembly.
After all was prepped, it took me and a helper about 2 hours from start to finish to get the dollies in place, remove the subframe/crossmember bolts, hoist up the body, support the body on jackstands/remove hoist, roll subframe out, get car back on ground, get the motor in the garage and clean up.
If it's your first time doing this and you have some decent help you might be on the safe side and budget a weekend to get it out just in case. If it were me I'd do the wiring harness stuff first, and unhook everything but the brakes and steering column under the hood (go ahead and do the shock tower fasteners at this point too), then jack up the back of the car and remove the driveshaft and torque arm. At this point all you have to do is roll the car to wherever you're going to hoist it up, unhook the steering column/brakes/subframe/crossmember and hoist the body up.

Registered User
Joined: Apr 2001
Posts: 2,195
From: Springfield, IL
Re: Some "engine out the bottom" removal pictures
nothing unusual having the hoist hold the body up in the air? that would be the only thing scary too me
clean motor.
almost looks like you should have waited too install all that shiny stuff on it
what did you do it for?
oh and thanks for the tips
clean motor.
almost looks like you should have waited too install all that shiny stuff on it
what did you do it for?
oh and thanks for the tips
Thread Starter
Registered User
Joined: Mar 2001
Posts: 2,521
From: Costa Mesa, CA
Re: Some "engine out the bottom" removal pictures
Having to hoist the body up can be scary at first. However, it was less scary than having my motor and transmission tilted at a 45 degree angle trying to work it out of the engine bay. Once you do it the initial time it's not so bad afterwords. Kinda funny when the neighbors look at you like "wtf is that guy doing??"
I'm removing it because it has to be gone through again unfortunately. It's so clean because it has less than 10 minutes of run time on the new build, and the passenger side bank is spitting coolant out of the header and whitesmoking. I'm going to try and get the head over to the machine shop today to have it checked out- the block was checked before machining, and the headgasket didn't show any leaks, although I'm taking the gasket there as well.
I'm removing it because it has to be gone through again unfortunately. It's so clean because it has less than 10 minutes of run time on the new build, and the passenger side bank is spitting coolant out of the header and whitesmoking. I'm going to try and get the head over to the machine shop today to have it checked out- the block was checked before machining, and the headgasket didn't show any leaks, although I'm taking the gasket there as well.
Registered User
Joined: Aug 2005
Posts: 4,405
From: Kantuckee Yo'
Re: Some "engine out the bottom" removal pictures
Would it be easier to remove the suspension coilovers first, I can see these being very hard to reallign for reinstall.
I can also see sandbags in the trunk to make the front end lighter.
What is the crane hooked to on the car?
I can also see sandbags in the trunk to make the front end lighter.
What is the crane hooked to on the car?
Last edited by wrd1972; Dec 28, 2005 at 01:53 PM.

Registered User
Joined: Mar 2001
Posts: 2,667
From: SLC, UT
Re: Some "engine out the bottom" removal pictures
very cool. I'm actually going to be doing the final removal tomorrow night. I've got about 3 hours into disconnecting and preping everything for removal.

Registered User
Joined: Apr 2004
Posts: 341
From: Pittsburgh, PA
Re: Some "engine out the bottom" removal pictures
I did mine in a similar manner. I have step by step notes written with all wires and stuff tagged with the corresponding labels on the pictures in Microsoft Word. (How ****!  ) No place to host it though. There are ~100 pictures.
) No place to host it though. There are ~100 pictures.

Registered User
Joined: Apr 1999
Posts: 753
From: Chandler AZ
Re: Some "engine out the bottom" removal pictures
Originally Posted by Jeff95TA
I did mine in a similar manner. I have step by step notes written with all wires and stuff tagged with the corresponding labels on the pictures in Microsoft Word. (How ****! ) No place to host it though. There are ~100 pictures.
) No place to host it though. There are ~100 pictures.Would you mind emailing me that? My email is calvert1@***.net
Thanks

Registered User
Joined: Aug 2001
Posts: 874
From: Carlisle, PA
Re: Some "engine out the bottom" removal pictures
Originally Posted by Jeff95TA
I did mine in a similar manner. I have step by step notes written with all wires and stuff tagged with the corresponding labels on the pictures in Microsoft Word. (How ****! ) No place to host it though. There are ~100 pictures.
) No place to host it though. There are ~100 pictures.
That is almost shoebox worthy right there.
Actually we should name an award after him and Brent for all the work they have done on CZ28, but that another story and thread.
Last edited by GetaZforgetGT; Dec 28, 2005 at 01:59 PM.
Registered User
Joined: Nov 2003
Posts: 1,756
From: West Linn, OR
Re: Some "engine out the bottom" removal pictures
Originally Posted by Jeff95TA
I did mine in a similar manner. I have step by step notes written with all wires and stuff tagged with the corresponding labels on the pictures in Microsoft Word. (How ****! ) No place to host it though. There are ~100 pictures.
) No place to host it though. There are ~100 pictures.
Registered User
Joined: Oct 2002
Posts: 378
Re: Some "engine out the bottom" removal pictures
Hey I would like the same emailed to BCOOPER1@elp.rr.com. You went through alot to label which I think is the easiest way to make sure you do not come up with those so called EXTRA PARTS.