
Looking for some quieter rockers???


Thread Starter
Registered User
Joined: Nov 2000
Posts: 1,937
From: Ft. Worth, TX
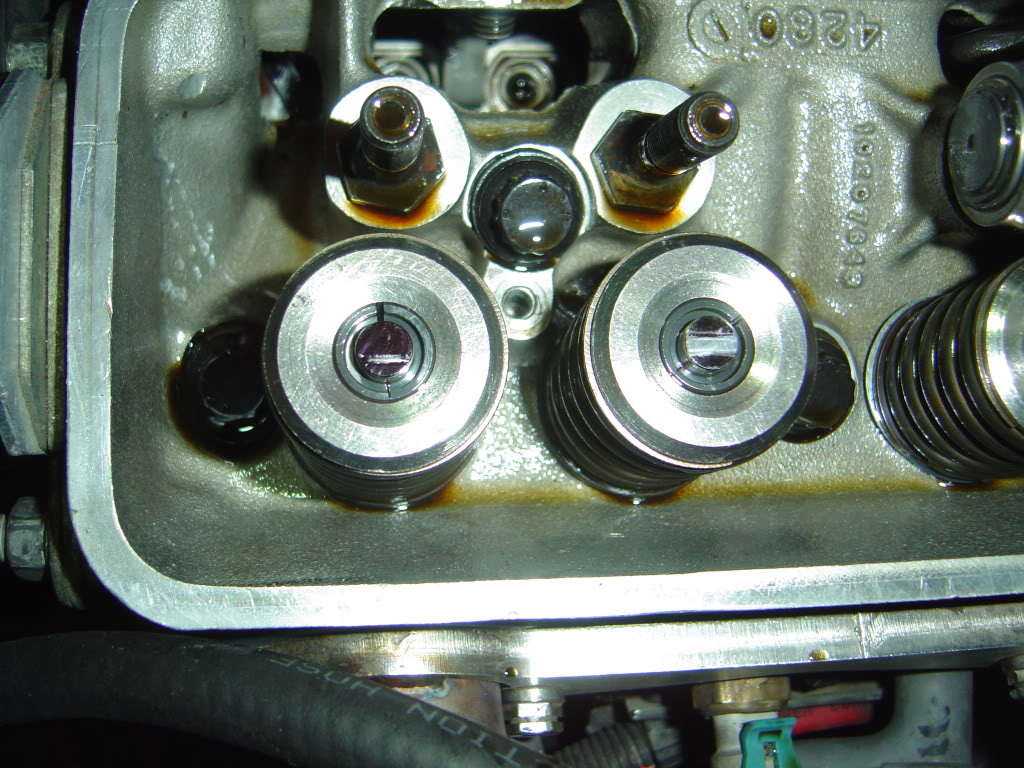
Ok, here's the results of lengthening the PR to 7.50" vs 7.30"
In the pic, the 7.50 is the one on the left, the exh valve. The 7.30 is on the right, the intake valve. Now, the 7.30" is the mark from about 200 miles of driving, that was on there from before.....I thought the valve was suppose to rotate some as it opens and closes??? Thats why its so pronounced.
It appears that lengthening the PR more starts to push it back out to the outer most edge.
Registered User
Joined: Aug 2005
Posts: 4,405
From: Kantuckee Yo'
I have started and contributed to numerous post over pushrod length. Ideally, you want centered pattern and minimal sweep. This is impossible with MOST LT1's that I have frigged with due to the overall geometry.
I normally try to find a happy medium between the pattern and sweep.
Your 7.500" (left) pattern actually looks pretty good even though its slightly off center. The right pattern has excessive sweep and is causing more parasitic loss at the roller tip. I would try 7.450" length and recheck the pattern to see if it goes more center without going wider on the sweep. One of those two lengths are going to be what you want.
By the way. The best stuff I have ever seen for checking patterns is the yellow grease used to set up ring and pinions. That stuff works great for doing this.
Are you checking PR lengths with a light test spring or a solid lifter? If you are NOT using a solid lifter, the data will be skewed.
Thread Starter
Registered User
Joined: Nov 2000
Posts: 1,937
From: Ft. Worth, TX
In the past I used a solid lifter, but since I don't want to take the intake off, this time I've been just setting it up and starting the motor for a second. The lift may just not be quite as much, but at running speed the lifter should be pumped up very fast since they feel solid already, you can't turn the nut with your fingers to depress it.
Thread Starter
Registered User
Joined: Nov 2000
Posts: 1,937
From: Ft. Worth, TX
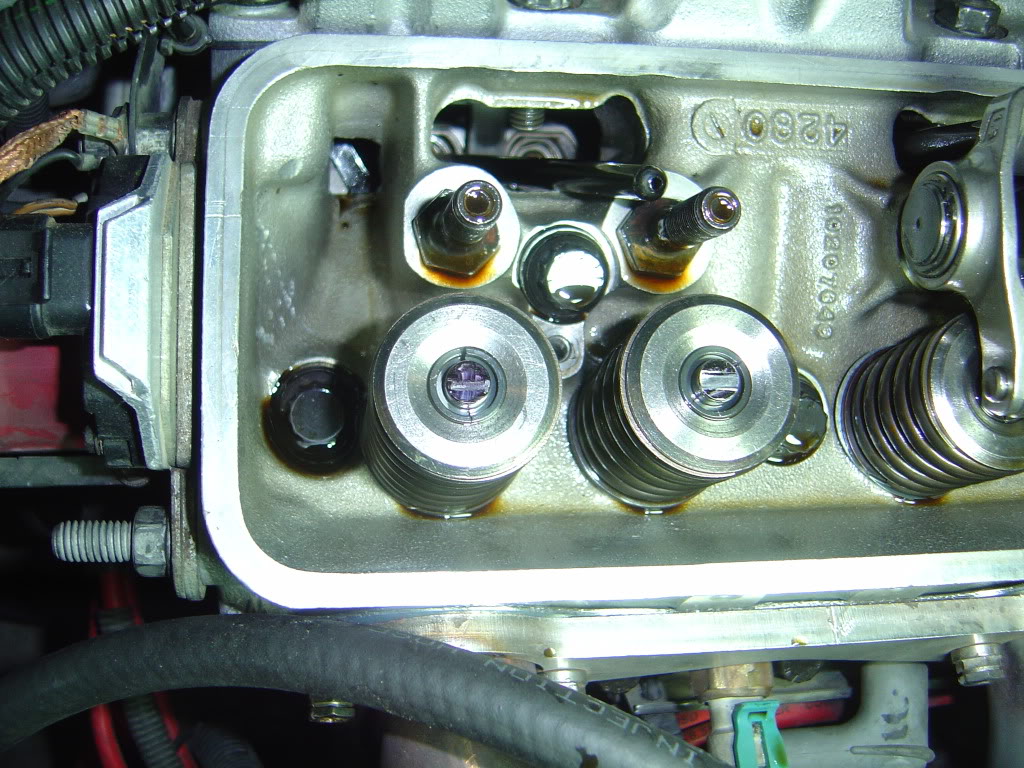
With a 7.40" PR the wear pattern as still off center to the outboard side.
Here's what it looks like with a 7.30" (the size I'm using) after a few seconds of running on the left as opposed to a few hundred miles on the right.
Here's what it looks like with a 7.30" (the size I'm using) after a few seconds of running on the left as opposed to a few hundred miles on the right.
Registered User
Joined: Apr 2007
Posts: 549
From: Lancaster, Texas
Studs don't just break. Breaking a rocker stud tells me you have a serious binding problem. Something, somewhere is binding, side-loading the stud(s) causing it to break.
I couldn't really tell from the photos on page #8 but are you sure you installed the rockers correctly, with the flat side of the trunnion UP?
Jake
West Point ROCKS!
I couldn't really tell from the photos on page #8 but are you sure you installed the rockers correctly, with the flat side of the trunnion UP?
Jake
West Point ROCKS!
Registered User
Joined: Aug 2005
Posts: 4,405
From: Kantuckee Yo'
I find it odd that you need pushrods in the length of 7.400 - 7.500 inches, thats NOT the norm. OEM is 7.200" and I am running 7.150" on mine for optimum geometry.
Do you have oversize (longer) valves?
At the very least, get a very light weight test spring from a hardware store to check your patterns. Use gear marking compound or a dry erase marker to paint the tip and rig up a remote start to crank the motor over without it actually starting up.
There is a purple wire in a harness near the PCM that runs down to the starter. Jump it with a remote switch to 12+ and you have a remote starter.
Last edited by wrd1972; Jun 11, 2009 at 11:32 AM.
Thread Starter
Registered User
Joined: Nov 2000
Posts: 1,937
From: Ft. Worth, TX
Studs don't just break. Breaking a rocker stud tells me you have a serious binding problem. Something, somewhere is binding, side-loading the stud(s) causing it to break.
I couldn't really tell from the photos on page #8 but are you sure you installed the rockers correctly, with the flat side of the trunnion UP?
Jake
West Point ROCKS!
I couldn't really tell from the photos on page #8 but are you sure you installed the rockers correctly, with the flat side of the trunnion UP?
Jake
West Point ROCKS!
Thread Starter
Registered User
Joined: Nov 2000
Posts: 1,937
From: Ft. Worth, TX
Well, as you can see from the valve on the right in that pic, that was driven for a few hundred miles, the rocker is well within the center of the valve, the sweep may not be as tight as it could be, but it is centered and would not be the cause of either the broken stud or the noise with that kind of pattern.
Last edited by 2QUIK6; Jun 11, 2009 at 01:18 PM.
Registered User
Joined: Apr 2007
Posts: 549
From: Lancaster, Texas
"The proper length pushrod is the one that creates proper valvetrain geometry"; quote from CompCams in March, 2008 Chevy High Performance mag.
I'm trying to look at this logically. I've been a member of seven different Forums that I frequent, usually daily. I've been a member on some longer than others but I read lots of posts on a lot of different issues. I can't recall reading of anyone breaking a rocker stud before. I'm not saying it hasn't happened, it's just that I haven't come across it. So my conclusion is that it isn't even a remotely common occurrence.
I recall many years ago I broke a rocker stud BOSS on a BB aluminum head, Broke the head, but not the stud; it was fine.
So what we're dealing with has to be, to say the least, unusual. There has to be something dramatically different about your setup that has led to the stud failure. Problem then becomes finding the cause; finding the difference between your setup and the setup of others who are also running aggressive lobe cams, etc. without failures.
My thinking is in order to do that, we need to examine not only EACH part that could contribute to your valvetrain failure, but also how those parts combine and work together.
My suggestion is to first conduct an autopsy. Check for any indicator/witness marks on the damaged parts. Then look at the undamaged studs/rockers, etc., to check for any sign of PENDING failure. Here are a few suggestions of where I'd look:
Any marks on the pushrod(s)? Any chance there's binding against the block, or the cylinder head or the intake manifold bolt(s).
Marks in the lifter valley of the block and the area on the heads where the pushrods travel.
Look at the underside of the rocker arm; any sign that the trunnion opening area has made contact with the stud? Bright light; magnifying glass.
Look at all the other studs; any signs of contact? Any little thin "nick-like" cuts at about the height that the rocker rides?
Are the pushrods still straight? Roll 'em on a sheet of glass/mirror/etc.; watch for any wiggle.
When a stud breaks, it's usually not a single event that causes it UNLESS there's a manufacturer's defect in the stud. In single event cases, it's usually the pushrod that lets go first; weakest link When a stud breaks, most often it's an accumulation of built up stresses, built up over time and gradually weakening the stud. Sort of like bending a coat hangar back and forth before it finally breaks.
I believe your stud broke right where it was experiencing the stress.
I suggest that, since you've had such a major failure, you go back to square one. Re-think all of your previous assumptions, like ". . . would not be the cause of either the broken stud . . .", ". . . non-agressive lobe . . .", etc.
I don't believe changing the aggressiveness of the cam's lobes is the answer; I think it's a geometry issue. Unless the geometry's right, it won't matter what cam you install, you're still going to have problems.
In checking, take your time and be thorough. You've got to be missing something.
Keep us posted on what you find.
Jake
West Point ROCKS!
Thread Starter
Registered User
Joined: Nov 2000
Posts: 1,937
From: Ft. Worth, TX
Well, I've looked at every peice very closely and can't find any signs of something abnormal, no wear markings on the rockers, PR is all ok, plenty of clearence on the PRs to the block/heads.
The way the stud broke does not appear to be from any blinding or twisting.
Think of it this way, if you were to grab a flimsy flag pole say 5 foot above the ground and start twisting it or bending it, it will break somewhere below your grip, somewhere between the ground and the 5 ft place you gripped the pole.
The only way the pole would break above your grip is if something pulled it from the top.
In the studs case, there is nothing above the rocker truion that could twist/break the stud where it did. The only way is if the rocker was pushing up on the rocker poly nut, which it would have the force against it to push the springs down plus some due to the 1.6 ratio of the rocker, more force is needed to push up the short side of the rocker in order to push the longer side/spring down.
If the rocker were twisting / bending the stud, the stud would have broke below the rocker.
I made a post about the stud breaking separately, seems that studs have been known to break and be replaced and never have a problem again. These were the cheaper Comp studs..maybe that was it ..maybe not...
I've went back to the beehives and aluminum Crane Gold rockers with new ARP studs at this point, but the noise is still as loud as ever. I'll probably throw my arms up at this point and take it back to a Buick club members shop that works on LT1s also and see what he thinks. Last time it was there for tranny work he thought maybe it was the steel rockers or the valve guides...both of which have been replaced now at this point....
Registered User
Joined: Jun 2002
Posts: 798
From: San Jose, CA
It could have been taking the most force anywhere but snapped there.
Mine Crane Gold SA 1.6 are noisey as well. I even have a few light lifter ticks start up then go away. It's a big noisey V8, nothing you can do about it.
Hal
Mine Crane Gold SA 1.6 are noisey as well. I even have a few light lifter ticks start up then go away. It's a big noisey V8, nothing you can do about it.
Hal
Last edited by Hal Fisher; Jun 13, 2009 at 12:30 AM.
Registered User
Joined: Apr 2007
Posts: 549
From: Lancaster, Texas
Just wondering how you're making out with your issues.
Just an udate on what I've done and how it turned out: Several weeks ago my son and I finished swapping the cylinder heads and camshaft on his 96 LT1.
We went with Dart Pro1 Platinums with CompCams 987 dual valve springs set at 130# on the seat (as installed by Dart)). .026" head gaskets and new ARP head bolts.
We installed a custom ground CompCams HR with their 3190 lobes on both intake and exhaust. .602/.584 valve lift. Those lobes are based on Comp's XE lobe profiles, but receive an additional CRC (Constant Radius of Curvature) process. Standard base circle lobes.
New Scorpion 7/16" NSA 1.7s on the INTAKE and 1.65s on the EXHAUST. I set the Preload at 3/4 turn from ZERO lash using the IC/EO method. 10W40 Mobil 1 oil and 7.2" TrickFlow 5/16", .080" wall one-piece hardened pushrods and CompCams guide plates.
New GM timing chain set. We retained the stock 96 LT1 lifters.
ARP 7/16" studs (1.90" as opposed to the 1.77"s). The entire assembly fit under the stock 96 LT1 valve covers without any modification to the covers. None.
Car was only driven for a couple of weeks as a Daily Driver before he had to return to
West Point for his final year, however he and I, both, have pegged the tach a few times. His valvetrain is NO LOUDER than his stock heads/cam/rockers, etc. were.
I included all that in the hope that some of it may help you if you're still having issues.
Keep us posted.
Jake
West Point ROCKS!
Thread Starter
Registered User
Joined: Nov 2000
Posts: 1,937
From: Ft. Worth, TX
Hey Jake, I haven't done much with it but drive it, still very noisey but no more issues since replacing the studs. Been to hot here to mess with it, maybe when it cools down I'll take it apart and look for any more abnormalties. Probably put about 3k miles on it since June.
The XE lobes should be every bit as steep as the LPEs, and maybe more so with the higher lift you're running.
The XE lobes should be every bit as steep as the LPEs, and maybe more so with the higher lift you're running.
Registered User
Joined: Aug 2005
Posts: 4,405
From: Kantuckee Yo'
Looks like I am going to be getting some scorpion rockers in the future.
Thread Starter
Registered User
Joined: Nov 2000
Posts: 1,937
From: Ft. Worth, TX
Just going back to the PR length, I did a few computations I did not think of before to double check the length I'm currently using of 7.30".
Stock PR length is 7.20"
Stock valve stems are 4.91"
Stock cam is on approx a 1.25" base circle.
My valves are Ferra's and are 4.96"
Cam is approx 0.875" base circle.
0.010 has been milled off heads and I have thin .026" head gasket...not sure what stock thickness is but I think its about .016" thicker at 0.042??
So my PR length would be:
stock len + difference in valve stem + (difference in base circle / 2) - head mill amt - head gasket thickness difference.
Divide the BC by 2 because its really the different from the centerline to base circle that matters for PR length...the radius.
7.20 + (4.96 - 4.91) + ((1.25 - 0.875) / 2) - 0.010 - .016 = 7.4115"
So, I'm going to do some more PR length experimentation in the coming month or so...