
Bad Intake Leak, Any Quick Fix Options? (w/ pic)


Thread Starter
Registered User
Joined: May 2005
Posts: 314
So I recently replaced my front waterpump seal and crank seal. Wasn't fun but finally my leaky LT1 wasnt leaking a drop. Atleast for a few months.
Now I've been noticing 3 perfectly spaced oil drip spots everywhere I park comming from the bellhousing between the tranny and rear of the motor. They look just like Orions belt, (ya know, the stars in the sky). So im guessing the rear intake seal has also crapped out on me
From what im told it's not a gasket but a bead of silicone.
Is that rear grey bead of sealant the culprit in this picture?
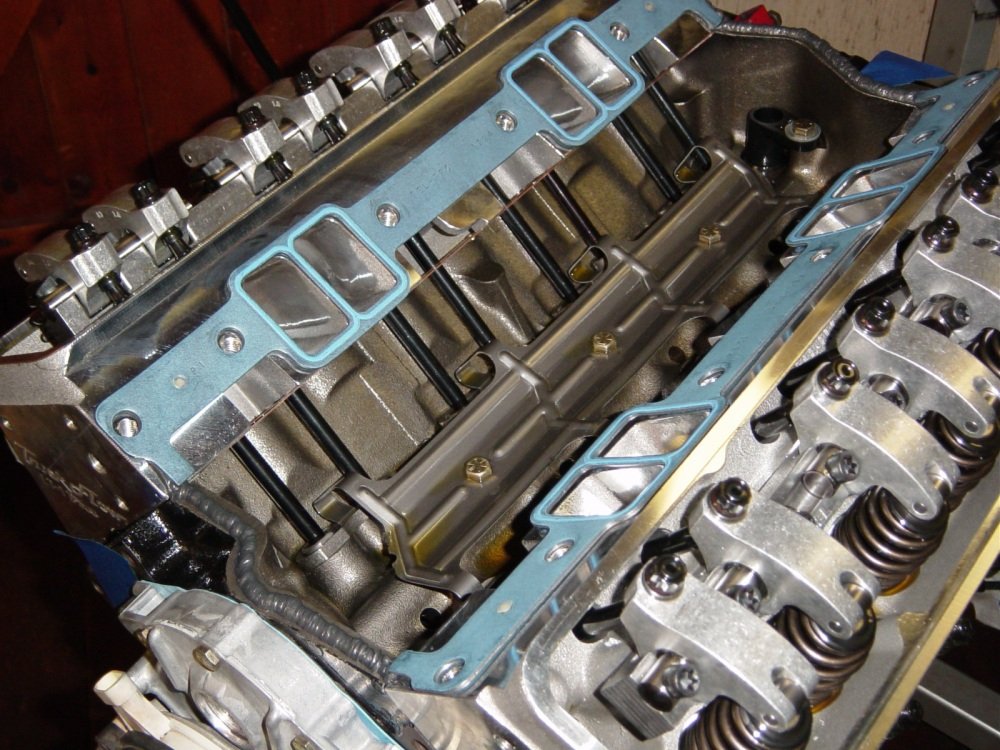
thanks to ellweinengines.com for the pic.
Is there anyway i can "force" a new strip of silicone in the joint to fix the leak temporarily?
JB weld?? gasket maker? anything?
im just looking for a temporary fix, just trying to get by for the winter. I cant take the intake off anytime soon here in Maryland without a garage. IT'S 20 DEGREES OUTSIDE!
Also what would cause this seal failure? I have a new PCV with plenty of suction, so i was hoping it wasnt a internal pressure issue..I also read that excessive downshifting would cause pressure to build up but i don't downshift either, I try to treat this baby right with 118,000 miles on the clock.
thanks in advance.
Now I've been noticing 3 perfectly spaced oil drip spots everywhere I park comming from the bellhousing between the tranny and rear of the motor. They look just like Orions belt, (ya know, the stars in the sky). So im guessing the rear intake seal has also crapped out on me
From what im told it's not a gasket but a bead of silicone.
Is that rear grey bead of sealant the culprit in this picture?
thanks to ellweinengines.com for the pic.
Is there anyway i can "force" a new strip of silicone in the joint to fix the leak temporarily?
JB weld?? gasket maker? anything?
im just looking for a temporary fix, just trying to get by for the winter. I cant take the intake off anytime soon here in Maryland without a garage. IT'S 20 DEGREES OUTSIDE!
Also what would cause this seal failure? I have a new PCV with plenty of suction, so i was hoping it wasnt a internal pressure issue..I also read that excessive downshifting would cause pressure to build up but i don't downshift either, I try to treat this baby right with 118,000 miles on the clock.
thanks in advance.
Last edited by Sick97SS; Dec 31, 2009 at 11:14 AM.
Administrator
Joined: Nov 1998
Posts: 71,112
From: Hell was full so they sent me to NJ
Yes, its the RTV bead that leaks.... the silver "snakes" on top of the block, in the photo.
How bad is the leak? How big are the 3 drips? How critical is a quick fix? Have you reached back to back of the block with a clean paper towel, and wiped where the oil would leak out of the intake seal, to positively show that is where the oil is leaking from? Have you considered the possibility of a rear main seal leak, since that's the oil that ends up in the bell housing?
How bad is the leak? How big are the 3 drips? How critical is a quick fix? Have you reached back to back of the block with a clean paper towel, and wiped where the oil would leak out of the intake seal, to positively show that is where the oil is leaking from? Have you considered the possibility of a rear main seal leak, since that's the oil that ends up in the bell housing?
Thread Starter
Registered User
Joined: May 2005
Posts: 314
After it sat a few days in the snowstorm before Xmas, the 3 drips turned into a small puddle....
Im pretty sure its the intake seal leaking because the oil seems to be oozing around the bellhousing. My oil filter, and starter are both soaked in oiley grime. And they never used to be.
Im also thinking it's not the rear seal because if it is im screwed ...
...
Im pretty sure its the intake seal leaking because the oil seems to be oozing around the bellhousing. My oil filter, and starter are both soaked in oiley grime. And they never used to be.
Im also thinking it's not the rear seal because if it is im screwed
...
Last edited by Sick97SS; Dec 31, 2009 at 11:33 AM.


Registered User
Joined: Sep 2004
Posts: 488
From: Schaumburg, IL
Good luck
Thread Starter
Registered User
Joined: May 2005
Posts: 314
So here's the best pictures i can get of the leak source. And its far more messy than i thought. The oil pressure sending unit can be seen and it looks farily clean compared to the rest of the image.
Do these intake leaks spray out and oily mist? i though it would just be drips. but there is oil everywhere!

this one looks like it's spraying on the EGR line

this shows a 2nd leak under the Oil pressure sending unit

how does the entire lengh of the seal fail at once? atleast from the pics i see 2 bad areas of seal that started at the exact same time.
Any good writeups laying around for intake removal? seems pretty strait forward. anything i need to be careful for? IE fuel line disconnects?
thanks for the help guys.
Do these intake leaks spray out and oily mist? i though it would just be drips. but there is oil everywhere!
this one looks like it's spraying on the EGR line
this shows a 2nd leak under the Oil pressure sending unit
how does the entire lengh of the seal fail at once? atleast from the pics i see 2 bad areas of seal that started at the exact same time.
Any good writeups laying around for intake removal? seems pretty strait forward. anything i need to be careful for? IE fuel line disconnects?
thanks for the help guys.
Last edited by Sick97SS; Jan 1, 2010 at 04:17 PM.
Registered User
Joined: Apr 2007
Posts: 549
From: Lancaster, Texas
Many years ago, back when I was young and limber, I experienced a rash of oil leaks in the same area. And, yes, I first tried re-sealing the area without pulling the intake, but it didn't work.
After one of my engines was waved off the starting line because it was leaking oil, I became obessed with finding a "cure". I tried different procedures that worked to a limited degree before I finally hit on what has worked since then.
I posted my procedure as a STICKY on LS1LT1.COM
In your case, I'd FIRST identify the actual source of the leak; not assume it's the China Wall right off the bat. Too often guys skip over one probable source to move to something more complicated/labor intensive/expensive, etc. Resist the temptation to ASSUME.
What I recommend is to first eliminate other areas, like the oil sensor/switch. The reason is accessing those is a lot easier and much less labor intensive than pulling the intake. If you find they're NOT the source, you can always move on to other areas.
First clean the area of all oil residue; spray carb cleaner/brake cleaner will work well. Then run the engine and try to identify if the leak is occuring at the sender/switch. If so, re-teflon taping the threads may be all that's needed.
If not, and the offending area may well be the China Wall, intake removal will be called for. Removing the intake is the easy part. I haven't come across a step-by-step on the removal and even the FSM doesn't go into a lot of detail on how to do it. You'll just have to look to see what needs to be removed unless someone has typed up the procedure and will share it here.
Re-installing it so it doesn't leak AGAIN is the real trick.
Now, like most things, there are differing ways to re-install the intake so it doesn't leak, so my recommended way isn't the only way; it's just what I came up with that works for me.
Jake
West Point ROCKS! Nation's TOP COLLEGE per Forbes Magazine!! Graduation Day Parade 20 May 2010!!!
Last edited by JAKEJR; Jan 1, 2010 at 08:08 PM.
Registered User
Joined: Sep 2004
Posts: 488
From: Schaumburg, IL
Do these intake leaks spray out and oily mist? i though it would just be drips. but there is oil everywhere!
how does the entire lengh of the seal fail at once? atleast from the pics i see 2 bad areas of seal that started at the exact same time.
Any good writeups laying around for intake removal? seems pretty strait forward. anything i need to be careful for? IE fuel line disconnects?
thanks for the help guys.
As for things to watch out for.....make sure you release the fuel pressure before pulling the rail is about it. I was lazy and failed to do it once. If the engine is cold you won't have any worries aside from getting gas in your eyes, but if it's hot you run the risk of starting something on fire. Aside form that, it's just unblot everything and go. I recommend "The Right Stuff" when you put it back together. It works really well and is less susceptible to degradation from the oil that normal RTV or gasket maker is. Since it's your first time, it shouldn't take you more than an afternoon if you really take your time. Biggest thing yo watch out for is to make sure you don't drop a bunch of gasket material into the valley while cleaning heads and valley rail. Stuff some cloth rags into the intake ports before you start taking the stuff off and lay another across the bottom to cover the valley, lifters, and the "spider". From there you can clean the surfaces and reinstall. Not really hard, more time consuming.
Good Luck
Thread Starter
Registered User
Joined: May 2005
Posts: 314
Awesome advice guys. much appreciated. Thanks to you guys i'm going to undertake this repair the right way instead of JB Welding the entire back of the LT1
JAKEJR, found your link, great info!...any chance you have a picture of those "dimples" for the China Wall. I'm definately going for them to avoid this happening again. Also i thought the intake bolts already had washers, are you saying that you added your own? (to evenly distribute the clamping force)
Here's my parts list for this little project.
-Lt1 Fel-Pro Performance Intake Manifold Gasket Sets
-Permatex Sensor-Safe High-Temp RTV Silicone Gasket
or
-Permatex the Right Stuff Gasket Maker
-Lots of Brake Clean, Rags, and Brewskis
I'm going to go dig for my Chiltons manual and hope the intake bolt torque sequence is in there, i cant find it online.
And Crash4cyl, I didn't think i needed to pull the fuel rail just diconnect the "quick-release" fuel lines. any tips to release the pressure in the lines?
Much thanks!!
Registered User
Joined: Apr 2007
Posts: 549
From: Lancaster, Texas
[QUOTE=Sick97SS;6220737]Awesome advice guys. much appreciated. Thanks to you guys i'm going to undertake this repair the right way instead of JB Welding the entire back of the LT1
JAKEJR, found your link, great info!...any chance you have a picture of those "dimples" for the China Wall. I'm definately going for them to avoid this happening again. Also i thought the intake bolts already had washers, are you saying that you added your own? (to evenly distribute the clamping force)
I'm going to go dig for my Chiltons manual and hope the intake bolt torque sequence is in there, i cant find it online.
QUOTE]

I went with gold colored bolts for the intake manifold to add a little "flash" and I added matching washers. ACE hardware.
The fuel rail can be swiveled out of the way without disconnecting the fuel lines.
The torque sequence differs over the years so I chose to follow GM's recommendation for my 96.
Jake
West Point ROCKS! Nation's TOP COLLEGE per Forbes Magazine!! Graduation Day Parade 20 May 2010!!!
JAKEJR, found your link, great info!...any chance you have a picture of those "dimples" for the China Wall. I'm definately going for them to avoid this happening again. Also i thought the intake bolts already had washers, are you saying that you added your own? (to evenly distribute the clamping force)
I'm going to go dig for my Chiltons manual and hope the intake bolt torque sequence is in there, i cant find it online.
QUOTE]
I went with gold colored bolts for the intake manifold to add a little "flash" and I added matching washers. ACE hardware.
The fuel rail can be swiveled out of the way without disconnecting the fuel lines.
The torque sequence differs over the years so I chose to follow GM's recommendation for my 96.
Jake
West Point ROCKS! Nation's TOP COLLEGE per Forbes Magazine!! Graduation Day Parade 20 May 2010!!!
Administrator
Joined: Nov 1998
Posts: 71,112
From: Hell was full so they sent me to NJ
Everyone really needs to look at Shoebox's website first. There's not much that isn't there. Look at his cam install page - the part where he gets to installing the intake manifold. Torque values and sequence are there.
http://shbox.com/ci/cam_install.html
http://shbox.com/ci/cam_install.html
Thread Starter
Registered User
Joined: May 2005
Posts: 314
Thanks Injuneer, Google needs more LT1 hotlinks to Shbox's site!!
It looks like he used the "dimple" technique as well in this pic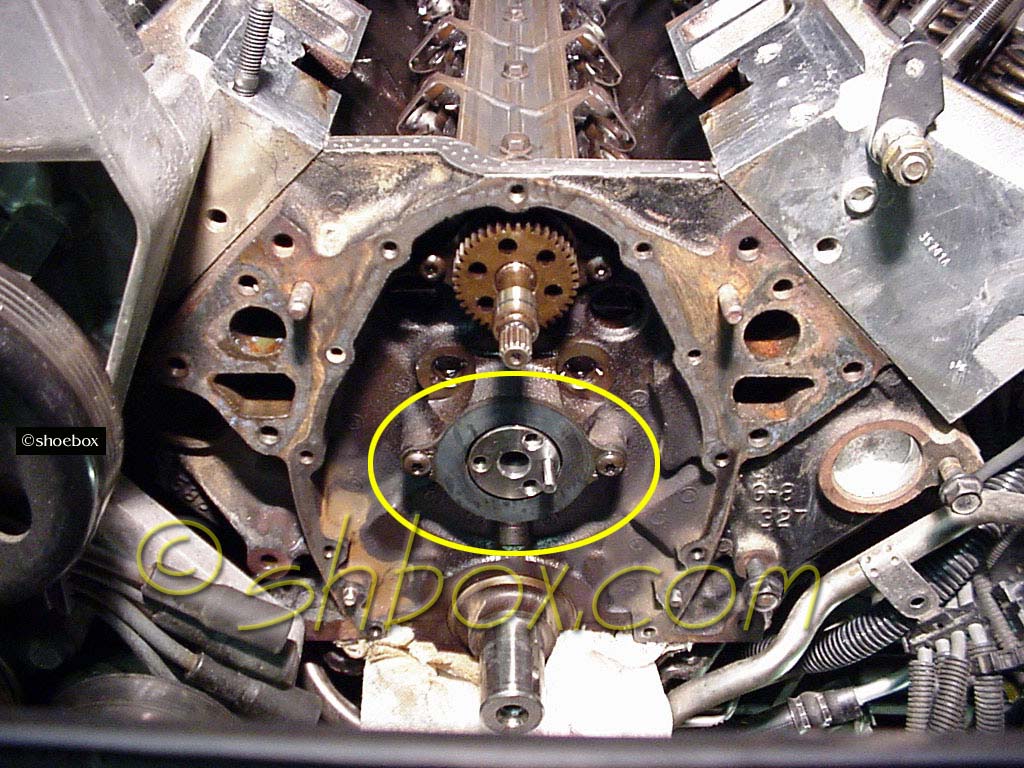
Can't wait for a warm (warmish) day to dive into this project. Till then it'll be kitty litter on the driveway and a spare quart of oil in the trunk.
So now i'm thinking this should be the last seal i'll have to replace on this car.
So far i've replaced the leaky rear pinion seal, leaky front crank seal, leaky waterpump drive seal, leaky opti seal, and leaky waterpump gaskets.
Hopefully the t56 holds together and lets not mention the rear crank seal
Last edited by Sick97SS; Jan 2, 2010 at 06:57 PM.
Registered User
Joined: Apr 2007
Posts: 549
From: Lancaster, Texas
Everyone really needs to look at Shoebox's website first. There's not much that isn't there. Look at his cam install page - the part where he gets to installing the intake manifold. Torque values and sequence are there.
http://shbox.com/ci/cam_install.html
http://shbox.com/ci/cam_install.html
Jake
West Point ROCKS! Nation's TOP COLLEGE per Forbes Magazine!! Graduation Day Parade 20 May 2010!!!
Registered User
Joined: Sep 2004
Posts: 488
From: Schaumburg, IL
Easy solution

Thread
Thread Starter
Forum
Replies
Last Post
F'n1996Z28SS
Cars For Sale
8
Aug 23, 2023 11:19 PM