
'95 Z28 restoration

Registered User
Joined: Sep 2005
Posts: 391
From: Fredericksburg, VA
What do you mean 'wrong side of the A/C components'?
I have 116K on my car. It's stock except for what's listed in the sig.

Thread Starter
Registered User
Joined: May 2002
Posts: 5,557
From: Dallas, Texas
The way it was in old pics is it would go from the alternator to the passenger side of the aluminum A/C thing (whatever the heck that A/C part technically is) to some location near or under the battery. I can't tell in pics where it actually splices in or whatever.
Now it is underneath some other stuff, running on the other side of that same aluminum A/C component really close to the serpentine belt. I played with it to see if it would migrate towards the serpentine belt, but I believe he has it zip tied somewhere I can't see or otherwise attached. I'm sure it is fine as is, but for a perfectionist like me, this type of thing bothers me.
I like to make sure things are right so problems don't occur from someone overlooking something. The opti vent hose being reconnected was one of those overlooked issues. There may be more, but I haven't looked further.
Registered User
Joined: Sep 2005
Posts: 391
From: Fredericksburg, VA
http://shbox.com/1/battery_cable_routing1.jpg
http://shbox.com/1/battery_cable_routing2.jpg
you'll have to disconnect the cable from the alternator if you want to reroute it. Remember to remove the ground from the battery, FIRST.
Administrator
Joined: Nov 1998
Posts: 71,122
From: Hell was full so they sent me to NJ
....... I also didn't like that he said I didn't need to open the bleed screws and let air out. Maybe he's just not familiar enough with LT1s to know how vital that is, or maybe the LT1 Corvettes automatically vent the air, or SOMETHING, so I let that issue slide. It sucks that you have to be an expert on your own car these days, but honestly, I don't have a lot of confidence that anyone who has worked on the car since the 90s has probably followed the proper procedure. Leaving both of the cars low on coolant and calling them done though... that's a new one! ") ...
...
...The F-Body version of the cooling system got short-changed.
Thread Starter
Registered User
Joined: May 2002
Posts: 5,557
From: Dallas, Texas
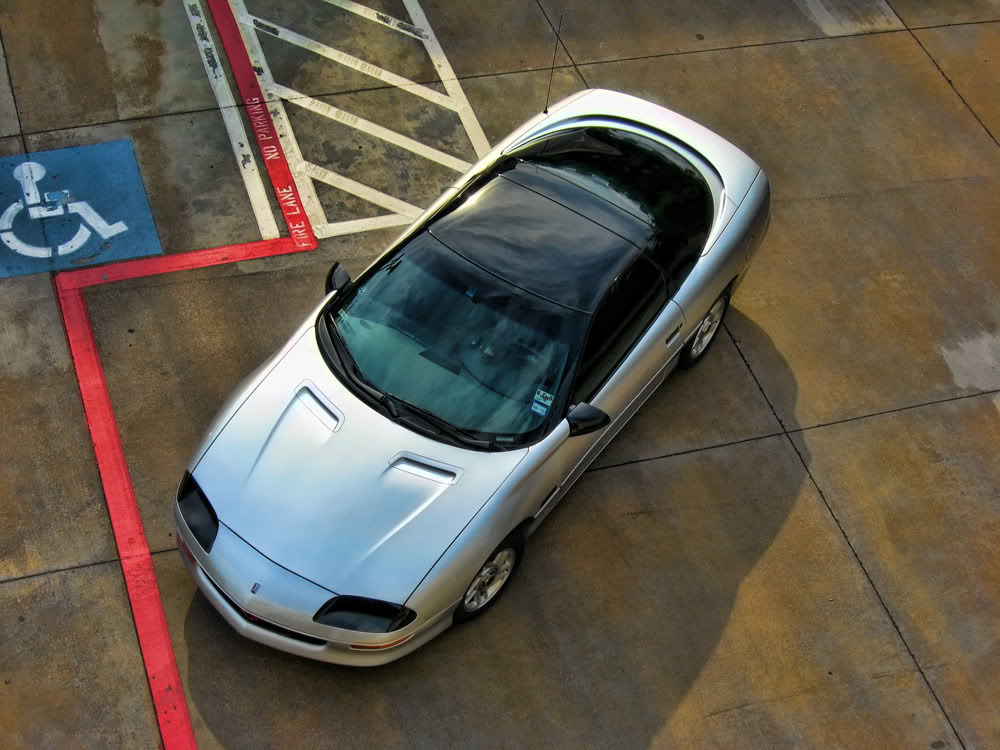
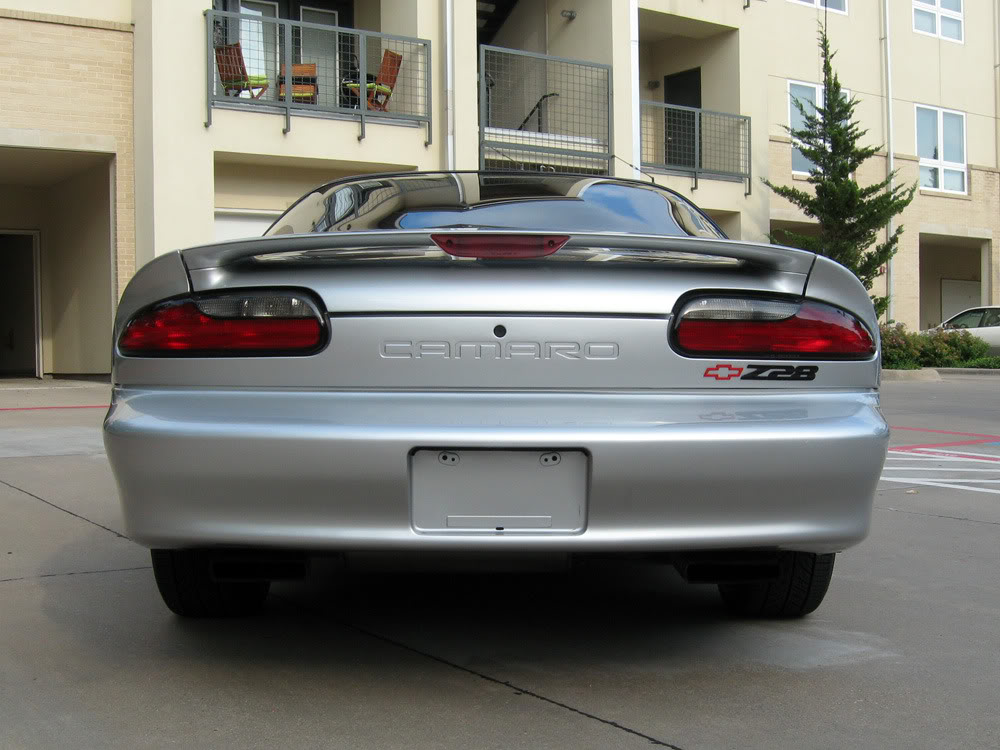
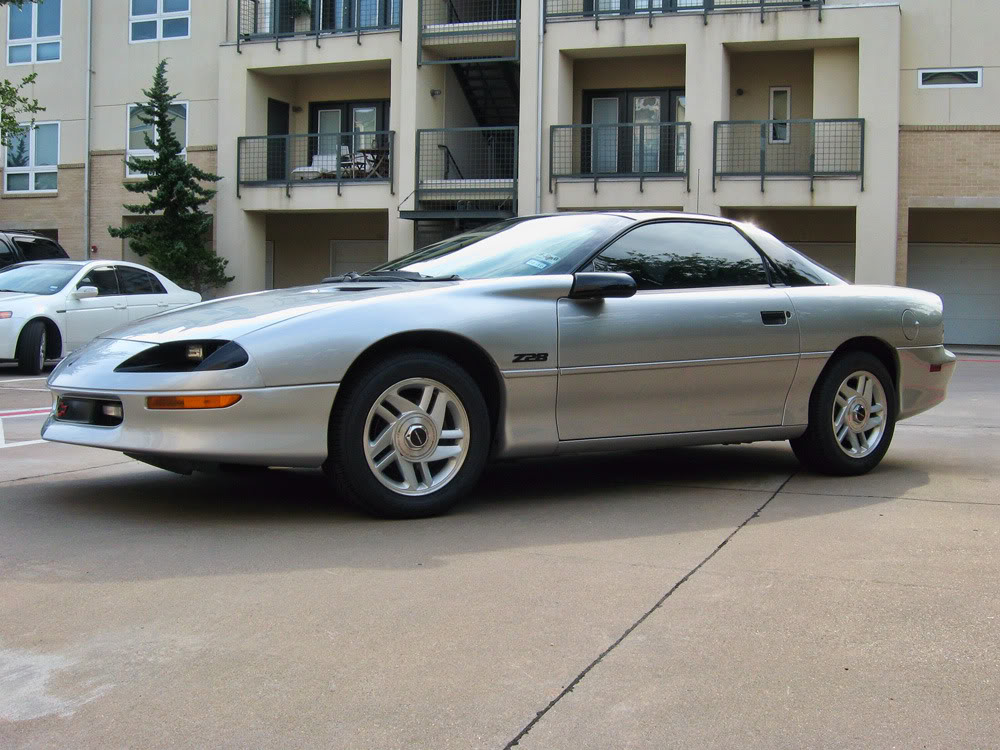
Since the rest of the restoration is just gasket stuff that still has to be done, I went ahead and washed the car and waxed it. I love, love, love Meguiar's wax! Only a 3.75 hour job rather than 6 hours like with that Mother's crap. I can't ever get all the Mother's type off the car and it always dries onto the plastic stuff.
For those that don't know... I bought new wheels and tires. They look great.

Took this pic with the car turned off, so no, the battery isn't dead lol

The guy doing the work on the car was unable to get the stock Camaro A/C control unit brand new, so he got something else that has 2 settings less... kind of unhappy about that. Anybody know what car this came out of?


For those that don't know... I bought new wheels and tires. They look great.
Took this pic with the car turned off, so no, the battery isn't dead lol
The guy doing the work on the car was unable to get the stock Camaro A/C control unit brand new, so he got something else that has 2 settings less... kind of unhappy about that. Anybody know what car this came out of?


Registered User
Joined: Jul 2006
Posts: 430
The way it was in old pics is it would go from the alternator to the passenger side of the aluminum A/C thing (whatever the heck that A/C part technically is) to some location near or under the battery. I can't tell in pics where it actually splices in or whatever.
Now it is underneath some other stuff, running on the other side of that same aluminum A/C component really close to the serpentine belt. I played with it to see if it would migrate towards the serpentine belt, but I believe he has it zip tied somewhere I can't see or otherwise attached. I'm sure it is fine as is, but for a perfectionist like me, this type of thing bothers me.
I like to make sure things are right so problems don't occur from someone overlooking something. The opti vent hose being reconnected was one of those overlooked issues. There may be more, but I haven't looked further.
Now it is underneath some other stuff, running on the other side of that same aluminum A/C component really close to the serpentine belt. I played with it to see if it would migrate towards the serpentine belt, but I believe he has it zip tied somewhere I can't see or otherwise attached. I'm sure it is fine as is, but for a perfectionist like me, this type of thing bothers me.
I like to make sure things are right so problems don't occur from someone overlooking something. The opti vent hose being reconnected was one of those overlooked issues. There may be more, but I haven't looked further.
Last edited by 1995blackttopta; May 26, 2010 at 02:08 PM.
Thread Starter
Registered User
Joined: May 2002
Posts: 5,557
From: Dallas, Texas
The A/C compressor stopped engaging and the car is blowing hot air, so it's back in the shop now.
I don't know if the HVAC panel (and I assume related control unit based on how much the darn part cost ($200+)) being the panel made for a Camaro w/o A/C is causing the problem or not. The car wasn't blowing very cold when we picked it up a month ago, but it got progressively worse over the weeks up until it was blowing completely hot air and the compressor wasn't engaging at all a few days ago.
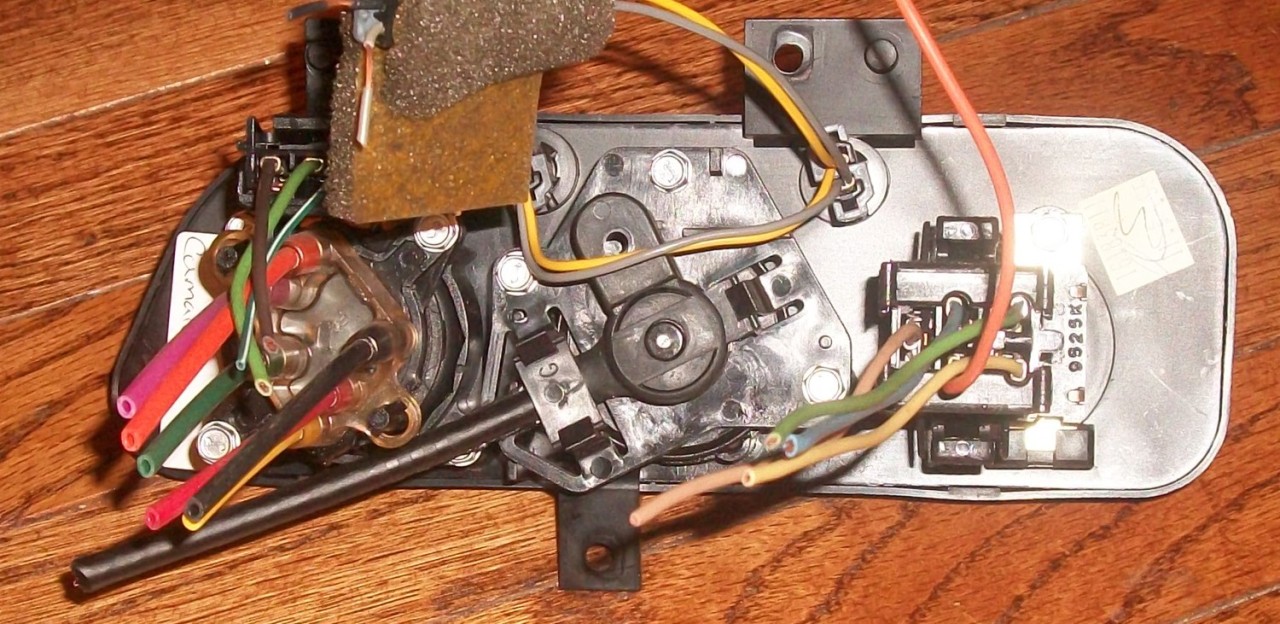
Going to go ahead and get the battery cable routing fixed while the guy has it taken apart. I sent him the diagrams you linked to, so thank you SnakeOiler for finding those (and of course many thanks to shbox for having that site!).
I also sent him pictures of the wiring harness and the schematic for the compressor from shbox's site.
If anybody has any additional info that will help me save $80/hr from this guy having to do trial and error, I would really appreciate any advice or tips I can tell him on how to fix the A/C problem!
I don't know if the HVAC panel (and I assume related control unit based on how much the darn part cost ($200+)) being the panel made for a Camaro w/o A/C is causing the problem or not. The car wasn't blowing very cold when we picked it up a month ago, but it got progressively worse over the weeks up until it was blowing completely hot air and the compressor wasn't engaging at all a few days ago.
Going to go ahead and get the battery cable routing fixed while the guy has it taken apart. I sent him the diagrams you linked to, so thank you SnakeOiler for finding those (and of course many thanks to shbox for having that site!).
I also sent him pictures of the wiring harness and the schematic for the compressor from shbox's site.
If anybody has any additional info that will help me save $80/hr from this guy having to do trial and error, I would really appreciate any advice or tips I can tell him on how to fix the A/C problem!

Registered User
Joined: Oct 2007
Posts: 127
Great stuff...
I love what you're doing to your car. Being in love with a car or being a car enthusiast isn't necessarily having the fastest/quickest - it's about loving a particular car and working on it. I also have a silver 1997 Z28 and it's been a pain in the *** since I've had it (2 1/2 years) but I just can't quit it - it just looks so good. 
I've been back and forth as to whether to do performance upgrades or just have a great performing, basically stock Z28. I'm thinking about getting the EFIconnection opti solution, or the cheaper LTCC, but I really want the engine to have the stock look. I also have a few leaks to still clean up like you - maybe over the winter. Right now, I don't want down time - wanna drive it.
It's rare that you see an unmodded Z, so your car is going to stand out more and more in coming years. I actually see more 2010 Camaro in my area than clean 4th Gens. I get compliments on mine all the time. One problem is that silver is supposedly hard to match so I'm also going to have to wait to fix the spider webs in the rear bumper.
Keep up the good work, and start cleaning up the engine - but no water!!!
Thread Starter
Registered User
Joined: May 2002
Posts: 5,557
From: Dallas, Texas
Thanks for the compliments!
The radiator cap is currently the only noticeable non-OEM/stock part, but we'll probably change that eventually when all the important work gets done.
I'd imagine this car IS pretty rare in that it's still stock after more than 90,000 miles.
There's a few more things on the list to do, especially if we wanted the car to look perfect again, but that stuff's all waaaaay down the road. I'm still on the look out for an OEM silver front bumper that doesn't have any damage or need paint work. Preferably one I can pick up locally. It's mostly wishful thinking, but I'm waiting and looking at craigslist every so often...
If this A/C issue doesn't get corrected pretty darn soon, I'm going to be looking for a used HVAC control switch panel and control unit pretty soon. We're really annoyed that was changed to a brand new OEM unit for a Camaro without A/C (I'm not even sure how it makes the A/C come on to be honest) without our approval by the mechanic, but he promised it would work.
Unfortunately it is not working right now...
Thread Starter
Registered User
Joined: May 2002
Posts: 5,557
From: Dallas, Texas
Re: '95 Z28 restoration
Had some more work done and figured I'd post up some info for those who may need this info from a search someday.
The A/C stopped blowing cold.
Took it in for service at the dealership, and they replaced two parts.
Replaced the Heater and A/C control switch (the switch behind the far right ****) because the one from the non-A/C equipped control panel was determined to not be telling the A/C relay to turn on the A/C compressor. They tried to find a brand new Heater and A/C control panel (part number 16183811 AKA AC Delco part number 15-72069) without luck and wouldn't use a used part off ebay. You may recall the mechanic who did part of the restoration on the car couldn't find the right part either, so he replaced it with a brand new control panel for a non-A/C equipped Camaro without our permission. So the dealership decided to find a new switch for the A/C equipped version and put it on the non-A/C control panel to see if it'd work. The part number of the new part is 16147649, the part number of the old part is 16147769. I'll have to keep you updated as to whether this is a long term fix or not...
The freon was determined to be out because of a leak in the high pressure system. So the A/C refrigerant pressure sensor was replaced (part number 22664328). If you have a copy of the Camaro parts manual, you'll notice this part is labeled as 22624066 but it was superceded by the new number.
The system was evacuated and recharged and from what I hear, it's working. I haven't had a chance or time to drive the car myself and see if it's working.
I'm curious about the switch, as the A/C equipped Camaros have 8 settings on the control panel and switch, but the non-A/C equipped Camaros have 6 settings on the panel and switch. It's my assumption that when my sister is running the A/C it's not actually pointing at anything in particular on the face plate anymore. If that's true, I'm going to look up the difference between the other parts on that incorrect-for-the-car panel and see if anything other than the face plate needs to be changed to be one for an A/C equipped Camaro again.
What a hassle.
Last edited by Brangeta; Apr 5, 2011 at 06:12 PM.
Thread Starter
Registered User
Joined: May 2002
Posts: 5,557
From: Dallas, Texas
Re: '95 Z28 restoration
LAME I looked it up, and the heater control valve behind the temperature select **** is different. I don't know what could possibly be different, but something's different apparently.
A/C version = 16159553 AC DELCO #15-71967
non A/C version = 14056648 (AKA 1550568, 15733271) which is the same part numer as a cruise control 3 port vacuum check valve fitting for a '86-'95 Corvette...
A/C equipped


N!3twBWk~$(KGrHqF,!jUEv1+0!w+5BMMgCnTMU!~~0_3.JPG)
non-AC equipped Camaro, so what could possibly be different between the parts?


According to the part number though, I'm supposed to have something like this hiding back there...

The control panel with icons is obviously different and both are discontinued... sad thing is, my parts manual I use has the # for the A/C version cut off anyway... the non-A/C version is 16183767. If I want that, I'm just going to have to buy a used, complete control panel.
Everything else is the same, but sadly discontinued regardless.
The switch for the fan speed blower (16159876 AKA 16264099 AKA 1571960) is the same on both panels, but just as an FYI... rockauto actually only has ONE of these left in stock according to their website. Anybody who has a broken switch for the fan speed better ****** it up quick.
A/C version = 16159553 AC DELCO #15-71967
non A/C version = 14056648 (AKA 1550568, 15733271) which is the same part numer as a cruise control 3 port vacuum check valve fitting for a '86-'95 Corvette...
A/C equipped
non-AC equipped Camaro, so what could possibly be different between the parts?
According to the part number though, I'm supposed to have something like this hiding back there...
The control panel with icons is obviously different and both are discontinued... sad thing is, my parts manual I use has the # for the A/C version cut off anyway... the non-A/C version is 16183767. If I want that, I'm just going to have to buy a used, complete control panel.
Everything else is the same, but sadly discontinued regardless.
The switch for the fan speed blower (16159876 AKA 16264099 AKA 1571960) is the same on both panels, but just as an FYI... rockauto actually only has ONE of these left in stock according to their website. Anybody who has a broken switch for the fan speed better ****** it up quick.