


painted valve covers, cleaned up coil packs...


Thread Starter
Registered User
Joined: Sep 1998
Posts: 8,319
From: US 1 Mile Marker 52 in the Florida Keys
painted valve covers, cleaned up coil packs...
pulled the coil packs off and the valve covers.
wire brushed the valve covers down, and then sprayed them with some Ceramic Engine Enamel from the local Advanced Auto.
paint worked out really well. even though i thuroughly degreased the covers, there were still a few very small fisheyes. but not enough to worry about.
i then turned my attention to the coil packs.
first thing i did away with is those small retaining pins that cross-clip the wiring harness to each coil. i retained the "pin" itself, but removed the loop that retains them.
then i got rid of those ugly bolts that hold the coil pack to the valve covers. they have those stupid extensions above the hex-head.
in their place i put some 6x15mm button head bolts from the local specialty hardware. they came with a black finish to blend with the black coil bracket.
next thing i did was the bolts that actually hold the coils to the bracket. 1/2 the bolts were regular 10mm hex bolts, while the rest were similar to the ones that hold the bracket to the valve cover.
i kept the regular ones, and purchased 8 new hex head bolts. then i put holes in a piece of cardboard and inserted all the bolts through so that the heads were only showing.
i then sprayed the bolts with black Rustoleum (happened to have it). again this was so they would blend in with the black coils and bracket.
i think this cleaned up the look of the coil packs, and compliments the new painted valve covers.
you could easily just use standard bolts, painted black in place of the button heads....i figured i would be different. if i did it again...i WOULD just use regular bolts. oh well...it was a couple bucks.
pics:


cleaned up coil packs

installed


everything installed
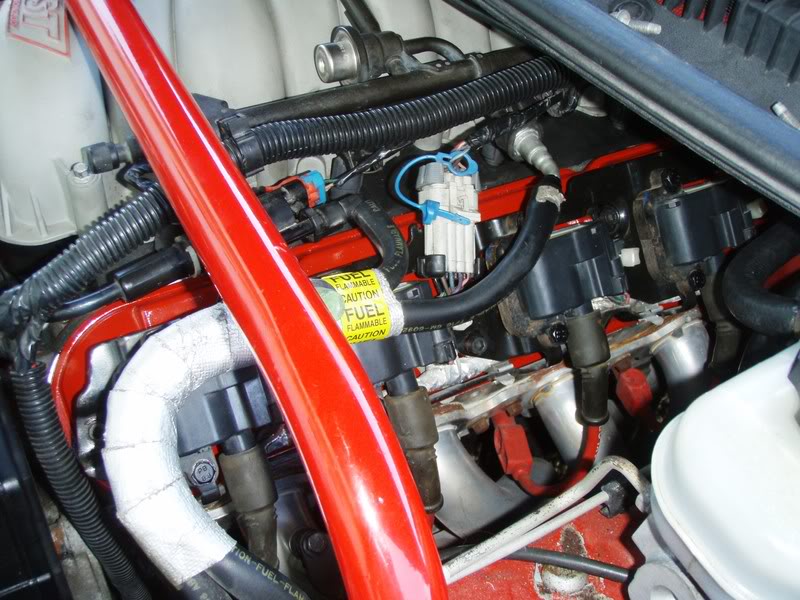

wire brushed the valve covers down, and then sprayed them with some Ceramic Engine Enamel from the local Advanced Auto.
paint worked out really well. even though i thuroughly degreased the covers, there were still a few very small fisheyes. but not enough to worry about.
i then turned my attention to the coil packs.
first thing i did away with is those small retaining pins that cross-clip the wiring harness to each coil. i retained the "pin" itself, but removed the loop that retains them.
then i got rid of those ugly bolts that hold the coil pack to the valve covers. they have those stupid extensions above the hex-head.
in their place i put some 6x15mm button head bolts from the local specialty hardware. they came with a black finish to blend with the black coil bracket.
next thing i did was the bolts that actually hold the coils to the bracket. 1/2 the bolts were regular 10mm hex bolts, while the rest were similar to the ones that hold the bracket to the valve cover.
i kept the regular ones, and purchased 8 new hex head bolts. then i put holes in a piece of cardboard and inserted all the bolts through so that the heads were only showing.
i then sprayed the bolts with black Rustoleum (happened to have it). again this was so they would blend in with the black coils and bracket.
i think this cleaned up the look of the coil packs, and compliments the new painted valve covers.
you could easily just use standard bolts, painted black in place of the button heads....i figured i would be different. if i did it again...i WOULD just use regular bolts. oh well...it was a couple bucks.
pics:
cleaned up coil packs
installed
everything installed


Banned
Joined: Mar 2004
Posts: 3,577
From: Sandy VJJville
It looks good, but you know, I've never liked the LS1 valve covers. They're just too dinky. They're not as nice to look at like a nice set of polished or painted LT1 valve covers, or any other valve cover with some body to them. Just my two cents. I guess the power makes up for it. 


Registered User
Joined: Jun 2007
Posts: 207
From: The Motor City
It looks good, but you know, I've never liked the LS1 valve covers. They're just too dinky. They're not as nice to look at like a nice set of polished or painted LT1 valve covers, or any other valve cover with some body to them. Just my two cents. I guess the power makes up for it.
Thread Starter
Registered User
Joined: Sep 1998
Posts: 8,319
From: US 1 Mile Marker 52 in the Florida Keys
i'll agree with the "dinky" look of the valve covers.
i think painting them really helps though. even just to paint them with natural aluminum like color would be a benefit.
the natural look of the covers is not consistent...the metal has color imperfections in it.
i think the red tied in the color with the rest of the engine bay. but didn't go overboard. i don't want to do the coil packs or bracket red since that WOULD be overboard in my opinion.
as for the wires going everywhere....some of its a neccessary evil. some is not. you can clean the engine bay up quite a bit by creatively wrapping the wires in tape, or that wire tubing stuff.
it helps that i've removed the EGR, AIR and cleaned some of the other stuff up.
i think painting them really helps though. even just to paint them with natural aluminum like color would be a benefit.
the natural look of the covers is not consistent...the metal has color imperfections in it.
i think the red tied in the color with the rest of the engine bay. but didn't go overboard. i don't want to do the coil packs or bracket red since that WOULD be overboard in my opinion.
as for the wires going everywhere....some of its a neccessary evil. some is not. you can clean the engine bay up quite a bit by creatively wrapping the wires in tape, or that wire tubing stuff.
it helps that i've removed the EGR, AIR and cleaned some of the other stuff up.
Banned
Joined: Mar 2004
Posts: 3,577
From: Sandy VJJville
No, you did well by leaving the coil packs and brackets alone. I've seen them painted red and it looked really cheap and cheesey.


Thread
Thread Starter
Forum
Replies
Last Post
ModdedNerd
General 1967-2002 F-Body Tech
2
Dec 14, 2014 10:28 AM