
Randy L's Auto Paint Detailing Method


Thread Starter
Registered User
Joined: Feb 2005
Posts: 198
Randy L's Auto Paint Detailing Method
Here's what 6-8 hours of effort can produce. My car is a '97 Z28 with original paint. Fortunately, the previous owner took pretty good care of the paint (washed weekly and garage kept). Because of this, the paint wasn't faded much, but you will see what a difference a good detailing can do. Also keep in mind that the results are magnified on black paint, so the lighter your car is the less noticeable the difference may be. If your paint is heavily scratched or faded, it will require "clay barring" or wet sanding. My method is for paint in average to good condition.
Here's the products I used to get the car to the condition you see in the pics below. The products are used in the order you see them (except for the Leather cleaner and Armor All in the back). This process took 6 hours and I didn't use a buffer...all done by hand!

Product List (from Left to Right, front row)
Turtle Wax Bug & Tar Remover (removes paint, tar, bugs, etc)
Meguiar's Mirror Glaze Fine Cut Cleaner (for fine scratches & water spots)
(not shown) KIT Scratch Remover (for heavy water spots)
Meguiar's Cleaner Wax (paste removes contaminants from paint surface)
Meguiar's Deep Crystal System Polish (restores essential oils to paint)
Meguiar's nxt Generation Tech Wax (adds a deep polished look)
Meguiar's Deep Crystal Carnuba Wax (adds water beading protection and finishes the surface to a bright reflective shine)
All items can be found at K-Mart, Wal-Mart, Auto Zone or other auto parts store. Follow the directions of each product. Also buy a couple 3-packs of wax applicators (the round spongy pads). Do NOT use the pad for more than one separate process (don't mix the pads). Get some cotton rags and 3 towels that are lint free.
Note the toothbrush and plastic brush. You need these to brush wax from the seams and crevaces. The other brushes are used for the wheels and tires. I scrub the inside of the rims as well (not just the outer edge) since the resulting shine makes the wheel look deeper.
STEP 1: Wash the car. I use any good liquid car wash. I do not use dishwashing soap since (like another article states) it removes all waxes. I prefer to use the Cleaner wax since it's less harsh...just my preference. Wash one section of the car at a time (say hood & roof, rear & rear fenders, etc.) this will allow you to rinse before the soap dries. Dried soap will leave a heavy residue so keep wetting down the entire car. I clean the wheels first. You can use a spray tire cleaner, but I just use a separate bucket with the car soap. Very dirty wheels will probably need a tire/wheel cleaner. DO NOT USE THE SAME SOAP FOR WHEELS/TIRES AND THE PAINT!!
When drying the car, use a very good quality chamois or a terry cloth that DOES NOT leave lint. Blow onto & around badges and side marker/turn signal lights. You'll be surprised how much water gets caught behind them. I use a Shop Vac as a blower and blow all seams, and areas where water is trapped. I get a LOT of water out.
STEP 2: Use the Bug & Tar remover to get off all heavy grit, tar, bird poop, etc. off the paint. Only apply where needed.
STEP 3: If you have heavy water spots, I use the KIT Scratch Remover. You may have to rub a little hard, but it REALLY removes those water spots! There are other solutions/chemicals you can use as well, but this is cheap and works great. If the water spots aren't too bad, I recommend the Cleaner Wax. That's what I used on the entire car. It preps the paint for the wax.
STEP 4: Next comes the Deep Crystal System Polish. It has a very light oil and the pad will get quite oily when using. The polish replenishes the lost oils in the paint and restores the deep luster and shine. It's VERY important that you do one section at a time. Do NOT let the polish dry since it WILL leave swirl marks and will require a LOT of buffing to get off. Use a good LINT FREE terry cloth towel for removal. For faded paints, you may need to do another application to even out the surface appearance. ONCE DONE, NOT USE THE TOWEL FOR ANY OTHER PROCESS DUE TO THE OIL.
STEP 5: Apply the nxt Tech Wax. I found it's most effective to apply in small overlapped circles in one direction. Do one section of the car at a time, when done with that section, go back and reapply wiping in circles going in the other direction. Do the entire car, make sure all wax is dry to a haze and wipe off with a CLEAN towel. When removing the wax, do not just wipe it off, lightly "buff" the paint with the towel to get a deep shine. First applications may require an additional coat...it DOES make a difference. Also apply wax to the chrome rims. Do not recommend doing it to aluminum rims since they aren't naturally shiny & reflective.
STEP 6: Apply 1-2 coats of the Carnuba Wax. Use the same procedure as Step 5. No need to rub hard. But spend the time while removing to buff a REALLY good shine from the wax. The carnuba wax will make the car very slippery and will help to seal the Tech wax in, letting it stay on longer. The carnuba will also let you wipe the car clean when daily dirt gets on it with a clean towel or the California Cleaner.
STEP 7: Armor All the tires. I simply spray it on and let it sit. It makes for a deeper gloss than wiping. Get a cotton cloth (old sock works great). Spray onto the sock and with 1-2 fingers, wipe onto all rubber seals around the trunk/doors and windows, plastic on wipers, etc. Don't get it on the paint. If you do, immediately wipe it off with a clean rag.
STEP 8: Use the toothbrush to remove paint along the seams, around the badges, etc. Use light pressure...too hard and you will leave scratches. Wipe off with a clean towel/rag.
Now, here are what 6 hours of elbow grease and patience will get you...
Here's the car before the detailing:

Same angle after detailing. Note the difference...even the rims!
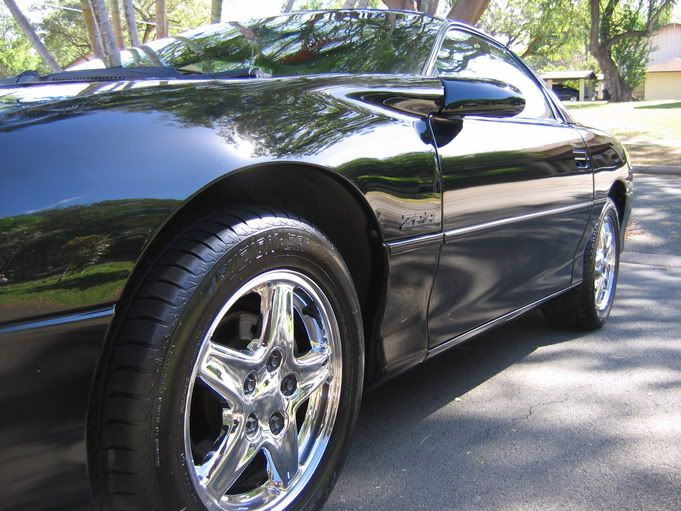
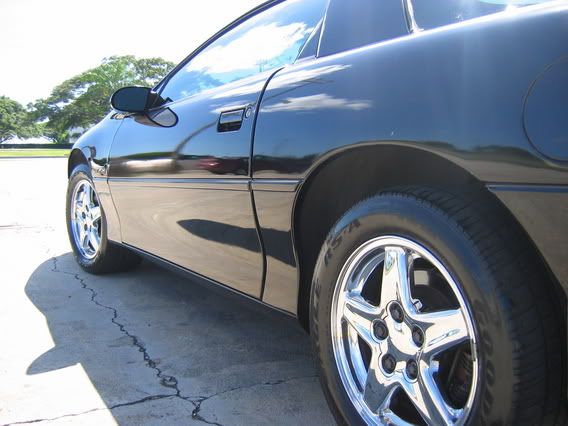
Another angle

More angles


Bird's Eye View Reflection:
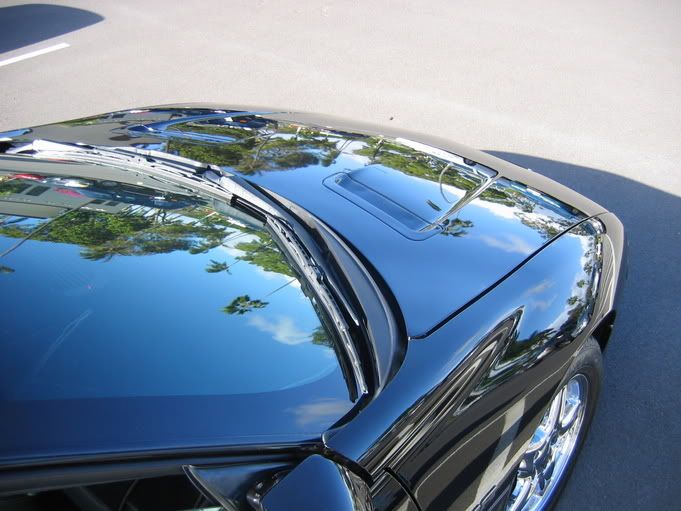
Here's my favorite photo. It's a reflection off the hood. I held the camera upside down to get the image right side up. You can see the edge of the hood near the bottom.

Another pic of the hood. Note reflection detail compared to the windshield.

Here's the products I used to get the car to the condition you see in the pics below. The products are used in the order you see them (except for the Leather cleaner and Armor All in the back). This process took 6 hours and I didn't use a buffer...all done by hand!
Product List (from Left to Right, front row)
Turtle Wax Bug & Tar Remover (removes paint, tar, bugs, etc)
Meguiar's Mirror Glaze Fine Cut Cleaner (for fine scratches & water spots)
(not shown) KIT Scratch Remover (for heavy water spots)
Meguiar's Cleaner Wax (paste removes contaminants from paint surface)
Meguiar's Deep Crystal System Polish (restores essential oils to paint)
Meguiar's nxt Generation Tech Wax (adds a deep polished look)
Meguiar's Deep Crystal Carnuba Wax (adds water beading protection and finishes the surface to a bright reflective shine)
All items can be found at K-Mart, Wal-Mart, Auto Zone or other auto parts store. Follow the directions of each product. Also buy a couple 3-packs of wax applicators (the round spongy pads). Do NOT use the pad for more than one separate process (don't mix the pads). Get some cotton rags and 3 towels that are lint free.
Note the toothbrush and plastic brush. You need these to brush wax from the seams and crevaces. The other brushes are used for the wheels and tires. I scrub the inside of the rims as well (not just the outer edge) since the resulting shine makes the wheel look deeper.
STEP 1: Wash the car. I use any good liquid car wash. I do not use dishwashing soap since (like another article states) it removes all waxes. I prefer to use the Cleaner wax since it's less harsh...just my preference. Wash one section of the car at a time (say hood & roof, rear & rear fenders, etc.) this will allow you to rinse before the soap dries. Dried soap will leave a heavy residue so keep wetting down the entire car. I clean the wheels first. You can use a spray tire cleaner, but I just use a separate bucket with the car soap. Very dirty wheels will probably need a tire/wheel cleaner. DO NOT USE THE SAME SOAP FOR WHEELS/TIRES AND THE PAINT!!
When drying the car, use a very good quality chamois or a terry cloth that DOES NOT leave lint. Blow onto & around badges and side marker/turn signal lights. You'll be surprised how much water gets caught behind them. I use a Shop Vac as a blower and blow all seams, and areas where water is trapped. I get a LOT of water out.
STEP 2: Use the Bug & Tar remover to get off all heavy grit, tar, bird poop, etc. off the paint. Only apply where needed.
STEP 3: If you have heavy water spots, I use the KIT Scratch Remover. You may have to rub a little hard, but it REALLY removes those water spots! There are other solutions/chemicals you can use as well, but this is cheap and works great. If the water spots aren't too bad, I recommend the Cleaner Wax. That's what I used on the entire car. It preps the paint for the wax.
STEP 4: Next comes the Deep Crystal System Polish. It has a very light oil and the pad will get quite oily when using. The polish replenishes the lost oils in the paint and restores the deep luster and shine. It's VERY important that you do one section at a time. Do NOT let the polish dry since it WILL leave swirl marks and will require a LOT of buffing to get off. Use a good LINT FREE terry cloth towel for removal. For faded paints, you may need to do another application to even out the surface appearance. ONCE DONE, NOT USE THE TOWEL FOR ANY OTHER PROCESS DUE TO THE OIL.
STEP 5: Apply the nxt Tech Wax. I found it's most effective to apply in small overlapped circles in one direction. Do one section of the car at a time, when done with that section, go back and reapply wiping in circles going in the other direction. Do the entire car, make sure all wax is dry to a haze and wipe off with a CLEAN towel. When removing the wax, do not just wipe it off, lightly "buff" the paint with the towel to get a deep shine. First applications may require an additional coat...it DOES make a difference. Also apply wax to the chrome rims. Do not recommend doing it to aluminum rims since they aren't naturally shiny & reflective.
STEP 6: Apply 1-2 coats of the Carnuba Wax. Use the same procedure as Step 5. No need to rub hard. But spend the time while removing to buff a REALLY good shine from the wax. The carnuba wax will make the car very slippery and will help to seal the Tech wax in, letting it stay on longer. The carnuba will also let you wipe the car clean when daily dirt gets on it with a clean towel or the California Cleaner.
STEP 7: Armor All the tires. I simply spray it on and let it sit. It makes for a deeper gloss than wiping. Get a cotton cloth (old sock works great). Spray onto the sock and with 1-2 fingers, wipe onto all rubber seals around the trunk/doors and windows, plastic on wipers, etc. Don't get it on the paint. If you do, immediately wipe it off with a clean rag.
STEP 8: Use the toothbrush to remove paint along the seams, around the badges, etc. Use light pressure...too hard and you will leave scratches. Wipe off with a clean towel/rag.
Now, here are what 6 hours of elbow grease and patience will get you...
Here's the car before the detailing:
Same angle after detailing. Note the difference...even the rims!
Another angle
More angles
Bird's Eye View Reflection:
Here's my favorite photo. It's a reflection off the hood. I held the camera upside down to get the image right side up. You can see the edge of the hood near the bottom.
Another pic of the hood. Note reflection detail compared to the windshield.

Registered User
Joined: Oct 2000
Posts: 794
From: Amarillo, TX
Re: Randy L's Auto Paint Detailing Method
Originally Posted by Randy L
If your paint is heavily scratched or faded, it will require "clay barring" or wet sanding.
Just a note - claying has nothing to do with heavy scratches or fading. Claying removes embedded contamination from the paint. Claying should be performed once a year for garage queens and twice a year for daily drivers.
Wetsanding, compounding, and polishing are possible remedies for paint defects.
Registered User
Joined: Sep 2004
Posts: 2,595
From: Lenexa, KS
Re: Randy L's Auto Paint Detailing Method
Originally Posted by Randy L
STEP 4: Next comes the Deep Crystal System Polish. It has a very light oil and the pad will get quite oily when using. The polish replenishes the lost oils in the paint and restores the deep luster and shine. It's VERY important that you do one section at a time. Do NOT let the polish dry since it WILL leave swirl marks and will require a LOT of buffing to get off.
Also when / how did you use the fine cut Mequiars brown bottle? do I need a buffer for that?

Registered User
Joined: May 2005
Posts: 314
Re: Randy L's Auto Paint Detailing Method
well first off your car looks amazing after the detailing and i would love for mine to look the same. I live up here in Maryland and we've had heavy rain for the past week. After the first sunny day i noticed these bubbles under my clearcoat on my hood!! is there a solution to this ugly problem?? they are smooth to the touch which complicates things.


Thread Starter
Registered User
Joined: Feb 2005
Posts: 198
Re: Randy L's Auto Paint Detailing Method
Zred, that stage cannot dry since the oils WILL leave swirl marks. Basically do one small section (half the hood, one fender, half the roof, etc) at a time. Immediately go back to wipe it off.
Sick, that really looks like the clearcoat is coming off! Doesn't look like a normal calcium deposit due to the irregular shape.
Bes, Hawaii has got to be the dustiest place I've been! After one session of detailing the car, I went in to shower and eat. 2 hours later, the stinkin' car is dusty all over again!

Thread
Thread Starter
Forum
Replies
Last Post
Victor Lamb
Suspension, Chassis, and Brakes
3
Aug 26, 2017 02:52 PM
Brake_L8
Cars For Sale
0
Jan 20, 2015 09:44 AM