
whats the whole story on the intake manifold leak?


Registered User
Joined: Dec 1999
Posts: 825
From: Houston, TX
Here's some info and a guide on how to repair it:
http://www.geocities.com/MotorCity/Downs/4013/ol.html
... and another repair guide:
http://www.projecttransam.com/projects2.asp
http://www.geocities.com/MotorCity/Downs/4013/ol.html
... and another repair guide:
http://www.projecttransam.com/projects2.asp
Thread Starter
Registered User
Joined: Sep 2002
Posts: 2,481
From: Arlington, VA
How hard is it to change it out honestly? I'm not positive mines leaking, but it may be a little. If its not too hard. Then I'll do it. I'm mechanically inclined so as long as I have a decent idea/instructions I can get the job done. Any extra info or pointers would be helpful. Thanks

Registered User
Joined: Mar 2003
Posts: 1,574
From: PA
Re: whats the whole story on the intake manifold leak?
Originally posted by scoobysnax83
What exactly leaks when the intake manifold gasket goes on our LT1's? What oil flows through there and how hard is it to change?
What exactly leaks when the intake manifold gasket goes on our LT1's? What oil flows through there and how hard is it to change?

Registered User
Joined: Sep 2010
Posts: 16
Hello, new to owning a Z28 and new to the boards here. I have this exact problem. I bought the car from its second owner a few months ago, knowing about the oil leak. He said he was planning on changing the clutch and the intake manifold gasket at 100,000 and wasn't really worried about it. He was only putting a few thousand miles a year on the car and didn't care. I'm going to blessed enough to use it for a toy myself but I'm tired of oil all over the garage floor and I know my smog inspection letter will be here before I know it. The clutch is going to need to happen asap too. (its at 84000 miles)
I just got off the phone with the dealer and they only have TSBs going back 9 years. I have scoured the internet and found many references, guides, and photos to get me started. I see that this post itself has been dormant for seven years. I was going to get this done this weekend but don't want to start taking apart too much stuff. Anyone out there save the TSB? or have a source for the new gasket? Thanks in advance
I just got off the phone with the dealer and they only have TSBs going back 9 years. I have scoured the internet and found many references, guides, and photos to get me started. I see that this post itself has been dormant for seven years. I was going to get this done this weekend but don't want to start taking apart too much stuff. Anyone out there save the TSB? or have a source for the new gasket? Thanks in advance
Registered User
Joined: Dec 1969
Posts: 27,728
From: Little Rock, AR
A TSB does not mean they do it for free. It is just an explanation of how they go about repairing it. All you need to do is go buy a gasket at the parts store. A seven year old thread may not be the best source for current info. There are tons of later threads with recommendations for sealants people now use and like. I have used Permatex Ultra Copper with success.
Registered User
Joined: Mar 1999
Posts: 2,068
From: Kernersville, NC
This is how and where to apply the sealant....
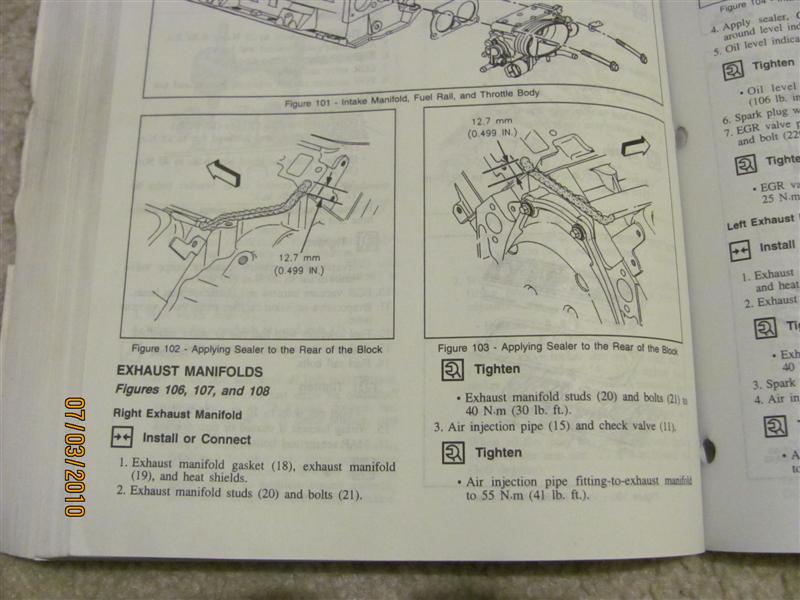
The sealant goes across each end of the block and part way up each head(~ 3/4").
Contrary to the pictures in a Haynes manual, the LT1 intake is dry. They have pictured a wet type intake.....has confused peeps over the years that are just getting started on working on this type engine. So, no coolant to worry about.
I highly recommend "The Right Stuff" by Permatex. I have had zero problems with the intake manifold leaking with this stuff. Cleaning all the surfaces is key to a good seal(lacquer thinner works well....I also very carefully use a razor blade...do not gouge the aluminum). Set the intake manifold straight down as you can....follow the intake torque pattern and specs. Use thread sealant on the intake manifold bolts.
I also let the sealant cure overnight before running it.
I personally prefer the GM intake gaskets over those things that Autozone sell. I guess they could have given me the cheapest thing in the store...but they looked like crap. I went and bought a GM set after purchasing those things.
Last edited by ACE1252; Sep 17, 2010 at 08:47 PM.

Registered User
Joined: Dec 2005
Posts: 907
I have had my intake off multiple times and never had a problem with the intake leaking afterwards. Just put the RTV approx 1/2" up onto the heads, place the intake gaskets in the sealant and then I put another little dap on top of the gasket to ensure a good seal where the gasket meets the block.

Registered User
Joined: Sep 2010
Posts: 16
Hey! Hello! thank you everyone! I think I need to go into my settings on here. I use several other forums for other topics that send you an automated email when you have much appreciated helpful responses, which I do! So last night I got all the plastic off the front the throttle body, alternator bracket off, dozens of plugs unplugged, the wiring of the tops of the coil deals, etc.
I found a few hoses and lines that are too dry rotted to go back on, for example, a hose thats about 3/4" that runs from the hole at the rear of the passenger side valve cover to the front of the throttle body. what's my best craftsmanship scenario for this guy? Is there a part number for a new one or am I going to the rolls of random black rubber tube at Pepboys?
Speaking of Pepboys, I haven't undone the fuel lines at the rear drivers side yet. I do not possess the specialized tool yet. That's my first order of business today. Is this a fairly generalized tool or one where I'll be happier if I find a good one? And how does the throttle cable come apart?
So, the rumor that the EGR tube should be wrapped before I put everything back together is false? Using premium sealer such as the Permatex Ultra Copper is what prevents this problem from re-occuring? A few discussions talk about pushing the tube back so it's as far from the intake as I can get it. I haven't messed with it too much yet but I'm imagining its not that flexible and if it were the 700 degree temps would just melt the paint off the firewall instead.
Lastly, (for now) the low coolant light is on on the dashboard, but the actual car is full. I've heard the sensor for this lives on top of the water pump and thermostat. Naturally I'm not putting everything back together till I address all this. Is this sensor going out common? I hope it's not a short somewhere like the recurring problem with my pickup truck that denies me the ability to repair the compass/clock module.
Thank you for the help everyone, I don't mean to ask dumb questions or too many questions, just want to make sure I do this work right
Registered User
Joined: Mar 1999
Posts: 2,068
From: Kernersville, NC
Your coolant level sensor is on the radiator about 2" below the filler neck. It looks like a square block and is held in place with a wire clip. Get a new one from the store of your choice. They go bad from time to time and there is no use in screwing with old one to try and clean it out. This is a common problem. I replaced mine not too long ago.
There are actually two coolant sensor temps on the LT1. The sensor in your water pump is the computer coolant temp sensor. The cluster gauge coolant sensor is in the driver's side head between cylinders 1 and 3.
Not sure what you are talking about on the EGR. I'd say false on that one. There are a couple of gaskets back there for the EGR system that I would replace with new ones. The EGR tube is stiff, but not too bad.
The GM part number for the hose you want is 10105324(I think...). Just take the old one with you to the GM counter to make sure. Here is a thread I made a couple of years ago regarding old hoses....
https://www.camaroz28.com/forums/sho...d.php?t=621823
In a different thread, I had issues with crumbling hoses on my EVAP system. I put that info in this thread(you will have to piece together those hoses with the sizes and types I mentioned in that thread...if and when you start working on it)......
https://www.camaroz28.com/forums/sho...d.php?t=697461
As far as the fuel disconnect tool, just buy the plastic ones. They work like a charm. When using them, do not pull the tool and fuel line together. Sounds dumb, but when I first learned how to disconnect the lines I wrestled with trying to pull them both at the same time and the damn thing would not budge. What you do is insert the disconnect tool firmly until you feel it hard stop against something. Then, you just pull the fuel line(alone) to remove it. Be prepared with a rag to absorb excess gas. Also, be careful of pressurized fuel. If you have ran it recently, the line may have pressurized fuel in it. Just bleed off the pressure via the schrader valve for checking the fuel pressure.
If you don't have some type of repair manual for the car, pickup a Haynes manual for the 93-2002 F-body(Camaro/Trans Am). It will help you. There is also a wealth of knowledge, writeups, and diagrams on Shoebox's website.
http://shbox.com/page/index.html
Of course, we will do our best to help as well. There are quite a few knowledgeable people here on this board for the LT1. I have learned quite a bit over the last 13 years here.....and am still learning. Hehe, I know my join date is '99 but I was just viewing threads for a couple of years before that.
There are actually two coolant sensor temps on the LT1. The sensor in your water pump is the computer coolant temp sensor. The cluster gauge coolant sensor is in the driver's side head between cylinders 1 and 3.
Not sure what you are talking about on the EGR. I'd say false on that one. There are a couple of gaskets back there for the EGR system that I would replace with new ones. The EGR tube is stiff, but not too bad.
The GM part number for the hose you want is 10105324(I think...). Just take the old one with you to the GM counter to make sure. Here is a thread I made a couple of years ago regarding old hoses....
https://www.camaroz28.com/forums/sho...d.php?t=621823
In a different thread, I had issues with crumbling hoses on my EVAP system. I put that info in this thread(you will have to piece together those hoses with the sizes and types I mentioned in that thread...if and when you start working on it)......
https://www.camaroz28.com/forums/sho...d.php?t=697461
As far as the fuel disconnect tool, just buy the plastic ones. They work like a charm. When using them, do not pull the tool and fuel line together. Sounds dumb, but when I first learned how to disconnect the lines I wrestled with trying to pull them both at the same time and the damn thing would not budge.
What you do is insert the disconnect tool firmly until you feel it hard stop against something. Then, you just pull the fuel line(alone) to remove it. Be prepared with a rag to absorb excess gas. Also, be careful of pressurized fuel. If you have ran it recently, the line may have pressurized fuel in it. Just bleed off the pressure via the schrader valve for checking the fuel pressure. If you don't have some type of repair manual for the car, pickup a Haynes manual for the 93-2002 F-body(Camaro/Trans Am). It will help you. There is also a wealth of knowledge, writeups, and diagrams on Shoebox's website.
http://shbox.com/page/index.html
Of course, we will do our best to help as well. There are quite a few knowledgeable people here on this board for the LT1. I have learned quite a bit over the last 13 years here.....and am still learning.
Hehe, I know my join date is '99 but I was just viewing threads for a couple of years before that.
Last edited by ACE1252; Sep 18, 2010 at 12:20 PM.

Thread
Thread Starter
Forum
Replies
Last Post
CARiD
Supporting Vendor Group Purchases and Sales
0
Jan 27, 2015 06:27 AM
chevroletfreak
LT1 Based Engine Tech
202
Jul 4, 2005 05:00 PM