
Intake Manifold


Registered User
Joined: Jul 2004
Posts: 3,034
From: Raleigh, NC
if you are indeed referring to the bottom side of the intake that covers the valley/mates to the block, why would you paint that?
and as far as rtv goes, ive use the copper stuff a million times without a problem. if the copper doesnt work for you, you arent doing it right.
and as far as rtv goes, ive use the copper stuff a million times without a problem. if the copper doesnt work for you, you arent doing it right.
I agree with you on the Copper RTV.

Thread Starter
Registered User
Joined: Mar 2007
Posts: 229
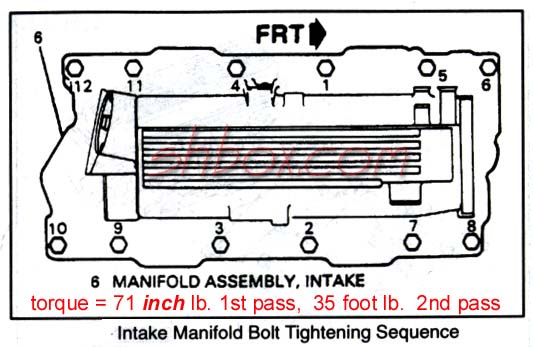
I dont know what im doing wrong then. Maybe its because i torque one bolt twice? instead of doing everything at 30ft. lbs. or whatever it is. Also I dont have a in. lb. wrench for the first round'? is that a posible cause? Should the bead be tall and as close as the ridge to me? Or wide?
Last edited by bowtiekid; Jul 14, 2008 at 07:44 PM.
Registered User
Joined: Jul 2004
Posts: 3,034
From: Raleigh, NC
You can just use a regular wrench for the first round and get them "snug".
I think the bead should be thick and not necessarily tall. Make sure you put a little bit extra in the corners and go all the way up the head to the intake gasket.
I waited 20 min or so after laying the bead before putting the intake on and then at least 24 hours before starting the motor.
I think the bead should be thick and not necessarily tall. Make sure you put a little bit extra in the corners and go all the way up the head to the intake gasket.
I waited 20 min or so after laying the bead before putting the intake on and then at least 24 hours before starting the motor.
Registered User
Joined: Jan 2002
Posts: 710
From: Gulf Breeze, Fl. USA
just so you know, 1 foot lb is 12 in lbs (think in terms of a ruler... meaning 12 inches equals one foot). as far as tightening, try hand tightening the bolts and then work on them with the wrench. work from the inside out. what i mean by that is, work the four center bolts (one center bolt on passenger side, then do the opposite side on driver side. next do the other center bolt on the driver side and do its opposite on passenger side). then work your way out from center bolts. the four outside corners should be the last ones you do if you keep working the bolts in a circular pattern. start with a small amount of pressure at first, making a couple different passes up to the final pass at 30 ft lbs (so start with a pass of 1 foot lb, then make a pass of 10ft lbs, then 20, then 30 since you are having so much trouble). taking your time can do a lot for you. as far as the bead goes, just run a decent thickness bead (guessing about 1/4-1/2" thickness and height) along the center of the rails. make sure to get the corners as i mentioned before (where the block meets the heads). getting the intake on square is key. get a friend to help you place the intake on square along with the studs if you are having trouble. and as i mentioned before, let it cure completely. dont get impatient wondering if its gonna hold this time. put it all back together and let it sit for a day or two (at least 24hrs if you can).
Registered User
Joined: Jul 2005
Posts: 85
Thanks for the advice....I'm getting ready to pull mine again. I will not do the t-56 conversion until I can get the back of the intake to quit leaking. It will leak on to the clutch and ruin it. Honestly I'm going to try making a gasket for the front and rear of the manifold with rubber trans pan gasket material. I don't know if this has been tried, but I'm open to any suggestions?
Thread Starter
Registered User
Joined: Mar 2007
Posts: 229
 The guideplates are comp cams, not sure on the part number
Registered User
Joined: Jul 2004
Posts: 3,034
From: Raleigh, NC
Thread Starter
Registered User
Joined: Mar 2007
Posts: 229
Registered User
Joined: Jul 2004
Posts: 3,034
From: Raleigh, NC
Try thunder racing for the GMPP guideplates. They say the Trickflow ones work well also.
I've never worked with helicoils.
Thread Starter
Registered User
Joined: Mar 2007
Posts: 229
So a dealership wouldnt stock those? and alright and I think I know what you mean. Work the 4 centers snug then the 4 outers snug then go back and torque the 4 centers then torque the 4 outers, correct?
Registered User
Joined: Jul 2004
Posts: 3,034
From: Raleigh, NC
Last edited by seawolf06; Jul 15, 2008 at 01:48 PM.

