LOG IN
REGISTER
Members
Camaro Podcast
Episode Discussion
Listen on Stitcher
Download iOS App
Download Android App
Forums
Welcome to CamaroZ28.Com
New Member Introduction
CamaroZ28.Com Podcast
Site Help and Suggestions
2016+ 6th Generation Chevrolet Camaro Forums
2016+ Camaro News, Sightings, Pictures, and General Discussion
2010 - 2015 5th Generation Chevrolet Camaro Forums
2010 - 2015 Camaro News, Sightings, Pictures, and Multimedia
2010 - 2015 Camaro Technical Discussion
2010 - 2015 Camaro Wheels, Tires, Brakes, Suspension
2010 - 2015 Camaro Interior, Exterior, Paint & Body, Electronics/Car Audio
1967-2002 F-Body Technical Discussion
General 1967-2002 F-Body Tech
1967-2002 Specific Technical Discussion
1967-2002 Powertrain Discussion
LS1 Based Engine Tech
LT1 Based Engine Tech
3rd Gen / L98 Engine Tech
Classic Engine Tech
V6 Tech
1967-2002 F-Body Care and Maintenance
Appearance
Wheels and Tires
Car Audio and Electronics
Show and Shine / Paint and Body Care
Marketplace
Parts and Cars FOR SALE and WANTED
Supporting Vendor Group Purchases and Sales
Motorsport Discussion
Drag Racing Technique
Autocross and Road Racing Technique
Track Kill Stories
Community
Automotive News / Industry / Future Vehicle Discussion
Events and Cruise Spots
Regional Camaro and Firebird Enthusiast Forums
New England Area
Middle Atlantic
Midwest
West North Central
South Atlantic
East South Central
West South Central
Mountain
Pacific
Outside of United States
News
Marketplace
Vendor Directory
Become a Vendor
Member Marketplace
Vendor Marketplace
New Posts
Tools
Car Payment Calculator
Tire Rim Calculator
Wiki
Recalls
Technical Service Bulletins (TSBs)
Members List
Live Feed
Gallery
View Dark Mode
Please register or login to enable Dark Mode.
Log In
Register
Threads
Google
Threads
Posts
Advanced
Dark Mode
Please register or login to enable Dark Mode.
Log In
Forgot your Password?
By logging into your account, you agree to our
Terms of Use
and
Privacy Policy
, and to the use of cookies as described therein.
Recent
Commented
Albums
My Pictures
KYWes's Photos
View Profile
Sort:
Most Recent
Most Recent
Most Comments
Albums
Photos
0
2023/07/07 14:29:55
KYWes
0
2023/07/07 14:29:51
KYWes
0
2023/07/07 14:29:46
KYWes
0
2023/07/07 14:29:41
KYWes
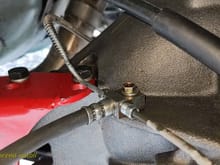
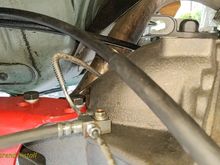
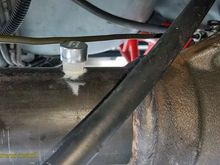
The t-block for the left and right hard lines and the main supply line. I drilled a 5/16" hole in the center bracing.
0
2021/07/08 16:57:32
KYWes
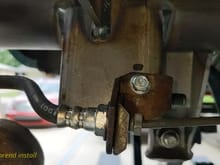
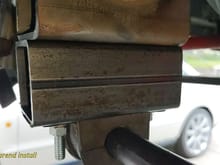
The passenger side brake brace. The Driver's side is similar.
0
2021/07/08 16:57:30
KYWes
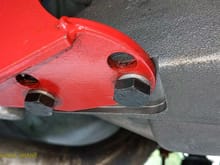
The top torque arm bolts
0
2021/07/08 16:57:28
KYWes
The bottom torque arm bolts.
0
2021/07/08 16:57:26
KYWes
I found this vent tube at Grainger.com It is part number 1U570 and they called it Protected vent 1/4. height 1.19. It screwed right into the hole provided by Moser Engineering.
0
2021/07/08 16:57:24
KYWes
Same procedure as driver's side.
0
2021/07/08 16:57:22
KYWes
Driver's side sway bar mount. I got 2" square 1/8" thick steel square stock. Cut to 4-1/2", drilled 5/16th" holes on the centerline with hole center 23mm from one end then 3" on center for the other hole. Bolted with 3-1/2" 5/16-18 bolts (3" would have been enough).
0
2021/07/08 16:57:20
KYWes
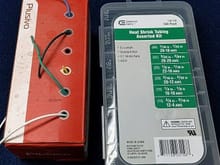
On the left is a 22 gauge wire assortment I purchased from Amazon. On the right is a heat shrink tubing assortment I purchased from Home Depot. Individual heat shrink tubing sizes are also available in smaller quantities in various sizes.
0
2021/03/16 03:19:06
KYWes
0
2021/03/16 03:15:20
KYWes
The sensor installed in the sensor mount. This mount goes into the top of the rear end housing.
0
2021/03/16 03:11:09
KYWes
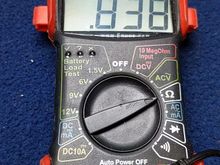
Typical resistance reading across the two wires.
0
2021/03/16 03:01:12
KYWes
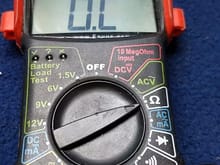
what should be seen checking from each wire to the case. This is an open or infinite resistance reading.
0
2021/03/16 03:01:09
KYWes
The next morning I covered both wires with a 1/4" heat shrink tubing and shrunk that. I then stripped the insulation off the remaining ends.
0
2021/03/16 02:54:52
KYWes
0
2021/03/16 02:54:50
KYWes
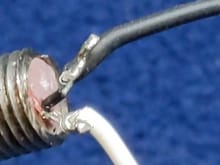
After stripping the insulation off, I twisted the stranded wires, and tinned them (applied solder to the wires)
0
2021/03/16 02:48:04
KYWes
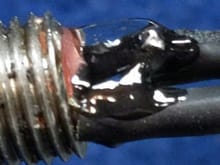
Then I slid 1/8" heat shrink over the connection and shrunk the tubing with my butane torch. A match can be used or a heat gun. Finally I applied epoxy to the wires for strength and stability. I let the epoxy cure over night but you may not need to.
0
2021/03/16 02:48:03
KYWes
I then twisted my 22 gauge extension wires on (white to white, black to black) Alternatively, hod onto the wires that came with your sensor that you previously connected to the existing wiring under the car.
0
2021/03/16 02:48:01
KYWes
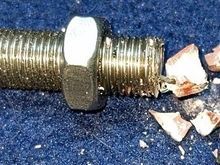
Chipped away epoxy.
0
2021/03/16 02:42:43
KYWes
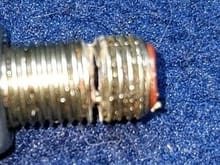
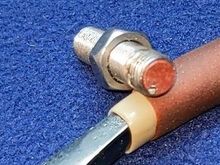
Housing cut through full circle 5mm or 5 threads down from the wire end.
0
2021/03/16 02:38:53
KYWes
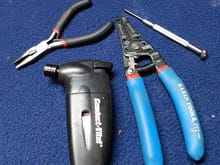
Needle nose pliers, jewelers screwdriver, miniature butane torch, small gauge wire strippers.
0
2021/03/16 02:32:25
KYWes
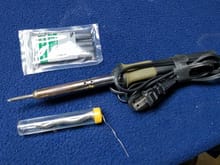
1/4" heat shrink, soldering iron, solder
0
2021/03/16 02:32:22
KYWes
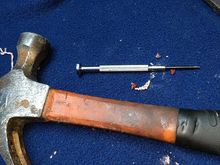
Hammer, jewelers screwdriver
0
2021/03/16 02:32:20
KYWes
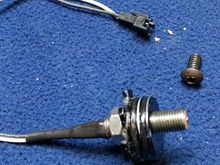
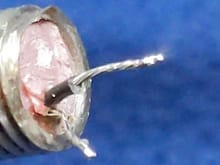
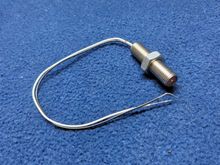
Sensor with wires broken off.
0
2021/03/16 02:29:30
KYWes
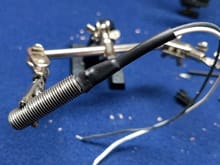
Strange Engineering 3 Channel ABS rear end sensor.
0
2021/03/16 02:27:47
KYWes
0
2021/02/11 08:11:31
KYWes
0
2020/04/05 08:21:45
KYWes
0
2020/04/05 08:21:30
KYWes
0
2020/04/05 08:21:14
KYWes
0
2020/04/05 08:21:02
KYWes
0
2020/04/05 08:20:38
KYWes
0
2020/04/05 08:20:28
KYWes
0
2020/04/05 08:20:14
KYWes
0
2018/07/29 20:08:01
KYWes
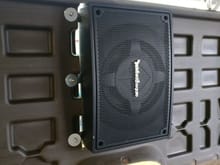
Fender washer have a small inner hole but are larger in diameter than regular washers.
0
2018/06/09 06:56:25
KYWes
I used fender washer to mount the subwoofer so as to spread the out the mounting pressure on the plastic.
0
2018/06/09 06:56:24
KYWes
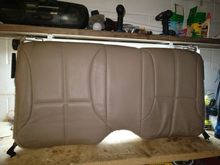
Here is the upper back seat removed from my car. The vinyl/carpet cover is one piece. Once you remove the latching hardware from the seat,
0
2018/06/09 06:56:12
KYWes
First
Page
1 of 3
Last
Go To
Page
1
2
3
1 of 3
Go To
GO
Go to page
of 3
pages
1
2
3