
dreaded intake manifold seal


Thread Starter
Registered User
Joined: May 2009
Posts: 13
dreaded intake manifold seal
I am hoping someone can help me out on this one. My intake manifold was starting to leak on the back seal and i thought i would replace it. When i replaced it, it did not seal along the back at all so i had to try a second time. Then when i replaced it the second time it held until about 4000 rpm then just blew out and now i once again have a huge leak. it there some trick on how to get the back to seal better?
Registered User
Joined: Sep 2001
Posts: 4,152
From: Woodstown, NJ
I am hoping someone can help me out on this one. My intake manifold was starting to leak on the back seal and i thought i would replace it. When i replaced it, it did not seal along the back at all so i had to try a second time. Then when i replaced it the second time it held until about 4000 rpm then just blew out and now i once again have a huge leak. it there some trick on how to get the back to seal better?
Registered User
Joined: Oct 1998
Posts: 3,144
From: Jackstandican
Whatever you heard about sanding or dimpling the block is absolute hog wash. Don't do it. It is not necessary. The block and intake surfaces which take sealant are porous enough to adhere. As stated, just make sure your surfaces are 100% free of old sealant or your greasy hands. Use carb or brake clean to do so. Put intake straight down onto block. Let sealant cure several hours before starting.
Registered User
Joined: Jul 2002
Posts: 1,942
From: Kissimmee, Fl, USA
I've done this a couple of times...on different cars. I believe the secret is to let the RTV cure completely. Use RTV with a temp rating equal to or higher than the grey stuff GM suggests...and let it cure for 24 hours before starting the car.
Good Luck!
Good Luck!

Registered User
Joined: Nov 2008
Posts: 263
From: Livingston, Louisiana
When i replaced mine i did just like ramair said. 1/4in bead a little up the sides of the heads. Once you set the intake on, per the direction on the back, you only finger tighten the bolts then let it sit for 30min-1 hour then torque them down. This was with the permatex ultra black. Haven't had a problem yet.
Registered User
Joined: Apr 2010
Posts: 39
From: Baton Rouge, LA
As everyone has said, run the bead of sealant and set the intake. Make sure your surfaces are clean and wipe them down with alcohol. Carb & Brake cleaner leave a residue, I don't see much of a problem because I have used them many times. But, just to be on the safe side go with the alcohol.
Make sure to try and set the manifold squarely onto the surface. Don't slide it back and forth or wiggle it too much.
Make sure to try and set the manifold squarely onto the surface. Don't slide it back and forth or wiggle it too much.
Registered User
Joined: Jul 2002
Posts: 1,942
From: Kissimmee, Fl, USA
If you choose to use a solvent to clean the mounting surfaces, use brake cleaner. It's the only stuff that will actually dissolve the old gasket stuff...it doesn't leave a residue.
I went to the Permatex website and looked at the current offerings. The two grey ones, the ones with the same service temps that GM uses, have slightly different properties. The Right Stuff grey stays flexible and is blow out resistant..sounds like a good choice. The regular grey rigid stuff is, obviously, less flexible and sounds like a better choice, especially when Permatex themselves suggest it for manifold end seals. Either way, clean the surfaces, apply the sealer, drop the manifold straight down on it, torque the bolts and leave it alone for hours.....
I went to the Permatex website and looked at the current offerings. The two grey ones, the ones with the same service temps that GM uses, have slightly different properties. The Right Stuff grey stays flexible and is blow out resistant..sounds like a good choice. The regular grey rigid stuff is, obviously, less flexible and sounds like a better choice, especially when Permatex themselves suggest it for manifold end seals. Either way, clean the surfaces, apply the sealer, drop the manifold straight down on it, torque the bolts and leave it alone for hours.....
Registered User
Joined: Jan 2010
Posts: 274
From: western ky
i like using the red silicone in the aerosol can, put a 1/4 inch bead on front and back of the valley and dab a small dot on the sides where the intake gasket comes to the corner, dont use the front or rear intake gaskets/seals...
i like to use paint thinner/naptha to clean surfaces with..
i've seen other guys take a screwdriver and scratch up the front and rear intake surface of the block to help the silicone grab the surface better. i havent done that myself though.
i like to use paint thinner/naptha to clean surfaces with..
i've seen other guys take a screwdriver and scratch up the front and rear intake surface of the block to help the silicone grab the surface better. i havent done that myself though.

Registered User
Joined: Jun 2010
Posts: 214
From: oklahoma
Installing lower intake and the set of gaskets didn't come with front and rear seals that seal the intake to the block, and the auto parts store didn't have an answer. The old one had rtv only no seals. Chiltons says there are seals and gives a gm part number but auto part store doesn't show anything. I hate to put just rtv like the last guy that owned the car so I need some advice. Thanks P.S. 1996 Z28, LT1
Registered User
Joined: Mar 1999
Posts: 2,068
From: Kernersville, NC
Get the major stuff off the surfaces(block and intake manifold) with a new putty knife or really carefully using a razor blade(if using a razor be careful not to gouge the surfaces...especially the intake....). Use lacquer thinner to mop up the rest. Clean the bolts and bolt holes with a chaser(not a tap or die).
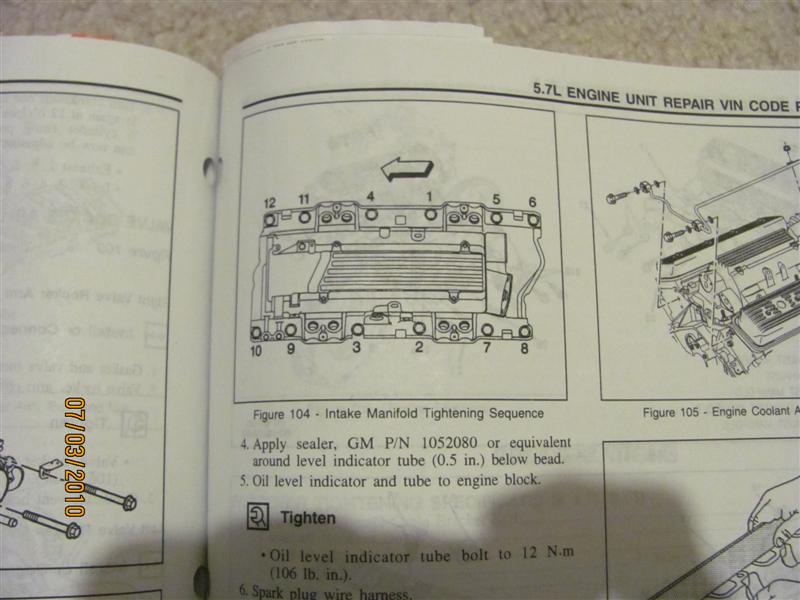
Get a can of the Right Stuff and lay a bead the width of the surface and also 0.5 inch up the valley on both sides. Do this for front and back.
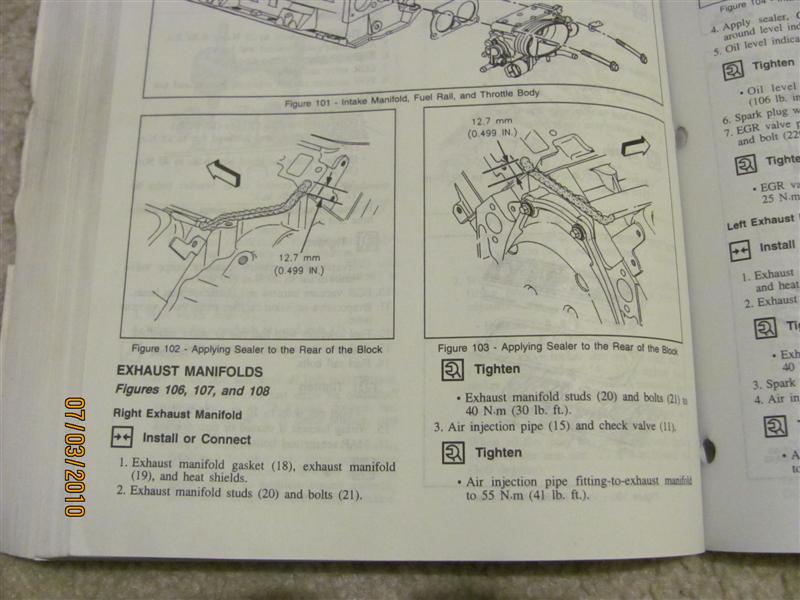
When letting the manifold down, do it square. The right stuff will squeeze out as you are torquing the manifold in sequence(follow the tightening pattern). Also, use permatex high temp thread sealant on those intake manifold bolts or you will have air leaks around the holes. Do not touch or clean up what squeezes out between the manifold and block....leave it alone. Let it cure for 24 hrs.
Get a can of the Right Stuff and lay a bead the width of the surface and also 0.5 inch up the valley on both sides. Do this for front and back.
When letting the manifold down, do it square. The right stuff will squeeze out as you are torquing the manifold in sequence(follow the tightening pattern). Also, use permatex high temp thread sealant on those intake manifold bolts or you will have air leaks around the holes. Do not touch or clean up what squeezes out between the manifold and block....leave it alone. Let it cure for 24 hrs.