Another LT1 Blower Car Build

Thread Starter
Super Moderator
Joined: Feb 2000
Posts: 2,026
From: Japan
Another LT1 Blower Car Build
I thought I'd put a few in process pictures and maybe a story or two up on my build to go with some of the others on this forum. I'll update the post in the stickied thread as well when I get some more time and the car is "done". The car is a '95 with 39K miles, I'm the second owner. The car has been in 5 different shops in the past 4 years (6 if you count the place that installed the carpet). Fortunately, now I've got some initial dyno numbers and it's about wrapped up. Last thing to be worked out is getting rid of the belt slip and adjusting the cam sensor so we can get some final dyno numbers and plan for the next round of mods. I have learned a lot from this build and would like to share some things so people don't go through the same mistakes I did. Stories to follow.
Here's the brief specs
1995 Z28 Convertible
396 LT1 with AFR 220s
Procharger D1 with large FMIC
LS1 Big Stuff 3
4L80E
9"
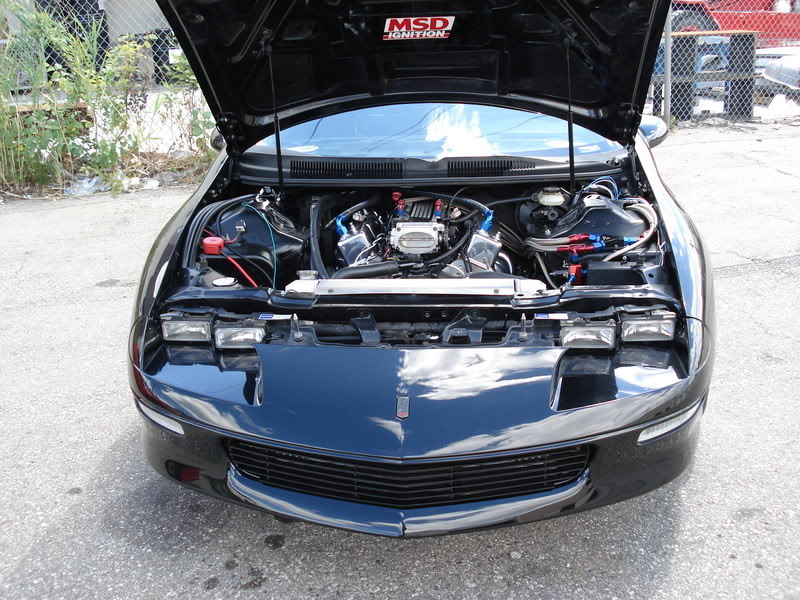
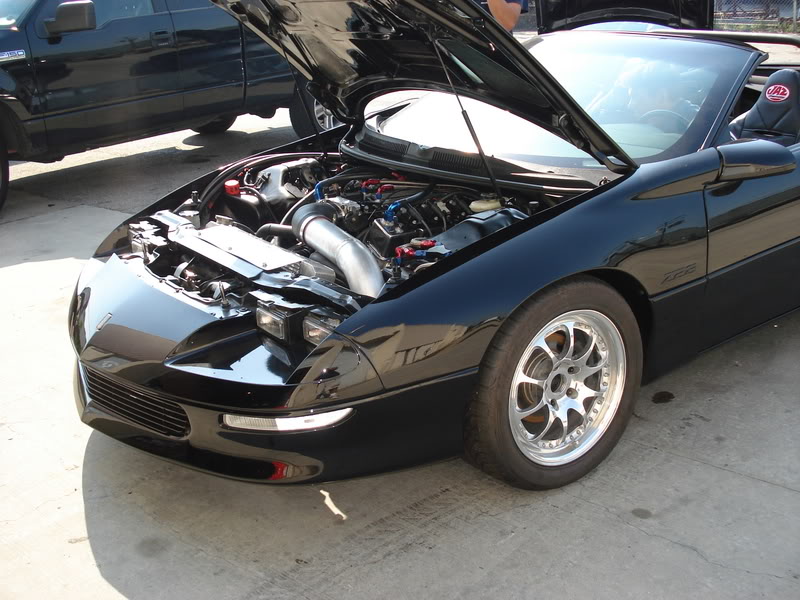
Here's a few pictures of the car from last fall:


Here's a picture of the underside from last year, shows the relocation of the muffler. I have a sumped fuel tank, so traditional muffler location isn't that great anymore. This is also before the 4L80 went in.

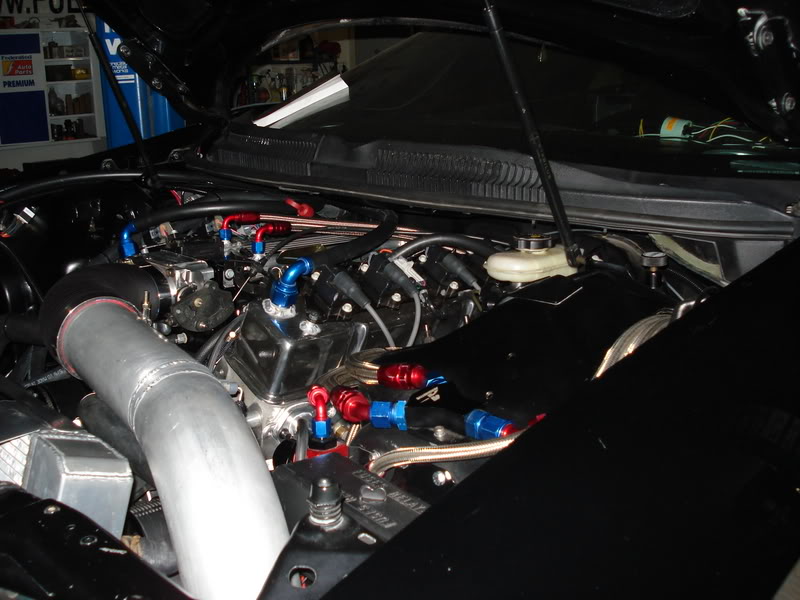
Here's one shot of under the hood while doing some changes to the cooling system.
Here's one of the fabricated blower inlet:

A couple of the intercooler:


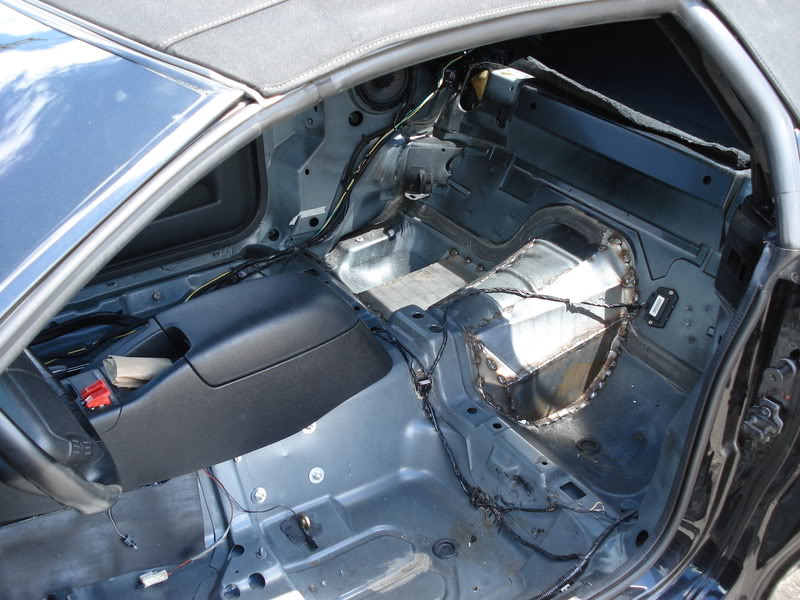
Here's one of some floor pan modifications:
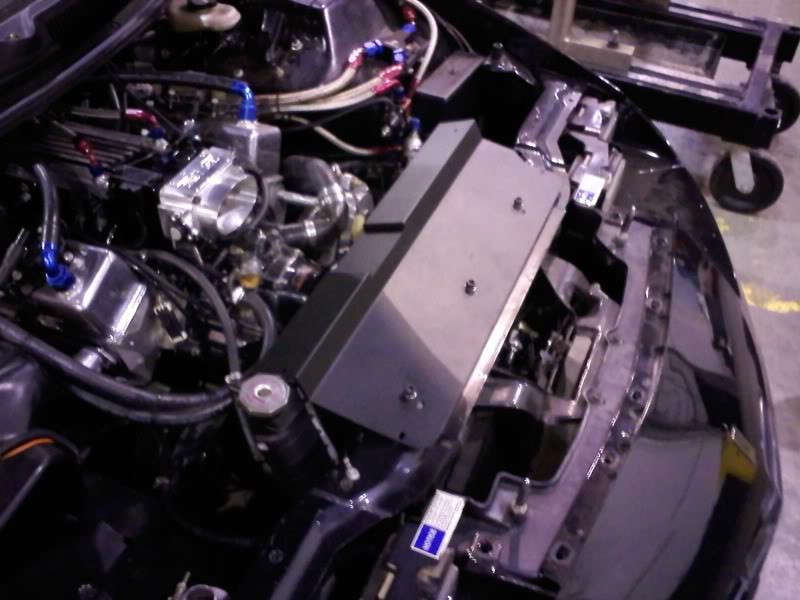
Here's another underhood shot, I'll get some more pics and the stories up later.
Here's the brief specs
1995 Z28 Convertible
396 LT1 with AFR 220s
Procharger D1 with large FMIC
LS1 Big Stuff 3
4L80E
9"
Here's a few pictures of the car from last fall:
Here's a picture of the underside from last year, shows the relocation of the muffler. I have a sumped fuel tank, so traditional muffler location isn't that great anymore. This is also before the 4L80 went in.
Here's one shot of under the hood while doing some changes to the cooling system.
Here's one of the fabricated blower inlet:
A couple of the intercooler:
Here's one of some floor pan modifications:
Here's another underhood shot, I'll get some more pics and the stories up later.


Thread Starter
Super Moderator
Joined: Feb 2000
Posts: 2,026
From: Japan
Thanks, it's got low miles going for it.
It's been on the dyno a few times, but there's still some belt slip. The cam signal is deteriorating some, so it was shut off after the car was started to get the dyno pulls in. Looking into the problem there right now. The optispark was converted to provide a signal for the BS3.
Yes, the floor pan was modded on the driver's side for torque arm clearance. The torque arm is an Alston Chassisworks one. The floor has been raised on the passenger side for muffler clearance.
Thanks!
Thanks!

Registered User
Joined: Jul 2004
Posts: 1,174
From: MI
Yes, I have some questions...
I have a similar build... 97ss 383-D1/ 190 AFR's/ MM6/ 72# Seimens/ Spearco IC and Snow Meth_H2O Inj.
I use lt1_edit verion 2.2 with an OBD2 GM PCM. And, an Optispark Dist (all-ign.com). I have had many Opti failures (6) and have been shopping for aftermarket Inj systems.
Do you use the Optispark distributor with the Big_Stuff_3?
or,
Aftermarket EFI single plane with other distributor?
I am looking @ Accel DFI now with speed density.
Also, how do you drive the stock GM distributor with no Opti signal input to the PCM?
Thanx. B.
Thread Starter
Super Moderator
Joined: Feb 2000
Posts: 2,026
From: Japan
Ok, now for a story or two. I'll include a few lessons I've learned from this build. Most of them have been very expensive lessons. In fact, I'll bet I've spent over 10K on the build just doing rework and fixing mistakes or correcting problems that I didn't directly cause, or were unfortunate accidents. Alot of it is due to the fact the build took so long.
First off, I bought this car back when I had the idea to turn my previous 4th gen ('95 6 speed hard top) into a car like this right before moving from one state to another. I bought the car because it had most of the parts I wanted, and the previous owner was going to sell it as is or part it out. For a short while I had almost two of everything, but sold a lot of it off here on the board or ebay, etc. Oh, and I bought the car right when I was going to move from Michigan to Illinois.
I didn't know specifically what I wanted to make and felt the previous owner had amassed a decent collection of parts, so I wanted to finish it up and go from there. The car needed some wiring work, exhaust, go to a large FMIC and a few other odds and ends. I also wanted to ditch the stock PCM, and go to a BS3. I dropped it off in a shop in the Detroit area who had a good reputation on another board I frequent and they began the work. Things were progressing, albeit very slowly, and then I got a phone call one day telling me that they had all the plugs out of the engine and were turning it over, they felt it had a lot of resistance and should have the engine looked at. The catch was that they were too busy to pull the engine, but recommended a shop that they worked with that could use the work and had the time to take care of it. Another bonus was that Katch was close by and they would be able to tear the engine down and check it over. Keep in mind that the engine was supposed to be brand new, so I was hopeful that it was something minor.
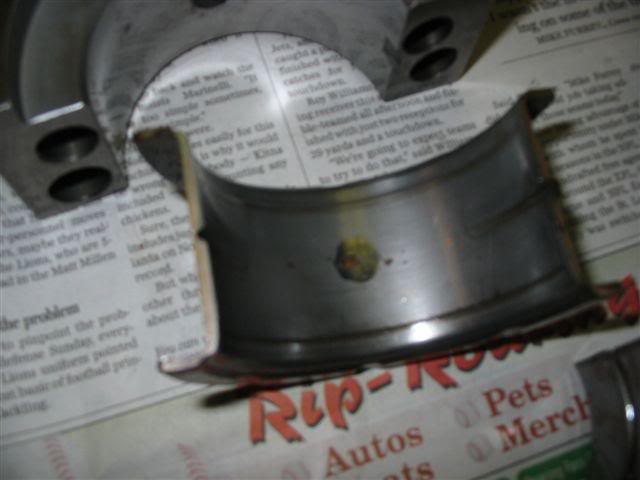
Fast forward a while, and Katch told me that the engine had a couple problems. One was that the guy I bought the engine from had used a ARP stud for the oil pump, but it was too long. It was so long in fact, that it had pushed down into the main bearing and had nearly wore a hole through the bearing material! Well, I guess we found the resistance in turning the engine over... Kind of depressing at the time, but I was glad we found the issue. Better than a big groove worn into the crank.
Oops!

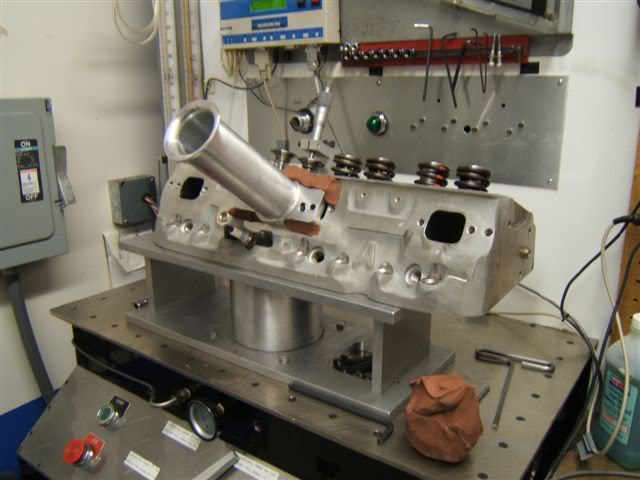
The other problem they discovered was that the AFR 220 heads required either offset rockers or a stud girdle and guideplates.

Got some new T&D shaft mount rockers and that solved that problem. The last thing done at the time was different set of pistons and I had the heads flowed.
I pulled the SRP pistons in favor of some Diamonds. I figured for huge boost they would be some good insurance. Katech then screwed it all back together again and we had it reinstalled.

First off, I bought this car back when I had the idea to turn my previous 4th gen ('95 6 speed hard top) into a car like this right before moving from one state to another. I bought the car because it had most of the parts I wanted, and the previous owner was going to sell it as is or part it out. For a short while I had almost two of everything, but sold a lot of it off here on the board or ebay, etc. Oh, and I bought the car right when I was going to move from Michigan to Illinois.
I didn't know specifically what I wanted to make and felt the previous owner had amassed a decent collection of parts, so I wanted to finish it up and go from there. The car needed some wiring work, exhaust, go to a large FMIC and a few other odds and ends. I also wanted to ditch the stock PCM, and go to a BS3. I dropped it off in a shop in the Detroit area who had a good reputation on another board I frequent and they began the work. Things were progressing, albeit very slowly, and then I got a phone call one day telling me that they had all the plugs out of the engine and were turning it over, they felt it had a lot of resistance and should have the engine looked at. The catch was that they were too busy to pull the engine, but recommended a shop that they worked with that could use the work and had the time to take care of it. Another bonus was that Katch was close by and they would be able to tear the engine down and check it over. Keep in mind that the engine was supposed to be brand new, so I was hopeful that it was something minor.
Fast forward a while, and Katch told me that the engine had a couple problems. One was that the guy I bought the engine from had used a ARP stud for the oil pump, but it was too long. It was so long in fact, that it had pushed down into the main bearing and had nearly wore a hole through the bearing material! Well, I guess we found the resistance in turning the engine over... Kind of depressing at the time, but I was glad we found the issue. Better than a big groove worn into the crank.
Oops!
The other problem they discovered was that the AFR 220 heads required either offset rockers or a stud girdle and guideplates.
Got some new T&D shaft mount rockers and that solved that problem. The last thing done at the time was different set of pistons and I had the heads flowed.
I pulled the SRP pistons in favor of some Diamonds. I figured for huge boost they would be some good insurance. Katech then screwed it all back together again and we had it reinstalled.
Thread Starter
Super Moderator
Joined: Feb 2000
Posts: 2,026
From: Japan
I forgot to mention above, that about the time that Katech had the engine done, the shop the car was at was closing. Turns out the guy that ran the place was going to go work for Katech. I went to another shop who also came highly recommended, they came and picked up the car and re-installed the engine. There was an issue then getting it running though, the converted opti wasn't working as planned, and it took a fair amount of trouble shooting, emails with John Meaney and others to get it worked out. We also added the race-pak dash, and some other things I'm forgetting at the moment.
Once we got the engine running, it was time to dyno. Off to the dyno it went, up on the rollers and it made a couple pulls. The tuner said it was running hot, and it leaked coolant. After some searching, it appeared the engine was leaking coolant out from the head studs. I gave Katech a call and they went and looked at the car. They suggested adding some Moroso ceramic sealer to the engine to try to seal the studs off, since head stud seepage isn't uncommon with SBC style engines. The sealer was added, and the engine was heat cycled a few times. Needless to say, it didn't work.
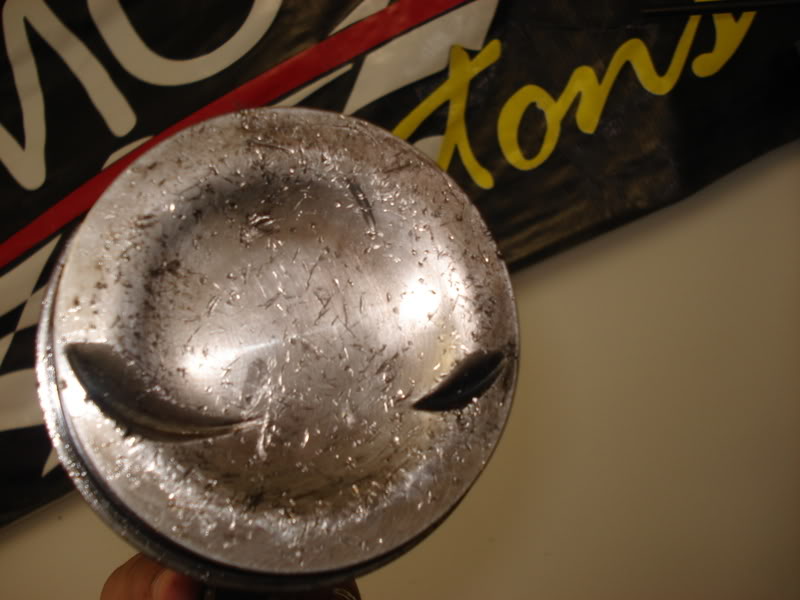
Katech then offered to pull the engine and fix the problem, which was a nice gesture. I was a little surprised, but felt that since I paid them an assload to do the engine, they were doing me some good customer service. They pulled the heads and found that the pistons were all torched around the tops and at the ring lands. They said they could do a hardness check on them, and if they weren't soft, they would chuck them up in their lathe and turn them down a whisker, along with some new head gaskets. They buttoned up the engine and then gave it back. This time they used some special epoxy on the head studs that they had good luck with from their C5 race program. I had my fingers crossed this would end the problems.
Re-installed the engine, and this time we put in a new electric water pump and switched to some different electric fans. Started it back up and got it back to the dyno. Sure enough, the studs leaked again. WTF! Had the engine pulled AGAIN. This time we switched to some ARP bolts in hope that this would cure the issue. We also ditched the Cometic head gaskets in favor of Felpros. Katech basically then told me that they didn't feel like doing anything more for the engine.
Finally got things about ready again, and we were at the dyno. This time I drove up to MI to be at the dyno event and brought a buddy with a truck and trailer to bring the car home. I actually got to drive the car this time from the shop to the dyno, but I noticed that it was doing some backfiring and popping. Strange, but I figured the tuning would take care of it.
Got the car up on the rollers and made a couple pulls, noticed that the car was smoking a fair amount, so we checked the oil and decided that we would drain the oil and refill it in case it was overfull. Got that done and made one more pull. POW! The car backfired, made a sick noise and then died.
Pushed the car off the dyno and then started pulling spark plugs to diagnose it. Got to one of them and saw that the electrode was all pushed over to the side. At that time I didn't know if it was an issue with assembly, or what, so I left the car there. I figured that I would give Katech a chance to tear it down again, or if someone else did it and found it was their problem, they would fix it. I drove back to IL empty handed...
Got a new engine builder and he tore the motor down. Found a couple pistons pretty banged up, and the head deck was pecked up from something being ingested in the engine and banging around in there. We never did figure out what it was, but it looks like it could have been something that flaked off from the intake runner, who knows.

Once we got the engine running, it was time to dyno. Off to the dyno it went, up on the rollers and it made a couple pulls. The tuner said it was running hot, and it leaked coolant. After some searching, it appeared the engine was leaking coolant out from the head studs. I gave Katech a call and they went and looked at the car. They suggested adding some Moroso ceramic sealer to the engine to try to seal the studs off, since head stud seepage isn't uncommon with SBC style engines. The sealer was added, and the engine was heat cycled a few times. Needless to say, it didn't work.
Katech then offered to pull the engine and fix the problem, which was a nice gesture. I was a little surprised, but felt that since I paid them an assload to do the engine, they were doing me some good customer service. They pulled the heads and found that the pistons were all torched around the tops and at the ring lands. They said they could do a hardness check on them, and if they weren't soft, they would chuck them up in their lathe and turn them down a whisker, along with some new head gaskets. They buttoned up the engine and then gave it back. This time they used some special epoxy on the head studs that they had good luck with from their C5 race program. I had my fingers crossed this would end the problems.
Re-installed the engine, and this time we put in a new electric water pump and switched to some different electric fans. Started it back up and got it back to the dyno. Sure enough, the studs leaked again. WTF!
Had the engine pulled AGAIN. This time we switched to some ARP bolts in hope that this would cure the issue. We also ditched the Cometic head gaskets in favor of Felpros. Katech basically then told me that they didn't feel like doing anything more for the engine.Finally got things about ready again, and we were at the dyno. This time I drove up to MI to be at the dyno event and brought a buddy with a truck and trailer to bring the car home. I actually got to drive the car this time from the shop to the dyno, but I noticed that it was doing some backfiring and popping. Strange, but I figured the tuning would take care of it.
Got the car up on the rollers and made a couple pulls, noticed that the car was smoking a fair amount, so we checked the oil and decided that we would drain the oil and refill it in case it was overfull. Got that done and made one more pull. POW! The car backfired, made a sick noise and then died.
Pushed the car off the dyno and then started pulling spark plugs to diagnose it. Got to one of them and saw that the electrode was all pushed over to the side. At that time I didn't know if it was an issue with assembly, or what, so I left the car there. I figured that I would give Katech a chance to tear it down again, or if someone else did it and found it was their problem, they would fix it. I drove back to IL empty handed...
Got a new engine builder and he tore the motor down. Found a couple pistons pretty banged up, and the head deck was pecked up from something being ingested in the engine and banging around in there. We never did figure out what it was, but it looks like it could have been something that flaked off from the intake runner, who knows.

Registered User
Joined: Sep 2002
Posts: 616
From: Piscataway, NJ USA
First off beautiful car. I have a vert myself and really like what you have done to the car. Sounds like things cousin have gone a bit smoother and sucks you have gone through all this. From your comments, looks like you are wrapping everything up.
Good luck and looking forward to the final numbers.
Good luck and looking forward to the final numbers.
Thread Starter
Super Moderator
Joined: Feb 2000
Posts: 2,026
From: Japan
First off beautiful car. I have a vert myself and really like what you have done to the car. Sounds like things cousin have gone a bit smoother and sucks you have gone through all this. From your comments, looks like you are wrapping everything up.
Good luck and looking forward to the final numbers.
Good luck and looking forward to the final numbers.
I restored my old post in the "2009 - Boosted LTXs Rollcall!!" thread that's stickied at the top. It's post #4. There's more detail on the car in there. Maybe it's time to change the name to 2010?
https://www.camaroz28.com/forums/sho...13&postcount=4


Thread Starter
Super Moderator
Joined: Feb 2000
Posts: 2,026
From: Japan