
4L60E,4l65e,4l70e,TECH THREAD,CODES,DIAGRAMS,HOW TOOS ETC.

Thread Starter
Supporting Vendor
Joined: Oct 2006
Posts: 1,014
From: BLOOMSBURG PA
TRANSMISSION RELATED OBD2 CODES AND EXPLANATIONS
* P1812 - Transmission Over Temperature Condition
* P1813 - Torque Control
* P1814 - Torque Converter Overstressed
* P1815 - Transmission Range Switch - Start In Wrong Range
* P1816 - TFP Valve Position Sw. - Park/Neu. With Drive Ratio
* P1817 - TFP Valve Position Sw. - Reverse With Drive Ratio
* P1818 - TFP Valve Position Sw. - Drive Without Drive Ratio
* P1819 - Internal Mode Switch - No Start\Wrong Range
* P1820 - Internal Mode Switch Circuit A Low
* P1822 - Internal Mode Switch Circuit B High
* P1823 - Internal Mode Switch Circuit P Low
* P1825 - Internal Mode Switch - Invalid Range
* P1826 - Internal Mode Switch Circuit C - High
* P1831 - Pressure Control (PC) Solenoid Power Circuit - Low Voltage
* P1832 - Pressure Control (PC)/Shift Lock Solenoid Control Circuit High Voltage
* P1833 - A/T Solenoids Power Circuit - Low Voltage
* P1834 - Torque Converter Clutch (TCC)/Shift Solenoid (SS) Control Circuit High Voltage
* P1835 - Kick-Down Switch Circuit
* P1836 - Kick-Down Switch Failed Open
* P1837 - Kick-Down Switch Failed Short
* P1842 - 1-2 Shift Solenoid Circuit Low Voltage
* P1843 - 1-2 Shift Solenoid Circuit High Voltage
* P1844 - Torque Reduction Signal Circuit Desired By TCM
* P1845 - 2-3 Shift Solenoid Circuit Low Voltage
* P1847 - 2-3 Shift Solenoid Circuit High Voltage
* P1850 - Brake Band Apply Solenoid Circuit
* P1851 - Brake Band Apply Solenoid Performance
* P1852 - Brake Band Apply SolenoidLow Voltage
* P1853 - Brake Band Apply Solenoid High Voltage
* P1860 - TCC PWM Solenoid Circuit Electrical
* P1864 - Torque Converter Clutch Circuit
* P1865 - 4-5 Shift Solenoid (SS) Valve Control Circuit High Voltage
* P1866 - Torque Converter Clutch (TCC) Pulse Width Modulation (PWM) Solenoid Control Circuit Low Voltage
* P1867 - Torque Converter Clutch (TCC) Pulse Width Modulation (PWM) Solenoid Control Circuit High Voltage
* P1868 - Transmission Fluid Life
* P1870 - Transmission Component Slipping
* P1871 - Undefined Gear Ratio
* P1873 - TCC Stator Temp. Switch Circuit Low
* P1874 - TCC Stator Temp. Switch Circuit High
* P1875 - 4WD Low Switch Circuit Electrical
* P1884 - TCC Enable/Shift Light Circuit
* P1886 - Shift Timing Solenoid
* P1887 - TCC Release Switch Circuit
* P1890 - ECM Data Input Circuit
* P1890 - Throttle Position Signal Input
* P1891 - Throttle Position Sensor PWM Signal Low
* P1892 - Throttle Position Sensor PWM Signal High
* P1893 - Engine Torque Signal Low Voltage
* P1894 - Engine Torque Signal High Voltage
* P1895 - TCM to ECM Torque Reduction Circuit
* P2008 - Intake Manifold Runner Control (IMRC) Solenoid Control Circuit
* P2009 - Intake Manifold Runner Control (IMRC) Solenoid Control Circuit Low Voltage
* P2010 - Intake Manifold Runner Control (IMRC) Solenoid Control Circuit High Voltage
* P2066 - Fuel Level Sensor 2 Performance
* P2067 - Fuel Level Sensor 2 Circuit Low Voltage
* P2068 - Fuel Level Sensor 2 Circuit High Voltage
* P2096 - Post Catalyst Fuel Trim System Low Limit
* P2097 - Post Catalyst Fuel Trim System High Limit
* P2098 - Post Catalyst Fuel Trim System Low Limit
* P2099 - Post Catalyst Fuel Trim System High Limit
* P2100 - Throttle Actuator Control (TAC) Motor Control Circuit
* P2101 - Control Module Throttle Actuator Position Performance
* P2105 - Throttle Actuator Control (TAC) System - Forced Engine Shutdown
* P2107 - Throttle Actuator Control (TAC) Module Internal Circuit
* P2108 - Throttle Actuator Control (TAC) Module Performance
* P2119 - Throttle Closed Position Performance
* P2120 - Accelerator Pedal Position (APP) Sensor 1 Circuit
* P2121 - Accelerator Pedal Position (APP) Sensor 1 Performance
* P2122 - Accelerator Pedal Position (APP) Sensor 1 Circuit Low Voltage
* P2123 - Accelerator Pedal Position (APP) Sensor 1 Circuit High Voltage
* P2125 - Accelerator Pedal Position (APP) Sensor 2 Circuit
* P2127 - Accelerator Pedal Position (APP) Sensor 2 Circuit Low Voltage
* P2128 - Accelerator Pedal Position (APP) Sensor 2 Circuit High Voltage
* P2135 - Throttle Position (TP) Sensor 1-2 Correlation
* P2138 - Accelerator Pedal Position (APP) Sensor 1-2 Correlation
* P2176 - Minimum Throttle Position Not Learned
* P2500 - Generator L-Terminal Circuit Low Voltage
* P2501 - Generator L-Terminal Circuit High Voltage
* P2535 - Ignition 1 Switch Circuit High Voltage (PCM)
* P2610 - ECU Malfunction
* P2763 - Short to voltage in the TCC Solenoid
* P2764 - Open or Short to ground in the TCC PWM solenoid valve circuit
* P2A00 - HO2S Circuit Closed Loop (CL) Performance Bank 1 Sensor 1 (PCM)
* P2A01 - HO2S Circuit Closed Loop (CL) Performance Bank 1 Sensor 2 (PCM)
* P3000 - Hacking AWH Data
Last edited by Performabuilt; May 14, 2009 at 05:27 PM.
Thread Starter
Supporting Vendor
Joined: Oct 2006
Posts: 1,014
From: BLOOMSBURG PA
Some Ideas For Tuning With A Stall Or Without
--------------------------------------------------------------------------------
First the best idea instead of listening to me is to take the car to and experienced tuner and let them do what they do. IMO
However since I get many calls about certain things, Here are a few things you should always do.
1-turn off the test for the codes po751 and po757 this will help avoid the limp mod after stall up or driving with a high stall converter.
2-Set lockup to happen only in 4th gear and above 40 mph .IMO
3-Set lockup so it cuts out under throttle way before the trans does a down shift. A down shift with lockup on can break hard parts in particular the input drum and shaft.
4-set the TCC duty cycle min and max at there highest setting though with our unit this would serve no purpose since we have mechanically set it to always be max. In any case this will help to prolong the life of the lockup clutch by reducing slipping.
5-Always with a built trans ours for sure set the line pressure tables at stock. Using tuning to raise line IMO is not the right way to get a firmer shift and has little or no affect on WOT shifts anyway.
6-shift points can be set wherever you like however remember that there is a delay mechanically from command to shift and this will vary with transmission condition, I have found from talking with customers that allowing 200 rpm for the 1-2 and 300 rpm for the 2-3 seems to work out in most cases. However the more power you make the more room you may need as the time for the trans to make the shift is a constant but as power increases the RPM rise is faster so more time is required. EXAMPLE" N/A verses SPRAYED.
For instance where it might take 200 rpm to make the shift N/A it might take 300 with a 150 shot. Also remember that RPM cannot be used as a stand alone to set shift points MPH comes into play also and additionally the KICK DOWN - speeds and throttle percentage also come into play I am told and affect the WOT up shift as well.
Now bear in mind I am not a tuner and these are actually things I have learned from actual tuners and customers doing there own tuning after solving different issues.
I do however have a copy of EFI LIVE I keep on my computer so I can at least use it to try and understand what I am told and read.
Thread Starter
Supporting Vendor
Joined: Oct 2006
Posts: 1,014
From: BLOOMSBURG PA
Found this on another forum posted as a single thread but wanted to have in this thread for easy reference also
PO121 CODE OR QUICK SHIFT 1-2-3-4 at WOT by 40 MPH FIX
Found this info on another forum and I know many people have popped up with this issue and wanted a fix. This would appear to be it. Hope it helps someone.
The curse of the P0121 Code... This code is infamous for giving people with larger cams fits...everything from traction control troubles, to shift point issues to just the good ole' P0121 code showing up for seemingly no reason making people scramble to purchase new Throttle Position sensors, adjust their set screws, etc, etc.
Before I go any further have a gander at the DTC information provided by LS2.com
http://www.ls2.com/boggs/dtcs/DTC%20P0121.htm
To outline a few key points
Quote:
The MAP is greater than 65 kPa
Quote:
The predicted throttle angle does not match the actual throttle angle
Quote:
All conditions present for 20 seconds
Now, that 65kpa map figure comes into play in nearly every LS1 Car/Truck because its the max map setting in most of the calibrations for the sanity test as shown here

Under normal circumbstances a stock cammed A4 will probably idle at around 35-40 map. When switching to a larger cam with more overlap your map readings could go up to as high as 70 or more kpa map which is way outside of the normal boundries. On a stock cammed car you'd probably need to be at around 30% tps to hit that same map number which is where that predicted throttle angle quote comes into play.
Now onto the last quote the 20 second timeframe. This will Usually come into play more often than not at idle with large cammed vehicles because many times your steady state map will be within the map sanity guidelines so there is a good possibity you might not see this code pop up immediatly.
There are a few ways you can cure this issue
a. Do as suggested in the help file which is to just set the min to 0 & max to 100
b. Adjust them to YOUR liking so you'll be within a reasonable limit. This will help determine if there IS a real issue with your TPS sensor later down the line.
So there you have it, as good an explanation I can come up with for that bastard code. So the next time you go WOT in your auto LS1 with a large cam & you go from 1st to 4th by 40mph or just a nagging p0121 code for no obvious reason you now have the info needed to fend it off.
PO121 CODE OR QUICK SHIFT 1-2-3-4 at WOT by 40 MPH FIX
Found this info on another forum and I know many people have popped up with this issue and wanted a fix. This would appear to be it. Hope it helps someone.
The curse of the P0121 Code... This code is infamous for giving people with larger cams fits...everything from traction control troubles, to shift point issues to just the good ole' P0121 code showing up for seemingly no reason making people scramble to purchase new Throttle Position sensors, adjust their set screws, etc, etc.
Before I go any further have a gander at the DTC information provided by LS2.com
http://www.ls2.com/boggs/dtcs/DTC%20P0121.htm
To outline a few key points
Quote:
The MAP is greater than 65 kPa
Quote:
The predicted throttle angle does not match the actual throttle angle
Quote:
All conditions present for 20 seconds
Now, that 65kpa map figure comes into play in nearly every LS1 Car/Truck because its the max map setting in most of the calibrations for the sanity test as shown here
Under normal circumbstances a stock cammed A4 will probably idle at around 35-40 map. When switching to a larger cam with more overlap your map readings could go up to as high as 70 or more kpa map which is way outside of the normal boundries. On a stock cammed car you'd probably need to be at around 30% tps to hit that same map number which is where that predicted throttle angle quote comes into play.
Now onto the last quote the 20 second timeframe. This will Usually come into play more often than not at idle with large cammed vehicles because many times your steady state map will be within the map sanity guidelines so there is a good possibity you might not see this code pop up immediatly.
There are a few ways you can cure this issue
a. Do as suggested in the help file which is to just set the min to 0 & max to 100
b. Adjust them to YOUR liking so you'll be within a reasonable limit. This will help determine if there IS a real issue with your TPS sensor later down the line.
So there you have it, as good an explanation I can come up with for that bastard code. So the next time you go WOT in your auto LS1 with a large cam & you go from 1st to 4th by 40mph or just a nagging p0121 code for no obvious reason you now have the info needed to fend it off.
Thread Starter
Supporting Vendor
Joined: Oct 2006
Posts: 1,014
From: BLOOMSBURG PA
HOW TO REMOVE PO757 WITH HP TUNERS
Go to VCM Editor
>Open you Bin file
>Go to Eng. Diagnostics
>Go to DTCs
>Scroll to p0757 or PO751
>leave enable box blank
>Next to that box you'll see 1 of these 4 settings
0-MIL on first error
1-MIL on second error
2-No MIL light
3-No error reported
> click on # 3 (no error reported)
>Flash PCM
Go to VCM Editor
>Open you Bin file
>Go to Eng. Diagnostics
>Go to DTCs
>Scroll to p0757 or PO751
>leave enable box blank
>Next to that box you'll see 1 of these 4 settings
0-MIL on first error
1-MIL on second error
2-No MIL light
3-No error reported
> click on # 3 (no error reported)
>Flash PCM
Last edited by Performabuilt; May 14, 2009 at 05:28 PM.
Thread Starter
Supporting Vendor
Joined: Oct 2006
Posts: 1,014
From: BLOOMSBURG PA
How gears and power adders affect shift timing and performance in tuning
First you must understand that when speaking of and auto trans at WOT"Max line pressure" the time from command to shift is a constant regardless of power it will remain the same, The trans when commanded to shift must either make the shift or slip. It cannot just say no .
.
Now there is however something that does change with lower gears sets and power adders that must be considered. RPM-Since both power adder and lower ratio change the rate at which RPM rise it must be taken into consideration. Since the shift time is a constant if the RPM rises at a faster rate more time must be allowed between desired and actual shift, Which is why for instance with ratio changes simply changing the ratio in the PCM may not be enough to stop the bouncing the rev limiter. Consideration must be allowed to the faster RPM increase this would also have to be considered with power adders such as N2O which is why you will hear people say that there trans shifts perfect N/A but hots the limiter on N2O.
And example and these numbers are random just for explanation. Lets say that with a 2.73 gear ratio it takes 200 RPM to complete a shift from command to actual (6200 commanded-6400 actual) with lets say 4.10 gears it may take 400-500 rpm and possibly more to complete the same shift(6200 commanded-6800 actual) Now if in addition you have a power adder like N2O this could e pushed even further not because the trans cant make the shift but again because the RPM are increasing at a greater rate in the given amount of time.
So when making gear ratio changes or power adding this must always be considered.
Also of note generally more time must be allowed for the 2-3 than for the 1-2 shift , The reason is on the 60e the shift to 2nd is very simple fluid is sent to the intermediate servo it moves and applies pressure to the band stopping the REVERSE INPUT DRUM and creating second gear where on the 2-3 shift more is o curing. Fluid must travel to both the 3-4 clutch set and simultaneously be fed to the back side of the servo to release the 2-4 band. So basically you have two chambers being filled at the same time with a given amount of fluid so it takes longer to complete this shift.
Additionally you may also note a small difference in the shift timing in D3 over D4 on the 2-3. Again in D3 something is different the OVERUN CLUTCH is also turned on during the 2-3 shift in this position so now you have 3 components being moved by a given amount of fluid further increasing the time from command to actual shift. This also must be considered when allowing the car to auto shift in the D3 position from second to third gear and would need to be allowed for.
Now all this time may e measured in 10th or 100th of a second but can make a considerable difference when trying to set a shift point near the rev limiter
Hope this information is use full for someone
Frank at PerformaBuilt
.Now there is however something that does change with lower gears sets and power adders that must be considered. RPM-Since both power adder and lower ratio change the rate at which RPM rise it must be taken into consideration. Since the shift time is a constant if the RPM rises at a faster rate more time must be allowed between desired and actual shift, Which is why for instance with ratio changes simply changing the ratio in the PCM may not be enough to stop the bouncing the rev limiter. Consideration must be allowed to the faster RPM increase this would also have to be considered with power adders such as N2O which is why you will hear people say that there trans shifts perfect N/A but hots the limiter on N2O.
And example and these numbers are random just for explanation. Lets say that with a 2.73 gear ratio it takes 200 RPM to complete a shift from command to actual (6200 commanded-6400 actual) with lets say 4.10 gears it may take 400-500 rpm and possibly more to complete the same shift(6200 commanded-6800 actual) Now if in addition you have a power adder like N2O this could e pushed even further not because the trans cant make the shift but again because the RPM are increasing at a greater rate in the given amount of time.
So when making gear ratio changes or power adding this must always be considered.
Also of note generally more time must be allowed for the 2-3 than for the 1-2 shift , The reason is on the 60e the shift to 2nd is very simple fluid is sent to the intermediate servo it moves and applies pressure to the band stopping the REVERSE INPUT DRUM and creating second gear where on the 2-3 shift more is o curing. Fluid must travel to both the 3-4 clutch set and simultaneously be fed to the back side of the servo to release the 2-4 band. So basically you have two chambers being filled at the same time with a given amount of fluid so it takes longer to complete this shift.
Additionally you may also note a small difference in the shift timing in D3 over D4 on the 2-3. Again in D3 something is different the OVERUN CLUTCH is also turned on during the 2-3 shift in this position so now you have 3 components being moved by a given amount of fluid further increasing the time from command to actual shift. This also must be considered when allowing the car to auto shift in the D3 position from second to third gear and would need to be allowed for.
Now all this time may e measured in 10th or 100th of a second but can make a considerable difference when trying to set a shift point near the rev limiter
Hope this information is use full for someone
Frank at PerformaBuilt
Thread Starter
Supporting Vendor
Joined: Oct 2006
Posts: 1,014
From: BLOOMSBURG PA
OBD1 GM-1 TROUBLE CODES DTC
13
Oxygen sensor circuit wiring/connection
55
Lean fuel monitor
14
Coolant sensor high temp. indicated
58
Trans Fluid high temp. indicated
15
Coolant sensor low temp. indicated
59
Trans Fluid low temp. indicated
16
Ignition low resolution pulse not detected
61
Low R134A pressure indicated
21
TPS signal voltage high -REPLACE TPS MAKE SURE PLUGGED IN (THROTTLE POSITION SENSOR)
63
Right heated O2 sensor lean indicated
22
TPS signal voltage low-REPLACE TPS (THROTTLE POSITION SENSOR)
64
Right bank O2 sensor lean indicated
23
IAT sensor low temp. indicated
65
Right bank O2 sensor rich indicated
24
VSS fault, no pulse indicated-REPLACE VSS (VEHICLE SPEED SENSOR)
66
A/C pressure sensor low pressure
25
IAT sensor high temp. indicated.
67
A/C pressure sensor circuit fault
26
EVAP purge control solenoid circuit.
27
EGR vacuum solenoid circuit
68
A/C relay fault
28
Transmission range control circuit-REPLACE MPS SENSOR IN TRANS (MANIFOLD PRESSURE SENSOR)
69
A/C relay fault
29
Secondary air injection circuit
70
A/C high pressure indicated
32
EGR failure
71
A/C evap sensor low temp indicated
33
MAP sensor signal high
72
VSS signal circuit error
34
MAP sensor signal low
73
Trans. pressure solenoid current surge-REPLACE PCS (PRESSURE CONTROL SOLENOID)
36
Ignition faulty high resolution signal
74
Traction control system
37
TCC brake switch stuck ON-CHECK BRAKE SWITCH UNDER DASH
75
Transmission system low voltage-CHECK ALTERNATOR OUT PUT AND BATTERY CONNECTIONS
38
TCC brake switch stuck OFF-CHECK BRAKE SWITCH UNDER DASH
77
Cooling fan relay control
39
Clutch switch error
79
Trans. temp sensor high temp. indicated
41
No ignition control circuit
80
Trans. component harness fault-CHECK THAT HARNESS PLUGGED INTO TRANS AND NO PINCHED OR BROKEN WIRES
42
Ignition control module circuit
81
Trans 2-3 shift solenoid circuit-REPLACE 2-3 SHIFT SOLENOID
43
Knock sensor wiring open or shorted
82
Trans 1-2 shift solenoid circuit-REPLACE THE 2-3 SHIFT SOLENOID
44
Lean exhaust detected
83
reverse switch inhibit circuit
45
Rich exhaust detected
84
Skip shift or 3-2 shift solenoid circuit-REPLACE THE 3-2 SHIFT SOLENOID
46
VATS pass key circuit fault
85
TCC stuck ON-REPLACE THE TCC SOLENOID AND CHECK VALVE ABOVE IT (TORQUE CONVERTER CLUTCH SOLENOID)
47
Knock sensor module or circuit
90
TCC solenoid circuit fault-REPLACE TCC SOLENOID
91
Skip shift lamp circuit
48
MAF sensor circuit
97
VSS output signal voltage low-REPLACE THE VSS (VEHICLE SPEED SENSOR)
50
System voltage low
99
TACH output circuit
51
PROM/EEPROM error
53
System voltage high-CHECK ALTERNATOR OUTPUT VOLTAGE
Last edited by Performabuilt; May 14, 2009 at 05:28 PM.
Thread Starter
Supporting Vendor
Joined: Oct 2006
Posts: 1,014
From: BLOOMSBURG PA
Some thoughts on tuning and power adders
Bear in mind that while the shift may be commanded at 5100 it could indeed take to 6200 for the trans to make the shift . You see while the electronics are instant hydraulics are not and several things come into play.
One thing is a constant at WOT it always takes the same amount of time for the trans to complete the shift. This time will of course vary from trans to trans depending on condition, Shift kit set up. Line presure.
What does change is the rate the RPM are climbing under various conditions. These numbers are off but bear with me.
Lets say it takes 1 second to complete a shift from 1-2 and at 340 hp NA the RPM climb 300. Ok same time period at 600 hp the rpm might climb 600 RPM during the same period. Other variables would be for instance gear ratio and engine with 4.10 gears behind it is going to climb in RPM much faster that lets say a 3.23 would so then again you might have another 300 or more increase in the RPM during the same time frame between the two gears.I think this is why many times you hear of people boucing limiter after going to lower gears even though they did set up the PCM for the hear change. They failed to compensate for the RPM rate increase. With the stock converter and stock power the PCM can adapt but once you get outside those it cannot do so on its own. Add a shot and the RPM rate increases again even though the time for the trans to shift is still a constant.
I think this is why you hear so many people talk about bouncing the rev after mods they changed something wether it be power or gearing that changes the rate of the rise and fail to realize that all of these things have to be compensated for. Its not as simple as I want it to shift at 6000 rpm and set it that way because to acheive and actual shift at 6000 RPM where you would actually have to command the shift would be different for virtually any mods you make that can affect the rate the RPM rise during the shift.
So realistically every car would be different depending on the POWER/GEAR RATIO/SPRAY.
Then a converter with a high stall is still a further complication and the RPM due to the slip in the converter may be higher that expected for the MPH and this again would vary again with the addition of power adders such as Nitrous or even rear end would affect this too.
So the conclusion I have come to is there can be no one size fits all when it comes to tuning for shifts it would be unique to each set up. A car with 4.10 might take 500-800 or whatever to complete and shift and a 2.73 car might do it in 200-400 and power adders change these numbers around more. So its kinda a trial and error system I would conclude would have to be used.
Also you have to beware looking at the shift completion times with the 4l6x units since the PCM uses the engine rpm verse output speed to determine when the shift did happen and with a stall these numbers can be way off so are useless. The exception would be the late 4lxx with the input speed senor 07 up with these you would get a true time since the converter is not part of the equation.This would be true of the 4l80e also since it does have input speed sensor.
Ramble over lol
Thread Starter
Supporting Vendor
Joined: Oct 2006
Posts: 1,014
From: BLOOMSBURG PA
Crankshaft Thrust Bearing Failure: Causes and Remedies
Although thrust bearings run on a thin film of oil, just like radial journal (connecting rod and main) bearings, thrust bearings can't support nearly as much load. While radial bearings can carry loads measured in thousands of pounds per square inch of projected bearing area, thrust bearings can only support loads of a few hundred pounds per square inch. Radial journal bearings develop their higher load capacity from the way the curved surfaces of the bearing and journal meet to form a wedge. Shaft rotation pulls oil into this wedge-shaped area of the clearance space to create an oil film which actually supports the shaft.
Thrust bearings typically consist of two flat mating surfaces, with no natural wedge shape in the clearance space to allow an oil film to form, and support the load.
Conventional thrust bearings are made by adding flanges at the ends of a radial journal bearing. This provides ease in assembly and has been used successfully for many years. Both teardrop or through grooves on the flange face, and wedge shaped ramps at each parting line, allow oil to enter between the shaft and bearing surfaces.
But the surface of the shaft and the vast majority of bearing surfaces are flat. This flatness makes it more difficult to create and maintain an oil film. For example, suppose two gauge blocks had a thin film of oil on them. If you were to press them together with a twisting action, the blocks would stick together.
This is similar to what happens when a thrust load is applied to the end of a crankshaft: Oil squeezes out from between the shaft and bearing surfaces. If there's too much load, the oil film collapses and the surfaces want to stick together, which causes a wiping action, and ultimately, bearing failure.
This is why many heavy-duty diesel engines use separate thrust washers, each with a contoured face: to enable them to support higher thrust loads. These thrust washers either have multiple tapered ramps and relatively small flat pads, or they have curved surfaces that follow a sine-wave contour around the outer edge.
Recent Developments
In the past few years, some new automotive engine designs have included contoured thrust bearings. This change enables them to carry higher thrust loads imposed by some of the newer automatic transmissions. Since it's impractical to use contoured faces on one-piece flanged thrust bearings, these new engine designs use either separate thrust washers, or a flanged bearing, which is a three-piece assembly.
Cause of Failure
Aside from the obvious causes, such as dirt contamination and misassembly, there are only three common factors which generally cause thrust bearing failures:
- Poor crankshaft surface finish
- Misalignment
- Overloading
Crankshaft thrust faces are difficult to grind because they are done using the side of the grinding wheel. Grinding marks left on the crankshaft face produce a visual swirl, or sunburst pattern. The scratches sometimes crisscross one another in a cross-hatch pattern similar to hone marks on a cylinder wall.
If these grinding marks are not completely removed by polishing, they will remove the oil film from the surface of the thrust bearing, much like multiple windshield wiper blades. A properly-finished crankshaft thrust face should have only very fine polishing marks that go around the thrust surface in a circular pattern.
Alignment
Under normal circumstances, a remanufactured crankshaft does not require grinding of the thrust face surfaces. There are, however, situations where grinding is necessary. One is the automatic oversize of a thrust flange main bearing, required by using undersized crankshaft main journals.
A second occurs when thrust surface wear (front and rear) is beyond allowable specifications. This situation often requires an oversize thrust flange bearing or washer, if one is available for that application. Under these conditions, the thrust face of the crankshaft will require oversize grinding. In this case, crankshaft end float should be calculated and determined prior to grinding additional material from the thrust face.
Grinding the thrust face of the crankshaft presents a challenge, because the crankshaft remanufacturer has to use the side of the grinding wheel, which is not specifically designed for metal surface removal.
In addition, keeping enough coolant between the thrust surface and the wheel (just as keeping oil for lubrication within the engine) is difficult, and that combination creates a danger of wheel loading and burn spots. The result: an inconsistent thrust surface. To avoid this situation, the grinding wheel must be dressed periodically, to maintain a 90� angle, perpendicular to the centerline of the grinding wheel. This transfers to the same 90� angle between the thrust surface and the centerline of the crankshaft.
During the grinding process, the grinding wheel must feed into the thrust face very slowly and be allowed to spark out completely. If the grinding wheel does not cut cleanly, it may create hot spots on the crankshaft, leading to a wavy, out-of-flat surface. It is important to avoid excessive grinding of the thrust surface; this procedure is intended primarily for surface clean up.
When Assembling Thrust Bearings:
- Tighten the main cap bolts to about 10 to 15 ft-lbs in order to seat the bearings; then loosen the cap bolts.
- Tap the main cap toward the rear of the engine with a soft faced hammer.
- Thread the main cap bolts in finger tight.
- Use a bar to force the crankshaft as far forward in the block as possible, to align the bearing rear thrust faces.
- While holding the crankshaft forward, tighten the main cap bolts to 10 to 15 ft-lbs.
- Complete tightening the main cap bolts to specifications in two or three equal steps.
Loading
A number of factors may contribute to wear and overloading of a thrust bearing, such as:
- Poor crankshaft surface finish
- Too much torque converter pressure.
- Improper clutch release bearing adjustment.
- Riding the clutch pedal.
- Excessive crankshaft load pressure due to a malfunctioning front-mounted accessory drive.
- Poor crankshaft surface geometry
- External overloading due to:
Note: There are other, commonly-thought issues such as torque converter ballooning, the wrong flexplate bolts, the wrong torque converter, the pump gears being installed backward or the torque converter not installed completely. Although all of these problems will cause undue force on the crankshaft thrust surface, it will also cause the same force on the pump gears, since all of these problems will put equal force in both directions from the torque converter. So any of these conditions should also cause serious pump damage very quickly (within minutes or hours).
Diagnosing the Problem By the time a thrust bearing failure becomes evident, the parts have usually been so severely damaged there's little if any evidence of the cause. The bearing is generally worn into the steel backing, which has severely worn the crankshaft thrust face as well. The following is a list of factors to consider while diagnosing the cause.
Engine-Related Problems
Is there evidence of distress anywhere else in the engine that would indicate a lubrication problem or foreign particle contamination?
Were the correct bearing shells installed, and were they installed correctly?
If the thrust bearing is in an end position, was the adjacent oil seal installed correctly? An incorrectly installed rope seal can cause enough heat to affect bearing lubrication.
Examine the front thrust face on the crankshaft for surface finish and geometry. This may give an indication of the original quality of the failed face.
Once you're satisfied that all potential internal sources have been eliminated, ask about potential external sources, such as overloading or misalignment.
Transmission Related Problems
- Did the engine have a prior thrust bearing failure?
- What external parts were replaced?
- Were any performance modifications made to the transmission?
- Was an additional cooler installed for the transmission?
- Was the correct flexplate used? At installation, there should be at least 1/16" (1/8" preferred, 3/16" maximum) clearance between the flexplate and converter, to allow for converter expansion.
- Was the transmission aligned to the engine properly?
- Were all dowel pins in place?
- Was the transmission-to-cooler pressure too high? If the return line has very low pressure compared to the transmission-to-cooler line, check for a restricted cooler or cooler lines.
- If a manual transmission was installed, was the clutch release bearing adjusted properly?
- What condition was the clutch release bearing in? A worn or overheated clutch release bearing that's adjusted properly may indicate the operator was "riding the clutch."
Thread Starter
Supporting Vendor
Joined: Oct 2006
Posts: 1,014
From: BLOOMSBURG PA
How does the Torque Converter Exert Force on the Crankshaft?
There are many theories on this subject, ranging from converter ballooning to spline lock. Most of these theories have little real basis, and rely little on fact.
The force on the crankshaft from the torque converter is simple: It's based on the same principle as a servo piston or any other hydraulic component: Pressure, multiplied by area, equals force.
The pressure part is easy: It's simply the internal torque converter pressure. The area is a little more tricky. The area that's part of this equation is the difference between the area of the front half of the converter and the rear half. The oil pressure does exert a force that tries to expand the converter like a balloon (which is why converter ballooning is often blamed); however, the forward force on the crankshaft occurs because the front of the converter has more surface area than the rear (the converter neck is open). This difference in area is equal to the area of the inside of the converter neck.
The most common scenario is the THM 400 used behind a big-block Chevy. General Motors claims this engine is designed to sustain a force of 210 pounds on the crankshaft. The inside diameter of the converter hub can vary from 1.50" to 1.64". Therefore, the area of the inside of the hub can vary from 1.77 square inches to 2.11 square inches. 210 pound of force, divided by these two figures offers an internal torque converter pressure of 119 PSI to 100 PSI, respectively.
So, depending on the inside diameter of the hub, it takes between 100 to 119 PSI of internal converter pressure to achieve a forward thrust of 210 pounds. The best place to measure this pressure is the outgoing cooler line at the transmission, because it's the closest point to the internal converter pressure. The pressure gauge must be teed in, to allow the cooler circuit to flow. Normal cooler line pressure will range from 50 PSI to 80 PSI, under a load, in drive: Far too low to create a forward thrust of 210 pounds.
Causes for Excessive Torque Converter Pressure
There are two main causes for excess torque converter pressure: restrictions in the cooler circuit, and modifications or failures that cause high line pressure.
One step for combating restrictions in the cooler circuit is to run larger cooler lines. Another is to install an additional cooler in parallel with the original, rather than in series. This will increase cooler flow considerably. An additional benefit to running the cooler in parallel is it reduces the risk of overcooling the oil in the winter. The in-parallel cooler may freeze up under very cold conditions; however, the cooler tank in the radiator will still flow freely.
Modifications that can result in higher-than-normal converter pressure include using an overly heavy pressure regulator spring, or excessive cross-drilling into the cooler charge circuit. Control problems such as a missing vacuum line or stuck modulator valve can also create high pressure.
What Will Help Thrust Bearings Survive?
A simple modification to the upper thrust bearing may be beneficial in some engines. Install the upper thrust bearing in the block to determine which thrust face is toward the rear of the engine. Use a small, fine tooth, flat file to increase the chamfer on the inside edge of the bearing parting line to about 0.040" (1 mm).

Carefully file at the centrally located oil groove and stroke the file at an angle toward the rear thrust face only, as shown in the illustration. Avoid contacting the bearing surface with the end of the file. The enlarged chamfer will allow pressurized engine oil from the pre-existing groove to reach the loaded thrust face, without passing through the bearing clearance first (direct oiling).
Since there may be a load against the rear thrust face, oil flow should be restricted by that load, so there shouldn't be a noticeable loss of oil pressure. This modification is not a guaranteed cure-all, but it should help if all other conditions, such as surface finish, alignment, cleanliness and loading are within required limits.
Aside from the items already mentioned, there is another external problem that should be addressed. Ground problems have been known to intensify thrust surface wear. Excessive current in the drivetrain can damage the thrust surface, which then affects the thrust bearing as though the thrust surface on the crank shaft isn't finished properly.
It's easy to check for excessive voltage in the drivetrain: Connect the negative lead of your DVOM to the negative post of the battery, and the positive lead to the transmission. You should see no more than 0.1 volts on your meter while the starter is cranking.
For an accurate test, the starter must operate for at least four seconds. It may be necessary to disable the ignition system so the engine won't start during the test.
If the voltage is excessive, check or replace the negative battery cable, or add ground straps from the engine to the frame, or the transmission to the frame.
Some systems may reach 0.3 volts momentarily without having a problem. For added assurance, improve the ground with a larger battery cable or additional ground straps.
Although the greatest current draw is usually while the starter is cranking, current in the drivetrain can occur while accessories are operating. That's why you should perform this voltage-drop test with the ignition on, and as many accessories operating as possible. Again, the threshold is 0.1 volt.
One final problem that may occur is current though the drivetrain, without measurable voltage. If the grounding problem is in the chassis but the engine and transmission ground is okay (or vice-versa), the vehicle may pass the test. What happens here is the ground circuit can be completed through the drive shaft and suspension.
To test this, measure the voltage drop with the drive shaft removed. Both the drivetrain and frame must pass the 0.1 volt test. This is where a ground strap from the engine or transmission to the frame does its best work.
Summary
As with most problems, rarely is one solution the answer for all examples. It is attention to detail and rebuild procedures that include many details that ensure success. The intent of this article is to include the most likely causes for crankshaft thrust failure, as well as dispel some of the myths and mysteries surrounding it.
There are many theories on this subject, ranging from converter ballooning to spline lock. Most of these theories have little real basis, and rely little on fact.
The force on the crankshaft from the torque converter is simple: It's based on the same principle as a servo piston or any other hydraulic component: Pressure, multiplied by area, equals force.
The pressure part is easy: It's simply the internal torque converter pressure. The area is a little more tricky. The area that's part of this equation is the difference between the area of the front half of the converter and the rear half. The oil pressure does exert a force that tries to expand the converter like a balloon (which is why converter ballooning is often blamed); however, the forward force on the crankshaft occurs because the front of the converter has more surface area than the rear (the converter neck is open). This difference in area is equal to the area of the inside of the converter neck.
The most common scenario is the THM 400 used behind a big-block Chevy. General Motors claims this engine is designed to sustain a force of 210 pounds on the crankshaft. The inside diameter of the converter hub can vary from 1.50" to 1.64". Therefore, the area of the inside of the hub can vary from 1.77 square inches to 2.11 square inches. 210 pound of force, divided by these two figures offers an internal torque converter pressure of 119 PSI to 100 PSI, respectively.
So, depending on the inside diameter of the hub, it takes between 100 to 119 PSI of internal converter pressure to achieve a forward thrust of 210 pounds. The best place to measure this pressure is the outgoing cooler line at the transmission, because it's the closest point to the internal converter pressure. The pressure gauge must be teed in, to allow the cooler circuit to flow. Normal cooler line pressure will range from 50 PSI to 80 PSI, under a load, in drive: Far too low to create a forward thrust of 210 pounds.
Causes for Excessive Torque Converter Pressure
There are two main causes for excess torque converter pressure: restrictions in the cooler circuit, and modifications or failures that cause high line pressure.
One step for combating restrictions in the cooler circuit is to run larger cooler lines. Another is to install an additional cooler in parallel with the original, rather than in series. This will increase cooler flow considerably. An additional benefit to running the cooler in parallel is it reduces the risk of overcooling the oil in the winter. The in-parallel cooler may freeze up under very cold conditions; however, the cooler tank in the radiator will still flow freely.
Modifications that can result in higher-than-normal converter pressure include using an overly heavy pressure regulator spring, or excessive cross-drilling into the cooler charge circuit. Control problems such as a missing vacuum line or stuck modulator valve can also create high pressure.
What Will Help Thrust Bearings Survive?
A simple modification to the upper thrust bearing may be beneficial in some engines. Install the upper thrust bearing in the block to determine which thrust face is toward the rear of the engine. Use a small, fine tooth, flat file to increase the chamfer on the inside edge of the bearing parting line to about 0.040" (1 mm).
Carefully file at the centrally located oil groove and stroke the file at an angle toward the rear thrust face only, as shown in the illustration. Avoid contacting the bearing surface with the end of the file. The enlarged chamfer will allow pressurized engine oil from the pre-existing groove to reach the loaded thrust face, without passing through the bearing clearance first (direct oiling).
Since there may be a load against the rear thrust face, oil flow should be restricted by that load, so there shouldn't be a noticeable loss of oil pressure. This modification is not a guaranteed cure-all, but it should help if all other conditions, such as surface finish, alignment, cleanliness and loading are within required limits.
Note: As with all modifications, it is important to find the original cause of the problem before making modifications. Failure to do so may result in a repeat failure.
Other External Problems Aside from the items already mentioned, there is another external problem that should be addressed. Ground problems have been known to intensify thrust surface wear. Excessive current in the drivetrain can damage the thrust surface, which then affects the thrust bearing as though the thrust surface on the crank shaft isn't finished properly.
It's easy to check for excessive voltage in the drivetrain: Connect the negative lead of your DVOM to the negative post of the battery, and the positive lead to the transmission. You should see no more than 0.1 volts on your meter while the starter is cranking.
For an accurate test, the starter must operate for at least four seconds. It may be necessary to disable the ignition system so the engine won't start during the test.
If the voltage is excessive, check or replace the negative battery cable, or add ground straps from the engine to the frame, or the transmission to the frame.
Some systems may reach 0.3 volts momentarily without having a problem. For added assurance, improve the ground with a larger battery cable or additional ground straps.
Although the greatest current draw is usually while the starter is cranking, current in the drivetrain can occur while accessories are operating. That's why you should perform this voltage-drop test with the ignition on, and as many accessories operating as possible. Again, the threshold is 0.1 volt.
One final problem that may occur is current though the drivetrain, without measurable voltage. If the grounding problem is in the chassis but the engine and transmission ground is okay (or vice-versa), the vehicle may pass the test. What happens here is the ground circuit can be completed through the drive shaft and suspension.
To test this, measure the voltage drop with the drive shaft removed. Both the drivetrain and frame must pass the 0.1 volt test. This is where a ground strap from the engine or transmission to the frame does its best work.
Summary
As with most problems, rarely is one solution the answer for all examples. It is attention to detail and rebuild procedures that include many details that ensure success. The intent of this article is to include the most likely causes for crankshaft thrust failure, as well as dispel some of the myths and mysteries surrounding it.
Thread Starter
Supporting Vendor
Joined: Oct 2006
Posts: 1,014
From: BLOOMSBURG PA
Neet tester/toy for transmission diagnosis
Parts- all from radio shack cheap
1-Three 12v LEDs They can be different colors(NO LIGHT BULBS WILL NOT WORK)
2-Some sort of bevel to mount them in Or you can mount them in a panel in your car permanent.
3-Three lengths of wire. Perferably different colors to avoid confusion.
4-Blue side wire splicers the type you use pliers to push down the tab to make a splice.
Ok you want to hook the three wires to the following in the harness either at the trans or find them at the PCM
A-Light green wire. This is the 1-2 shift solenoid.
B-Yellow with black stripe. This is the 2-3 shift solenoid
C-Tan wire with black stripe. This is the lockup (TCC)
solenoid.
Do not cut the wires use the slicers and connect your wires one to each and then run them into the car.
Inside the car take each wire and hook up to the negative side of the LEDs choose which ones you want to represent each solenoid.
Tie the POSITIVE side of all the LEDs together and run a wire to a 12v switched source(radio fuse)
Ok now its simple
(1-2)on and (2-3) on is 1st gear
(1-2)off and (2-3) on is second gear
(both off ) is 3rd gear
(1-2)on and (2-3) off is 4th gear
TCC on means your converter should be locked.
This IMO is cool and helpful no more will you wonder if that 2-3 shift that hit the limiter was tuning or trans related and you will know the time from comand to actual shift watching when the lights iluminate and feeling when the shift happens. This could be usefull when setting shift poits since the time is a constant.
No more wondering wether your converter not being locked is a tuning or transmission issue you will see when and if the PCM comands lockup and this can all be done for less than $10 and 30 minutes setting it up.
Hope someone finds this usefull was thinking I have explained this a dozen times to people trying to solve various lockup and shifting issue and may or may not have scanner tools and its proved invaluable to them so why not just post it for anyone who might wanna make a new toy/gadget.
Thread Starter
Supporting Vendor
Joined: Oct 2006
Posts: 1,014
From: BLOOMSBURG PA
BOGGS ON DOWNSHIFT
This Informations is supplied by WHEATLEY a sponsor on the trucks forums but since alot of guys on here mod trucks. I thought this would also be of interest and should also apply to 05-06 GTO.
"Here is an issue that comes up with guys that drop LS1's or 6.0's in their trucks with built Transmissions. This does not happen to all of them but some. I have run into this several times with customers. They said they had a different tuner previously and came to me wondering if I could fix the problem (this is for ETC fitted trucks) not cable driven
If going WOT from a 55-65MPH roll, when the tranny downshifts to second the ETC will open 100% then you will notice it will shut to about 30% for a split second, then open back up to 100% once again. This causes a bad surge of course
Watching the logs using VCM scanner (HPTuners) you will see that the ETC shuts and reopens FAST and also cutting fuel. Like it is hitting the rev limiter, although it is not hitting the rev limiter
Now you can control ETC or Fuel and or Both.
Disabling ETC limit will cure this issue, therefore using only fuel for the rev limiter instead of FUEL and ETC
Here is a Screen shot in hptuners what I am talking about.
This has ALOT of people scratching their heads and blaming there transmission, when it is in fact in the tuning.
This applies to ETC fitted trucks and SUV's, never seen this problem on f bodies and or vettes.
Like I said though, not all ETC fitted trucks will experience this, but there are some out there that will, and this is the cure
Now on 07-09 NNBS trucks, you can select if you want to use fueled or Spark to control the fuel cutoff,99-07 classic truck you do not have the option to select spark like the NNBS trucks. Only fuel or ETC (electronic throttle control)
I have seen some tuners out there disable the ETC setting on the NNBS truck and never enabling the spark or fuel to control the rev limiter, there for there is not rev limiter active. This certain customer spun some rod bearing because of this tuners crazy mistake
If you need any more input to fully understand just let me know, this could be very helpful to some of your customers that may experience this problem and try to blame the tranny, when it is in fact not the tranny."
WHEATLEY
BOG AFTER INSTALLING BUILT TRANS
I HAVE SCREEN SHOTS OF WHAT HE IS TALKING ABOUT WILL UPLOAD THEM AND POST LATER
Last edited by Performabuilt; May 14, 2009 at 05:29 PM.
Thread Starter
Supporting Vendor
Joined: Oct 2006
Posts: 1,014
From: BLOOMSBURG PA
Po757 limp mode after stall installation. How to fix it in hp tuners
--------------------------------------------------------------------------------
Removing the test for PO757 with HPT TUNERS
This code should always be removed IMO during tuning with any stall over 2800 rpm.
This information provided to me by WHEATLEY a tuner/sponsor on the truck forum.
(Wheatley)“Set the PO757 code to no error reported. To do this, open the tune file. Now click Engine Diagnostics>DTC’s. Now scroll down the DTC list until you find PO757 uncheck the box next to it.
To the right you will see 0-MILL on the first error. Click the pull down arrow and select NO ERROR REPORTED.”(Wheatley)
It’s that simple. I would imagine it’s similar in other tuning software.
Doing this will eliminate limp mode second-third gear only after a stall a very common issue with stall and IMO should be done anytime your tuning for a stall above 2800 rpm.
Frank at PerformaBuilt
__________________
Thread Starter
Supporting Vendor
Joined: Oct 2006
Posts: 1,014
From: BLOOMSBURG PA
WHAT HAPPENS IN A TRANSMISSION AND DETAILED PARTS LIST WHATS WHAT?
Park = Park paw its not really a gear, It basically a lug that falls into a slot on the rear planetary race stopping the car from rolling, And yes some back and forth motion is normal.
Reverse = The reverse input clutch in the forward most drum and the low reverse clutch are applied
Neutral = Nothings applied
OD=
1st- both shift solenoids are on-the Forward clutch is applied and the
Input sprag and Low roller clutch are holding. (LOW REVERSE CLUTCH
NOT OR USED HERE)
2nd-Shift solenoid A is OFF and shift solenoid B is on- The 2-4 band
is applied via the 2nd gear servo, The forward clutch and Input sprag
are holding, The low roller clutch is free wheeling.
3rd-Both shift solenoids are off. The 2-4 band is released by the 3rd
clutch oil. The 3-4 clutch-forward clutch are on The input sprag is
holding. The low roller is free wheeling.
4th-The A solenoid is ON, The B solenoid is OFF the 3-4 clutch is still
applied the 2-4 band is applied via the 4th servo. The input sprag is
free wheeling as is the low roller clutch. The forward clutch is
applied but negated by the Input sprag free wheeling
Ok thats the general fuction of the 60E,65E,70E in the OD 4th gear position.
Now lets tackel each part"
1-Low roller clutch-This a a set of rollers with and accordian spring when you attempt to turn the race one way the springs will relax and allow movment but the other directing they will wedge the rollers against the race stopping movement thus why its called a one way clutch like a ratchet will turn one way but not the other. Symptoms of failure are-No movement from a dead stop in any gear but manual low one (CARS WITH SECOND GEAR START MAY START IN SECOND ALSO) however once moving you can shift up through all the gears and all will work until you come to a stop again.In manual LOW1 the LOW/REVERSE clutch is applied and while not used when in first gear in the upper gears positions it will overide or support the low roller when in manaul low. In fact there is actually something to be said about starting in manual low at the track since it will add considerable strength in this area.
2-INPUT SPRAG- Though a little differnt in design the basic function is the same as the low roller. symptoms of its failure are. No movement in OD however car will move in manual 2-1 positions and may allow manual shift through all 4 gears. The reason for this is much like the low/reverse clutch set mentioned above when in these positions in first gear the overun clutch is appliedand will support or bypass the power transfer through the input sprag and allow movent. Another symptom if rather than letting go the sprag becomes bound up or rolled over and locked so it cant turn will be a feeling like the brakes are applied when the 3-4 shift applies since normally the sprag is free wheeling in 4th gear.
3-Forward clutch set- This set is on in all forward gears and transfers all power in 1-2-3 gears but free wheels in 4th through the sprag reversal.Symptons of its failure are slipping in all forward gears or no movement .Sometimeds like a sprag failure when you place in manual 1 or 2 the symptom may disappear since the overun clutch can support the damaged forward clutch frictions. However in many cases both are damaged at the same time.
4- 3-4 clutch set-Many people are confused about his one because its says 3-4 its called that because it is apllied in both 3rd and 4th gear. But in reality is the 3rd/direct clutch.
When its one along with the forward clutch and sprag holding your ratio is 1 TO 1 straight through the trans no gearing at all.
Symptoms of its failure are normal 1-2 followed by neutral feel, However its not neutral in fact its a return to first gear. Other symptoms before complete failure would be slipping in third and 4th gears. Now of note many people associate a no 2-3 at WOT only with this failure. However generally this is not the case if shifts just off wot are solid.
5- 2-4 band- Again a little confusing to some, Its called the 2-4 band because its used to make both 2nd and 4th gears though each is applied by a different servo applying the same component. The band is applied by the second gear servo. When it applies it stops the reverse input drum and sunshell rotation, This through the planet set make the second gear ratio. But also when applied while the 3-4 clutch is on makes the fourth gear ratio. Symptoms of its failure would be slipping or loss of 2nd and 4th gear.
6-Reverse input set and low/reverse clutch set.
The combination of these two sets make reverse Failure of either of these will result in no or slipping reverse. Also as noted above the LOW/REVERSE SET while not on in any position in first gear does come on in the manual low position and provides both support for the low roller and the engine braking effect when you gear down manually coasting.
7-INPUT DRUM-Contains the overun,foward and 3-4 clucth set and input sprag. The Input shaft is splined into it. Failure of it will result in a no movement in any gear forward or reverse with pump presure present. All engine power must transfer through it.
8-Sunshell- The sunshell is used in reverse,2nd and 4th gears. A common failure is the splines strip at the bottom. This will result in loss of reverse,second and 4th gears. Its commonly replaced with THE BEAST SUNSHELL which rarley has this problem.
9-PLANETS-There are two planet sets front and rear they are available in 4 pinion used in the 700r4 and 4l60e and there are 5 pinion used in the 4l65e. Most comon two failures in either set are.
A-inadequate lube. This comonly happens when the seal in the input drum becomes damaged or worn out and no longer directs lube through the output shaft which feed oil to the planets. Or when there is a converter failure and the material from it becomes logged either in the cooler or the orifices in the shaft . Syptoms of this type failure are whizzing grinding noise and loss of movement eventually. When trans is torn down planet gears will be blackened or blue from the heat.
B-Failure of the planet housing ussually the splines strip at the base of the rear planet.
There are other types of failures but these two in my experince are the most common.
10-REACTION CARRIER SHAFT- Most common failure here is the tube/shaft breaks this is ussually in tandem with the rear planet failure mentioned above.
11-Valve body assembly-Generally the only failure you will see here is either a failed solenoid as far as electrical goes or however there is one comon mechanical failure. This happens when the converter regulator (iso valve) causes wear in the bore and leaks this will result in slipping lockup or PO1870 It can be repaired any of several ways.
A-block valve function by eliminating PWM this can be done in several ways. A very stiff spring or solid pin to force the outer valve to remain stroked to the outside plug of the VB. Somanx make a new valve and a reamer to repair the body if you want to keep PWM. Transgo also makes a valve for it but it more or less accomplises the same goal as blocking the valve.
12-PUMP ASSEMBLY -The most important part if the trans since without good presure nothing else will survive. On the plus side its relativley trouble free. I have see pumps from 200000 miles units look like new. The most comon failures are generally install related.
A-Converter not fully seated during trans install resulting in either imediate failure of the pump on start up. Or conveter does index itself on start up but pump failes shortly afterward due to stress created by the miss installation.
B-Converter spacing issue. Converter spacing to high when engine revs the flex plate flexes forward as does converter. Converter looses index to pump and pump is detroyed when it move back as RPM decreases.
DIAGARAM 1 EXTERNAL CASE EXPLODED
4L60ECASEEXTERNALEXPLODED.gif?t=1241911519
4L60ECASEEXPLODEDID.gif?t=1241911619
DIAGRAM 2 INTERNAL PARTS EXPLODED 1
4L60EINTERNALSEXPLODED.gif?t=1241911684
4L60EINTERNALSID.gif?t=1241911756
DIAGRAM 3 INTERNAL PARTS EXPLODED 2
4L60EINTERNALSEXPLODED2.gif?t=1241911815
DIAGRAM 4 VALVE BODY EXPLODED 1
4L60EVBEXPLODED1-1.gif?t=1242006919
DIAGRAM 5 VALVE BODY EXPLODED 2
4L60EVBEXPLODED2-1.gif?t=1242007082
4L60EVBID-1.gif?t=1242007121
DIAGRAM 6 PUMP EXPLODED
4L60EPUMPEXPLODED.gif?t=1242007205
4L60EPUMPEXPLODEDID.gif?t=1242007248
Park = Park paw its not really a gear, It basically a lug that falls into a slot on the rear planetary race stopping the car from rolling, And yes some back and forth motion is normal.
Reverse = The reverse input clutch in the forward most drum and the low reverse clutch are applied
Neutral = Nothings applied
OD=
1st- both shift solenoids are on-the Forward clutch is applied and the
Input sprag and Low roller clutch are holding. (LOW REVERSE CLUTCH
NOT OR USED HERE)
2nd-Shift solenoid A is OFF and shift solenoid B is on- The 2-4 band
is applied via the 2nd gear servo, The forward clutch and Input sprag
are holding, The low roller clutch is free wheeling.
3rd-Both shift solenoids are off. The 2-4 band is released by the 3rd
clutch oil. The 3-4 clutch-forward clutch are on The input sprag is
holding. The low roller is free wheeling.
4th-The A solenoid is ON, The B solenoid is OFF the 3-4 clutch is still
applied the 2-4 band is applied via the 4th servo. The input sprag is
free wheeling as is the low roller clutch. The forward clutch is
applied but negated by the Input sprag free wheeling
Ok thats the general fuction of the 60E,65E,70E in the OD 4th gear position.
Now lets tackel each part"
1-Low roller clutch-This a a set of rollers with and accordian spring when you attempt to turn the race one way the springs will relax and allow movment but the other directing they will wedge the rollers against the race stopping movement thus why its called a one way clutch like a ratchet will turn one way but not the other. Symptoms of failure are-No movement from a dead stop in any gear but manual low one (CARS WITH SECOND GEAR START MAY START IN SECOND ALSO) however once moving you can shift up through all the gears and all will work until you come to a stop again.In manual LOW1 the LOW/REVERSE clutch is applied and while not used when in first gear in the upper gears positions it will overide or support the low roller when in manaul low. In fact there is actually something to be said about starting in manual low at the track since it will add considerable strength in this area.
2-INPUT SPRAG- Though a little differnt in design the basic function is the same as the low roller. symptoms of its failure are. No movement in OD however car will move in manual 2-1 positions and may allow manual shift through all 4 gears. The reason for this is much like the low/reverse clutch set mentioned above when in these positions in first gear the overun clutch is appliedand will support or bypass the power transfer through the input sprag and allow movent. Another symptom if rather than letting go the sprag becomes bound up or rolled over and locked so it cant turn will be a feeling like the brakes are applied when the 3-4 shift applies since normally the sprag is free wheeling in 4th gear.
3-Forward clutch set- This set is on in all forward gears and transfers all power in 1-2-3 gears but free wheels in 4th through the sprag reversal.Symptons of its failure are slipping in all forward gears or no movement .Sometimeds like a sprag failure when you place in manual 1 or 2 the symptom may disappear since the overun clutch can support the damaged forward clutch frictions. However in many cases both are damaged at the same time.
4- 3-4 clutch set-Many people are confused about his one because its says 3-4 its called that because it is apllied in both 3rd and 4th gear. But in reality is the 3rd/direct clutch.
When its one along with the forward clutch and sprag holding your ratio is 1 TO 1 straight through the trans no gearing at all.
Symptoms of its failure are normal 1-2 followed by neutral feel, However its not neutral in fact its a return to first gear. Other symptoms before complete failure would be slipping in third and 4th gears. Now of note many people associate a no 2-3 at WOT only with this failure. However generally this is not the case if shifts just off wot are solid.
5- 2-4 band- Again a little confusing to some, Its called the 2-4 band because its used to make both 2nd and 4th gears though each is applied by a different servo applying the same component. The band is applied by the second gear servo. When it applies it stops the reverse input drum and sunshell rotation, This through the planet set make the second gear ratio. But also when applied while the 3-4 clutch is on makes the fourth gear ratio. Symptoms of its failure would be slipping or loss of 2nd and 4th gear.
6-Reverse input set and low/reverse clutch set.
The combination of these two sets make reverse Failure of either of these will result in no or slipping reverse. Also as noted above the LOW/REVERSE SET while not on in any position in first gear does come on in the manual low position and provides both support for the low roller and the engine braking effect when you gear down manually coasting.
7-INPUT DRUM-Contains the overun,foward and 3-4 clucth set and input sprag. The Input shaft is splined into it. Failure of it will result in a no movement in any gear forward or reverse with pump presure present. All engine power must transfer through it.
8-Sunshell- The sunshell is used in reverse,2nd and 4th gears. A common failure is the splines strip at the bottom. This will result in loss of reverse,second and 4th gears. Its commonly replaced with THE BEAST SUNSHELL which rarley has this problem.
9-PLANETS-There are two planet sets front and rear they are available in 4 pinion used in the 700r4 and 4l60e and there are 5 pinion used in the 4l65e. Most comon two failures in either set are.
A-inadequate lube. This comonly happens when the seal in the input drum becomes damaged or worn out and no longer directs lube through the output shaft which feed oil to the planets. Or when there is a converter failure and the material from it becomes logged either in the cooler or the orifices in the shaft . Syptoms of this type failure are whizzing grinding noise and loss of movement eventually. When trans is torn down planet gears will be blackened or blue from the heat.
B-Failure of the planet housing ussually the splines strip at the base of the rear planet.
There are other types of failures but these two in my experince are the most common.
10-REACTION CARRIER SHAFT- Most common failure here is the tube/shaft breaks this is ussually in tandem with the rear planet failure mentioned above.
11-Valve body assembly-Generally the only failure you will see here is either a failed solenoid as far as electrical goes or however there is one comon mechanical failure. This happens when the converter regulator (iso valve) causes wear in the bore and leaks this will result in slipping lockup or PO1870 It can be repaired any of several ways.
A-block valve function by eliminating PWM this can be done in several ways. A very stiff spring or solid pin to force the outer valve to remain stroked to the outside plug of the VB. Somanx make a new valve and a reamer to repair the body if you want to keep PWM. Transgo also makes a valve for it but it more or less accomplises the same goal as blocking the valve.
12-PUMP ASSEMBLY -The most important part if the trans since without good presure nothing else will survive. On the plus side its relativley trouble free. I have see pumps from 200000 miles units look like new. The most comon failures are generally install related.
A-Converter not fully seated during trans install resulting in either imediate failure of the pump on start up. Or conveter does index itself on start up but pump failes shortly afterward due to stress created by the miss installation.
B-Converter spacing issue. Converter spacing to high when engine revs the flex plate flexes forward as does converter. Converter looses index to pump and pump is detroyed when it move back as RPM decreases.
DIAGARAM 1 EXTERNAL CASE EXPLODED
4L60ECASEEXTERNALEXPLODED.gif?t=1241911519
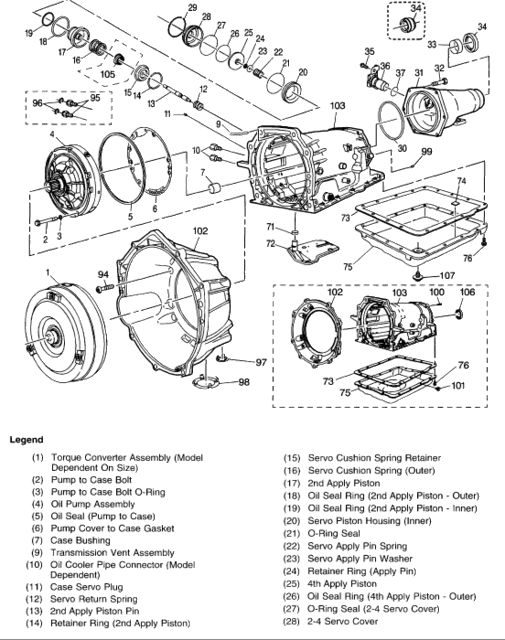
4L60ECASEEXPLODEDID.gif?t=1241911619
DIAGRAM 2 INTERNAL PARTS EXPLODED 1
4L60EINTERNALSEXPLODED.gif?t=1241911684
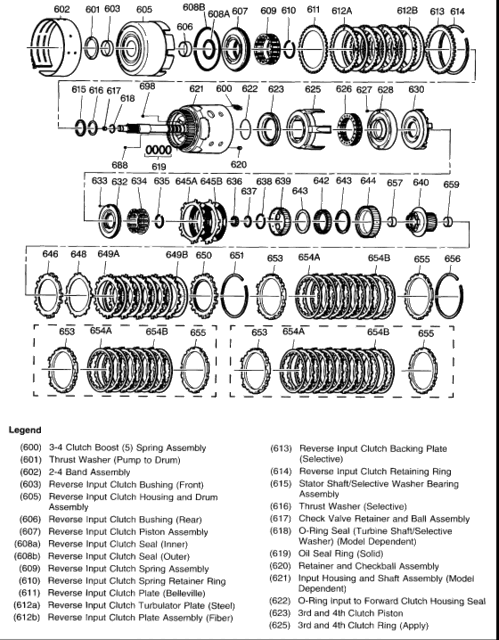
4L60EINTERNALSID.gif?t=1241911756
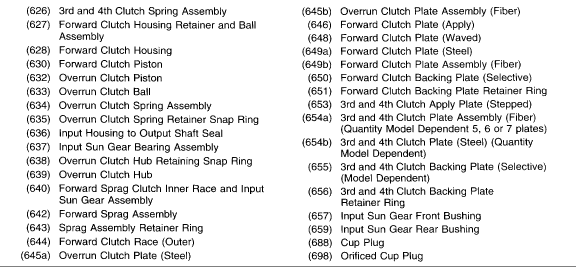
DIAGRAM 3 INTERNAL PARTS EXPLODED 2
4L60EINTERNALSEXPLODED2.gif?t=1241911815
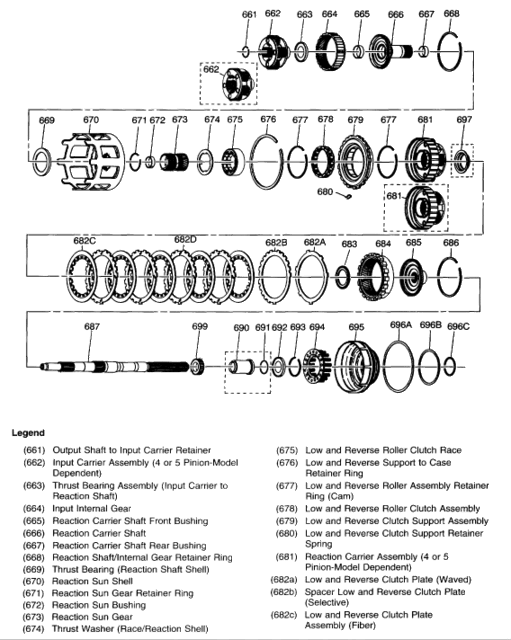
DIAGRAM 4 VALVE BODY EXPLODED 1
4L60EVBEXPLODED1-1.gif?t=1242006919
DIAGRAM 5 VALVE BODY EXPLODED 2
4L60EVBEXPLODED2-1.gif?t=1242007082
4L60EVBID-1.gif?t=1242007121
DIAGRAM 6 PUMP EXPLODED
4L60EPUMPEXPLODED.gif?t=1242007205
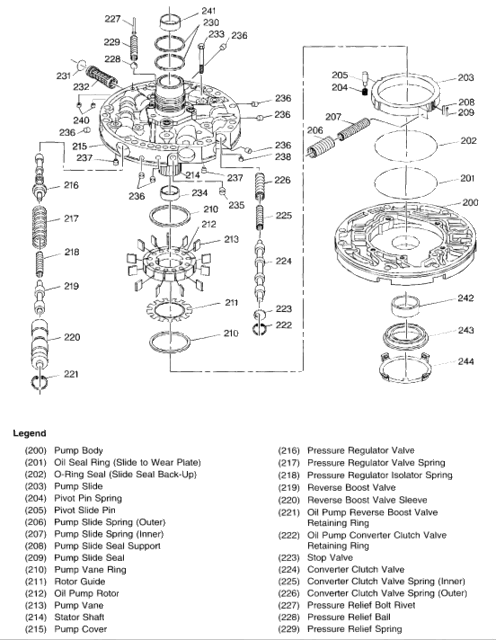
4L60EPUMPEXPLODEDID.gif?t=1242007248
Last edited by Performabuilt; May 14, 2009 at 05:30 PM.
Thread Starter
Supporting Vendor
Joined: Oct 2006
Posts: 1,014
From: BLOOMSBURG PA
Speed Density (MAF-less) tune...
--------------------------------------------------------------------------------
Here's some hints if you're running a SD (MAF-less) tune and the trans seem to shift harsh:
Disable P0101, P0102, P0103 in the following tables:
- Transmission DTC Fault Max Pressure Enablers
- Transmission DTC Fault Pressure Modifiers
Also disable P0101, P0102, P0103 in this table:
- Transmission Failsafe Enablers
Also check this table for/disable P0101, P0102, P0103:
- Transmission DTC Fault Processing Enablers
(that table probably won't contain those 3, but check it anyway)
Also do this (very important):
When driving monitor/log DYNCYLAIR, TRQENG, TFMPRS...
The PCM computes DYNCYLAIR from the VE table for various purposes:
- to compute/lookup fueling/fuelmass,
- to compute/lookup spark timing,
- to compute/lookup TRQENG;
TRQENG is used to compute/lookup the PCS current (or duty cycle) to drive the PCS with... in the hydrualic schematics the PCS produces Torque Signal pressure which drives the Boost Valve which assists the Isolator spring in driving the Pressure Regulator valve to control line pressure.
So, if the VE table is low, then DYNCYLAIR will be low, which causes TRQENG to be low, which causes Torque Signal pressure to be low, which causes line pressure to be low, which causes slippage which kills the transmission and the fluid.
When you view a log of TRQENG and TFMPRS, look at the shift pressure tables in the transmission calibration and see which cells TRQENG is looking up... at WOT these should be saying 80+ psi for TFMPRS.
So if you're running/tuning in SD be careful that the VE table is not going low by mistake (it will make your transmission slip, and it will make your AFR lean which will increase CC temps, cause knock, damage motor).
by JOECAR
Thread Starter
Supporting Vendor
Joined: Oct 2006
Posts: 1,014
From: BLOOMSBURG PA
Transmission wiring diagrams
transelectrical1.gif?t=1242232952
transelectrical2.gif?t=1242233113
transelectrical3.gif?t=1242233158
4l60E solenoid locations
4l60esolenoidlocations.gif?t=1242233391
transelectrical1.gif?t=1242232952
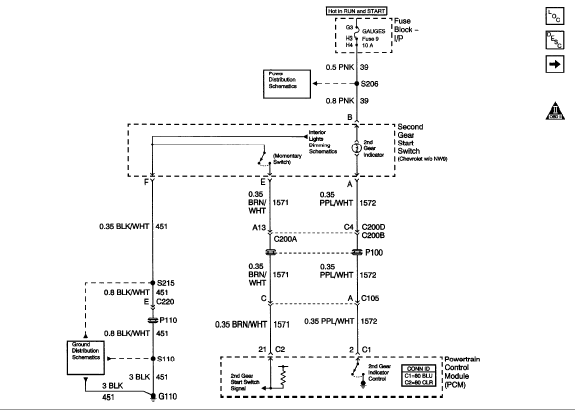
transelectrical2.gif?t=1242233113
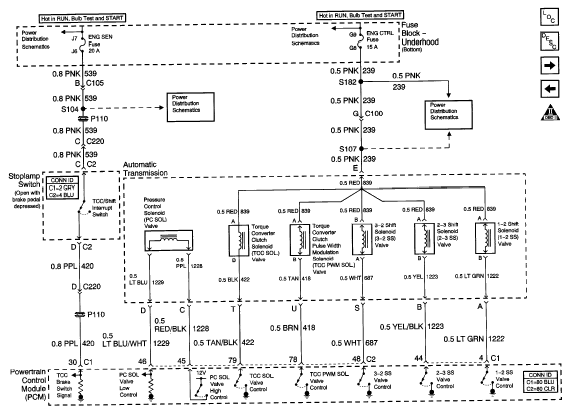
transelectrical3.gif?t=1242233158
4l60E solenoid locations
4l60esolenoidlocations.gif?t=1242233391
- The torque converter clutch solenoid (1)
- The pressure control solenoid (2)
- The internal wiring harness (3)
- The 2-3 shift solenoid (4)
- The 1-2 shift solenoid (5)
- The transmission fluid pressure manual valve position switch (6)
- The 3-2 shift solenoid (7)
- The torque converter clutch pulse width modulation (TCC PWM) solenoid (8) (not used 93-94)
- The transmission fluid pressure manual valve position switch (1)
- The 1-2 shift solenoid (2)
- The 2-3 shift solenoid (3)
- The pressure control solenoid (4)
- The TCC PWM solenoid (5) (not used in 93 truck and 94 car)
- The 3-2 shift solenoid (6)