*LT1 Rag Joint Eliminator Guide*
 03-15-2015, 01:43 AM
#1
Registered User
Thread Starter
Join Date: Nov 2014
Location: GA
Posts: 13
*LT1 Rag Joint Eliminator Guide*
Hey everyone, I've recently finished up replacing my old rag joint on my Z28 with an eliminator I made myself.
I probably had about 1.5" inches of play in my steering before the wheels would move even a hair. It pretty much ruined driving, especially at night.
It's a pretty simple project and figured I could post some details here to help some others out.
I made mine out of aluminum and used a milling machine and a lathe. It's not required to use the equipment that I did.
But, if you know someone that has a shop with the equipment, it would be worth seeing if they would let you use it. It makes the job much easier.
Also I'm going to write up steps for both removal and installation as well.
Everywhere online that I looked didn't have anything in-depth on how to do this so I'm hoping this can be a valuable write-up for someone who needs it.
*Steering Shaft REMOVAL*:
What You'll Need:
- Liquid Wrench (or WD-40, PB Blaster etc...)
- Ratchet
- 11mm Socket
- Long Extension
- Breaker Bar (Very Handy)
- Rubber Mallet
- Long Flat Head Screwdriver
- Jack w/ Jack-stands
- Flashlight helps too...
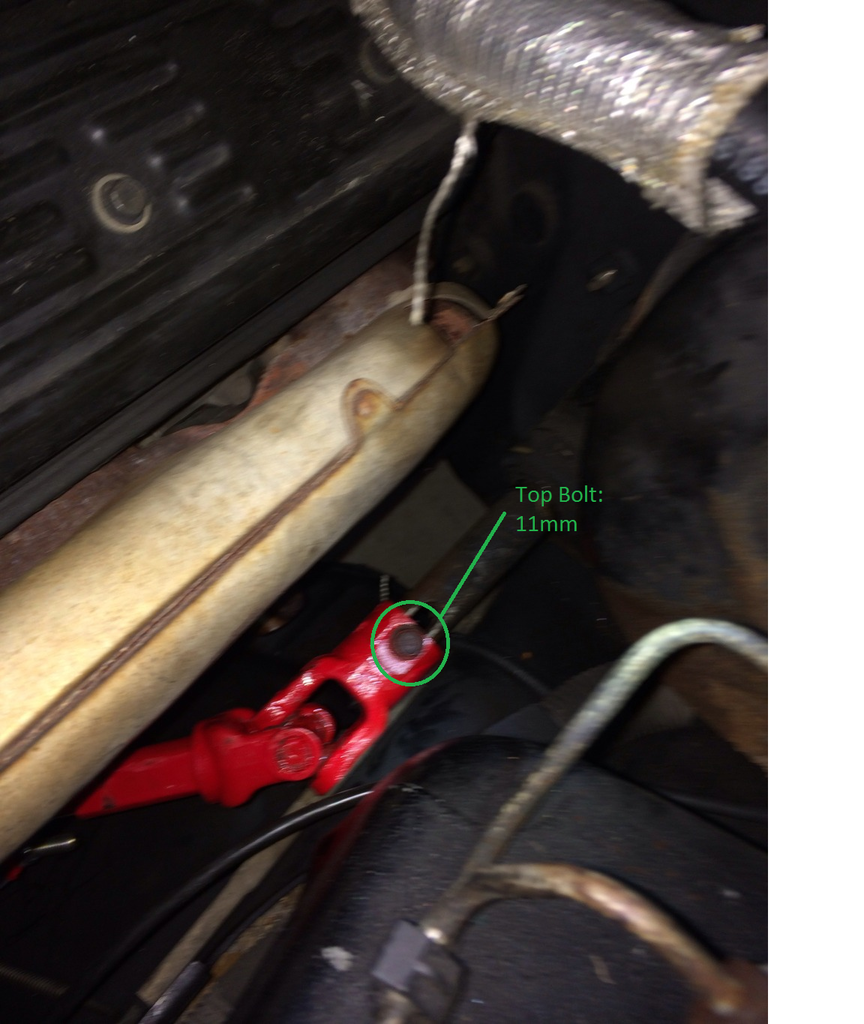
First thing to take care of is the two bolts holding the steering shaft on. There is one at the top, and one at the bottom.
I also want to note that the car does not need to be raised to get to the bottom bolt, the jack will come later when it's time to remove the shaft.
Go ahead and load these bolts down liberally with liquid wrench. There is thread lock on these bolts and if they are rusted,
the heads could break off with out it. Starting with the top bolt, use your breaker bar, extension, and 11mm socket to break the bolt loose.
If the bolt doesn't give at first resort back to some liquid wrench and try again. Once it is freed up, swap to your ratchet and take it the rest of the way out.
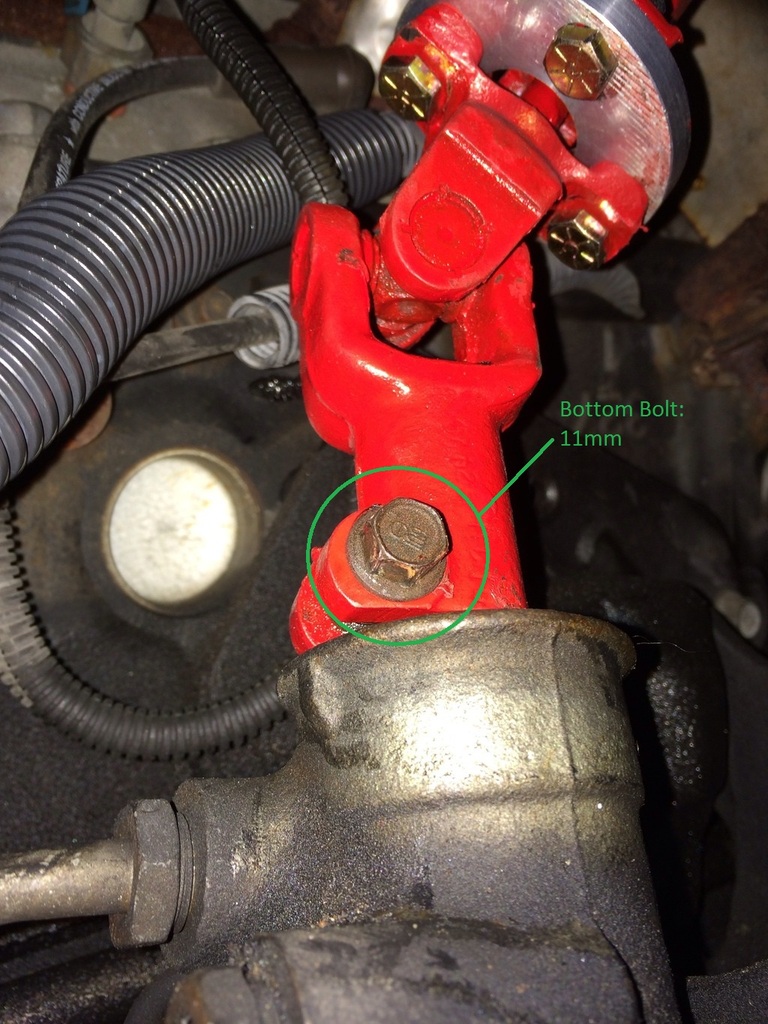
Now for the bottom bolt, all you need is the breaker bar, ratchet, and the 11mm socket. Do the same that was done to the top bolt.
Now before raising the car, get a flat head screwdriver and place it through the slot at the top where the steering shaft connects to the steering column.
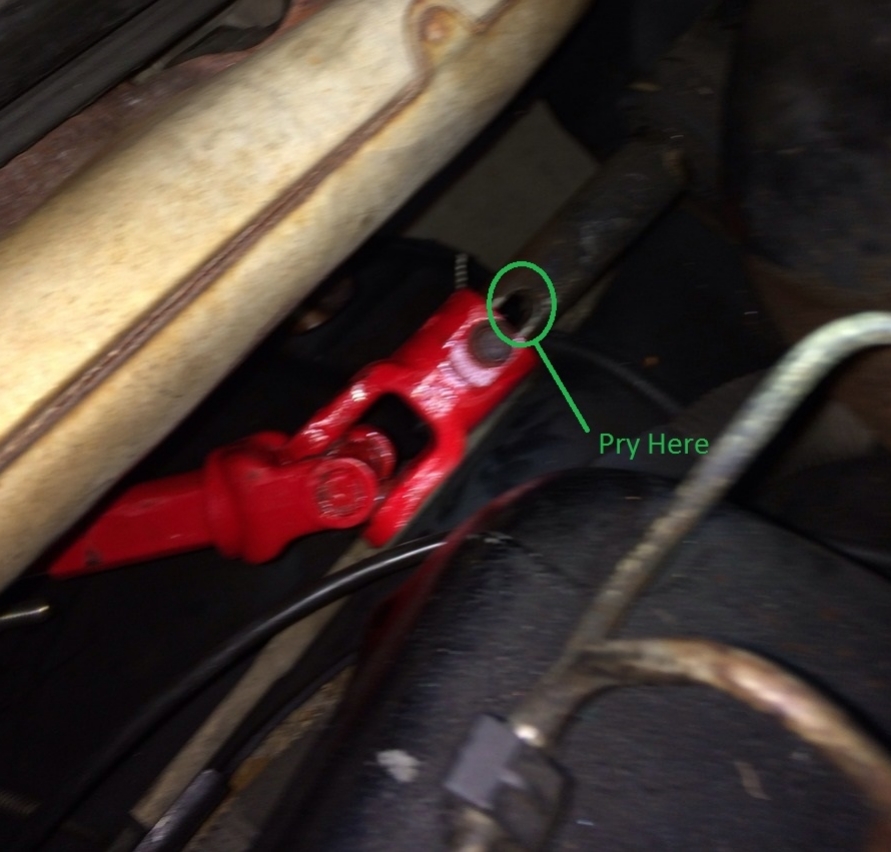
Use this slot to pry the steering shaft down a little bit just to break it from where it's settled, not to take it off.
Once that is done, raise the car off the ground and place it on jack stands. Before getting underneath get a rubber mallet and a flat head screwdriver.
From up under you should easily be able to find where the bottom universal joint connects to the rack.
Find a good spot to place your flat head and strike it up towards the top with the mallet.
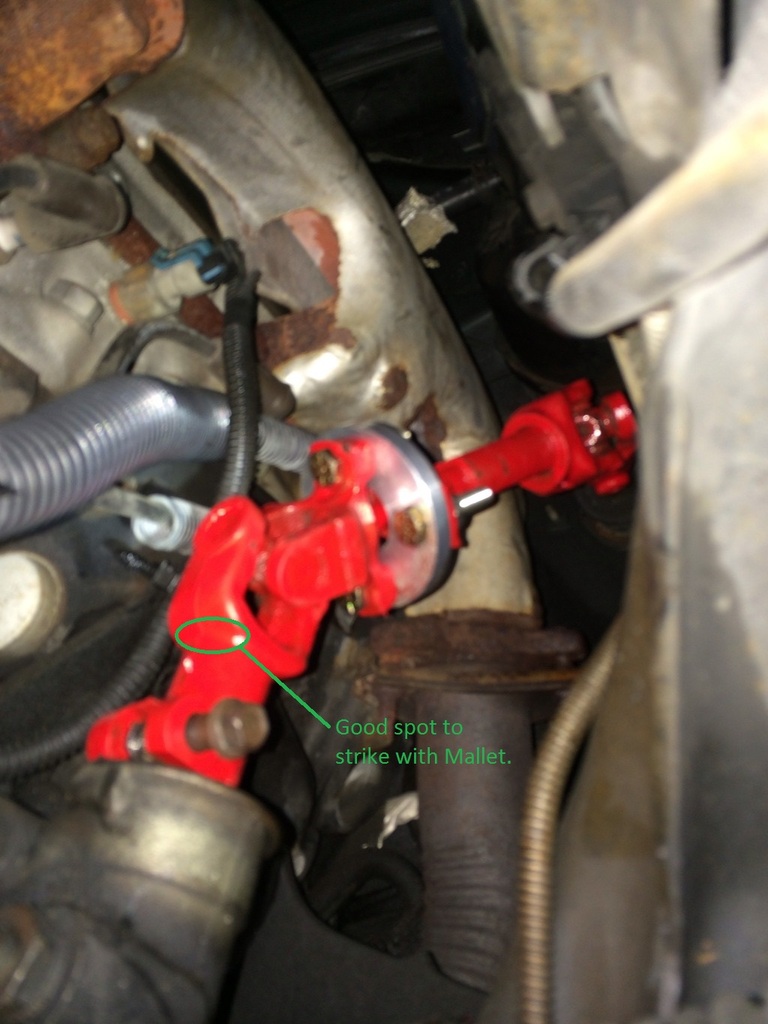
It should come off easy and if you got it good and loose from above, you should be able to pull the whole thing off by hand.
If not, a little prying at the top with the flat head should bring it off.
Now that the shaft is out, it's time to remove the rag joint itself.
*Rag Joint REMOVAL*:
Before starting this next step, make sure you mark the steering shaft where you can put it back together how it was.
It's important that you keep it that way. There are two different methods of getting the four rivets out of the bracket pieces surrounding the rag joint. I will go over both of them.
What You'll Need:
Method #1:
- Vise (Or anything that will hold the part good and tight)
- Die Grinder (Or a Reciprocating Saw, Hacksaw, etc...)
- Punch
- Hammer
Method #2:
- Vise
- Drill
- 5/16" Drill Bit (Make sure it's a bit for cutting metal)
Method #1:
Get the steering shaft placed in a vise where it will not move and the rivets are positioned where you can easily work on them.
Using a die grinder, start taking off areas of the brackets that are in the way, these will not be used with the eliminator. Be careful not to hurt the steering shaft itself.
Once you have the rivets out in the open real good, start taking off the heads.
There is a shaft running through the middle of the rag joint so be aware of that while you're cutting.
Once the heads are removed, grab a hammer and a punch. Place the punch where the heads were cut off and start beating the rivets out.
Be careful though, the cast iron can bend. Make sure the part has proper support. If you see no progress with the rivet sliding out, try grinding at it some more.
I highly recommend using a die grinder over a hacksaw or reciprocating saw. Ask around to see if someone can let you borrow one.
It is possible with a hacksaw but it's definitely a much larger chore.
Once all rivets are taken out, the shaft will separate and the old rag joint will fall out. Look at the rag joint and see what a piece of crap it is.
Method #2:
Get the steering shaft placed in a vise where it will not move and the rivets are positioned where you can easily work on them.
The holes on the steering shaft that line up with the rag joint are 5/16" in diameter. So, take a drill and a 5/16" bit and drill through the center of the rivets. They should fall right out.
Optional: If you want to paint the Steering Shaft, now would be the time to do so. Use High Temp Enamel of your color choice.
*Fabricating a Rag Joint Eliminator*
Now I understand everyone may not have the right kind of stuff to make they're own Eliminator.
With that said, here is a link to Unbalanced Engineering where you can buy one. ==>Unbalanced Engineering 1993-97 Camaro and Firebird Rag Joint Eliminator Kit
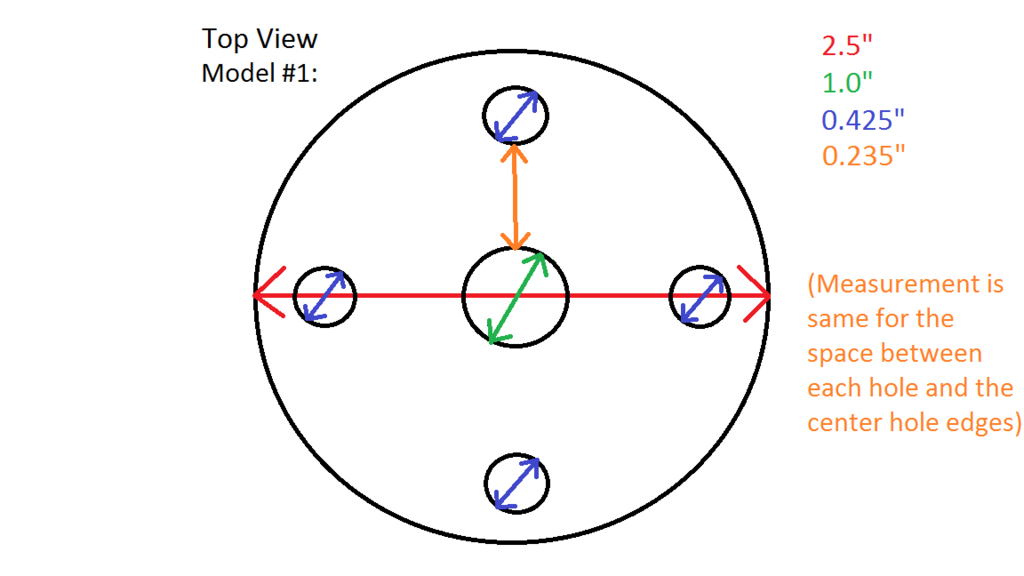
For those who are able to, here are the dimensions of the disc:
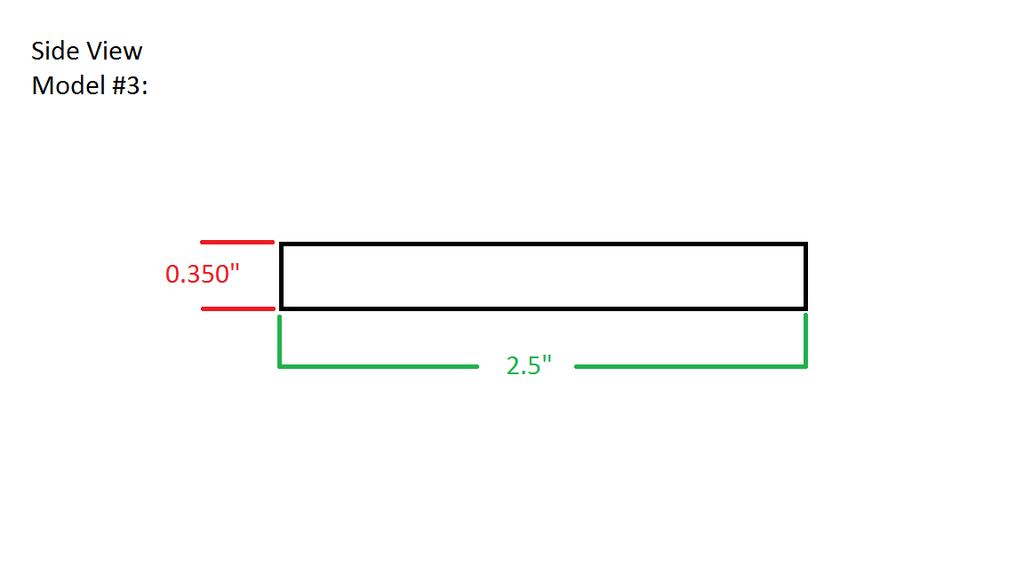
Diameter of Disc: 2.5" Radius: 1.25"
Diameter of Center Hole: 1" Radius: 0.5"
Diameter of Outer Holes: 0.425" Radius: 0.2125"
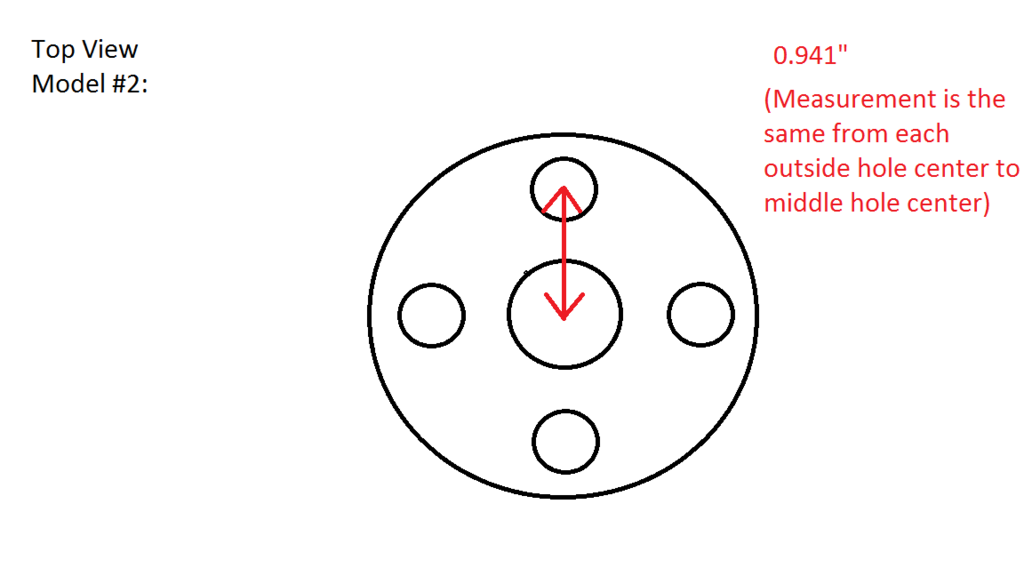
Distance from Dead Center of Disc to center of outer holes: 0.941"
Thickness of Disc: 0.350"
Here are some pictures:
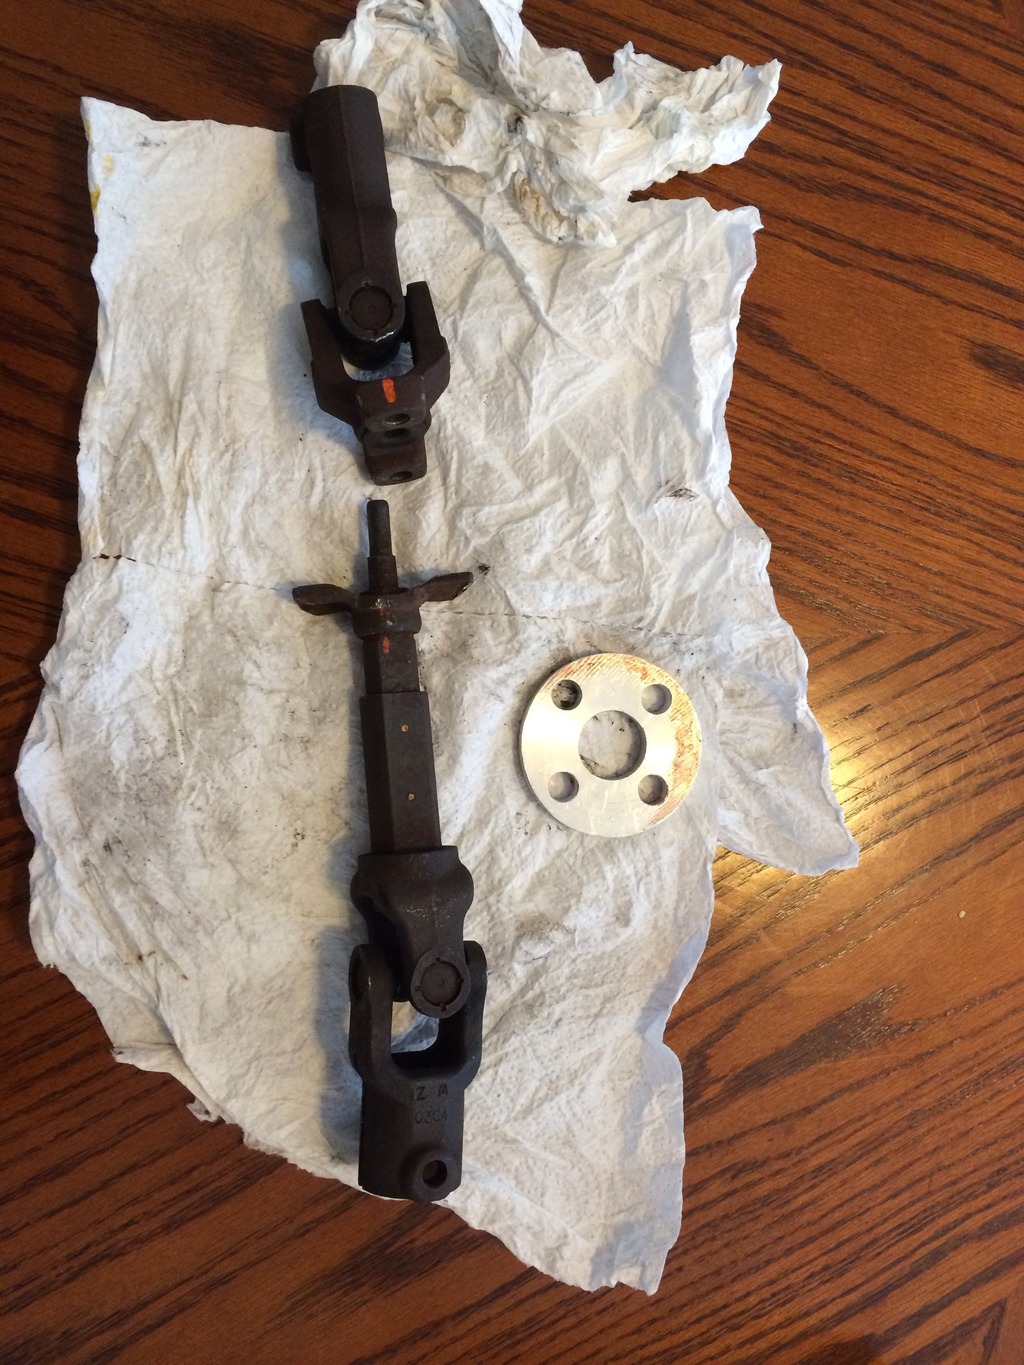
Once you get this part made you'll have this:
I wish I would have took some pictures while I was making the part. I didn't think about it but if anyone has a question, just ask.
Now all that's left is installing the Eliminator back into the steering shaft, then back into the car.
*Rag Joint Eliminator INSTALLATION*
What You'll Need:
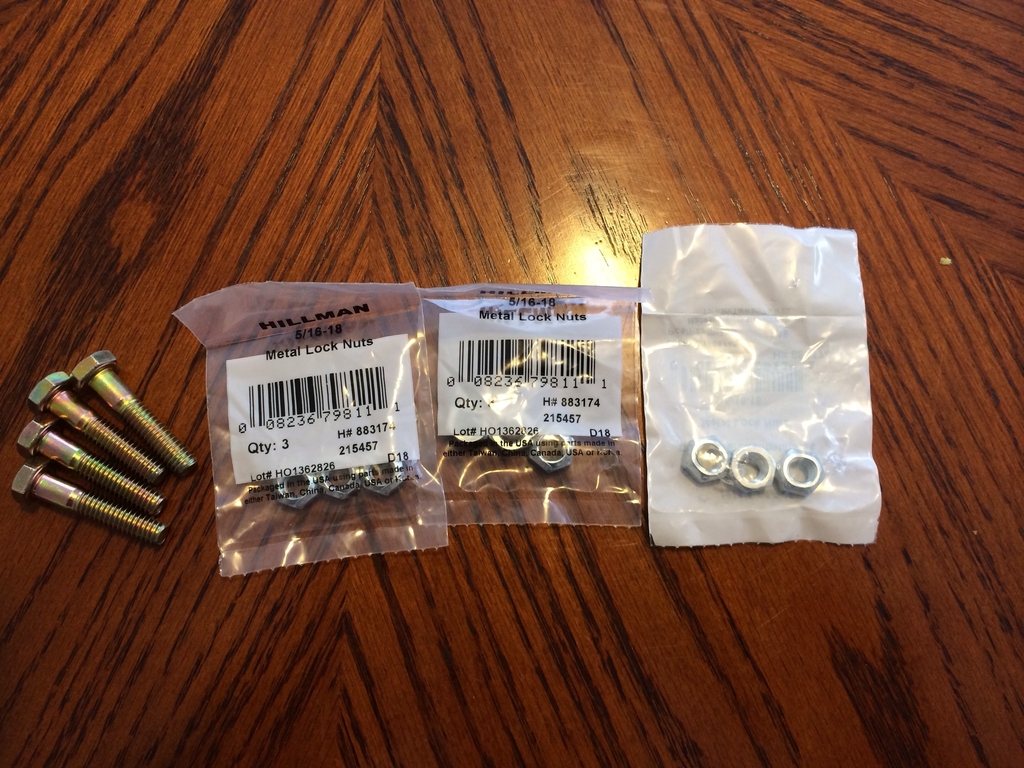
- (Four) 5/16-18 x 1 1/2" Bolts
- (Four) 5/16-18 Lock Nuts
- 1/2" Wrench
- 1/2" Socket with Ratchet
To fasten the Eliminator back into the steering shaft, you'll need some bolts and lock nuts. I used some 5/16-18 x 1 1/2" Bolts with some 5/16-18 Lock Nuts that I picked up from a hardware store.
A Vise can help here but it's not need. Place these bolts through the holes on your steering shaft with the eliminator in place. Make sure you put it back together the way it was.
If you painted it and forgot where you marked it, just look at your universal joints and match how they are in this picture:
Start all of your lock nuts on the bolts by hand. Then, while holding the head of the bolt with the wrench, tighten the lock nut down with the ratchet.
Make sure all four are as tight as you can get them. Once you're satisfied with it, it's time to finally get it in the car.
*Steering Shaft INSTALLATION*
What You'll Need:
- Lock-Tite
- Ratchet
- 11mm Socket
- Long Extension
- Breaker Bar
- Rubber Mallet
- Long Flat Head Screwdriver
- Jack w/ Jack-stands
- Flashlight
First, slide the top end of the shaft to the steering column.
Before replacing the top bolt, take some Lock-Tite and apply to the threads. Don't tighten down all the way yet.
Just do enough to keep it from falling off while you place the bottom end. Now, from under the car you should easily be able to grab the bottom of the steering shaft.
Slide the universal joint back onto the shaft to the rack. If you need so extra force, get your flat-head and mallet.
From above the car gently tap it down until it is fully in place. Apply Lock-Tite to the bottom bolt and place it back in the shaft.
With a ratchet and 11mm socket, get the two bolts good and tight. Use the extension to reach the top bolt.
Once both bolts are tight with the ratchet, take the breaker bar and make sure they're GOOD and tight.
After you're sure everything is tightened how it should be, take a jack and begin taking the stands out and lowering the car back down.
After that, she's good to roll!
All of my play was coming from my rag joint. This is definitely something you should look into first if you have some steering slop.
I probably had about 1.5" inches of play in my steering before the wheels would move even a hair. It pretty much ruined driving, especially at night.
It's a pretty simple project and figured I could post some details here to help some others out.
I made mine out of aluminum and used a milling machine and a lathe. It's not required to use the equipment that I did.
But, if you know someone that has a shop with the equipment, it would be worth seeing if they would let you use it. It makes the job much easier.
Also I'm going to write up steps for both removal and installation as well.
Everywhere online that I looked didn't have anything in-depth on how to do this so I'm hoping this can be a valuable write-up for someone who needs it.
*Steering Shaft REMOVAL*:
What You'll Need:
- Liquid Wrench (or WD-40, PB Blaster etc...)
- Ratchet
- 11mm Socket
- Long Extension
- Breaker Bar (Very Handy)
- Rubber Mallet
- Long Flat Head Screwdriver
- Jack w/ Jack-stands
- Flashlight helps too...
First thing to take care of is the two bolts holding the steering shaft on. There is one at the top, and one at the bottom.
I also want to note that the car does not need to be raised to get to the bottom bolt, the jack will come later when it's time to remove the shaft.
Go ahead and load these bolts down liberally with liquid wrench. There is thread lock on these bolts and if they are rusted,
the heads could break off with out it. Starting with the top bolt, use your breaker bar, extension, and 11mm socket to break the bolt loose.
If the bolt doesn't give at first resort back to some liquid wrench and try again. Once it is freed up, swap to your ratchet and take it the rest of the way out.
Now for the bottom bolt, all you need is the breaker bar, ratchet, and the 11mm socket. Do the same that was done to the top bolt.


Now before raising the car, get a flat head screwdriver and place it through the slot at the top where the steering shaft connects to the steering column.

Use this slot to pry the steering shaft down a little bit just to break it from where it's settled, not to take it off.
Once that is done, raise the car off the ground and place it on jack stands. Before getting underneath get a rubber mallet and a flat head screwdriver.
From up under you should easily be able to find where the bottom universal joint connects to the rack.
Find a good spot to place your flat head and strike it up towards the top with the mallet.

It should come off easy and if you got it good and loose from above, you should be able to pull the whole thing off by hand.
If not, a little prying at the top with the flat head should bring it off.
Now that the shaft is out, it's time to remove the rag joint itself.
*Rag Joint REMOVAL*:
Before starting this next step, make sure you mark the steering shaft where you can put it back together how it was.
It's important that you keep it that way. There are two different methods of getting the four rivets out of the bracket pieces surrounding the rag joint. I will go over both of them.
What You'll Need:
Method #1:
- Vise (Or anything that will hold the part good and tight)
- Die Grinder (Or a Reciprocating Saw, Hacksaw, etc...)
- Punch
- Hammer
Method #2:
- Vise
- Drill
- 5/16" Drill Bit (Make sure it's a bit for cutting metal)
Method #1:
Get the steering shaft placed in a vise where it will not move and the rivets are positioned where you can easily work on them.
Using a die grinder, start taking off areas of the brackets that are in the way, these will not be used with the eliminator. Be careful not to hurt the steering shaft itself.
Once you have the rivets out in the open real good, start taking off the heads.
There is a shaft running through the middle of the rag joint so be aware of that while you're cutting.
Once the heads are removed, grab a hammer and a punch. Place the punch where the heads were cut off and start beating the rivets out.
Be careful though, the cast iron can bend. Make sure the part has proper support. If you see no progress with the rivet sliding out, try grinding at it some more.
I highly recommend using a die grinder over a hacksaw or reciprocating saw. Ask around to see if someone can let you borrow one.
It is possible with a hacksaw but it's definitely a much larger chore.
Once all rivets are taken out, the shaft will separate and the old rag joint will fall out. Look at the rag joint and see what a piece of crap it is.
Method #2:
Get the steering shaft placed in a vise where it will not move and the rivets are positioned where you can easily work on them.
The holes on the steering shaft that line up with the rag joint are 5/16" in diameter. So, take a drill and a 5/16" bit and drill through the center of the rivets. They should fall right out.
Optional: If you want to paint the Steering Shaft, now would be the time to do so. Use High Temp Enamel of your color choice.
*Fabricating a Rag Joint Eliminator*
Now I understand everyone may not have the right kind of stuff to make they're own Eliminator.
With that said, here is a link to Unbalanced Engineering where you can buy one. ==>Unbalanced Engineering 1993-97 Camaro and Firebird Rag Joint Eliminator Kit
For those who are able to, here are the dimensions of the disc:
Diameter of Disc: 2.5" Radius: 1.25"
Diameter of Center Hole: 1" Radius: 0.5"
Diameter of Outer Holes: 0.425" Radius: 0.2125"
Distance from Dead Center of Disc to center of outer holes: 0.941"
Thickness of Disc: 0.350"
Here are some pictures:


Once you get this part made you'll have this:

I wish I would have took some pictures while I was making the part. I didn't think about it but if anyone has a question, just ask.
Now all that's left is installing the Eliminator back into the steering shaft, then back into the car.
*Rag Joint Eliminator INSTALLATION*
What You'll Need:
- (Four) 5/16-18 x 1 1/2" Bolts
- (Four) 5/16-18 Lock Nuts
- 1/2" Wrench
- 1/2" Socket with Ratchet
To fasten the Eliminator back into the steering shaft, you'll need some bolts and lock nuts. I used some 5/16-18 x 1 1/2" Bolts with some 5/16-18 Lock Nuts that I picked up from a hardware store.

A Vise can help here but it's not need. Place these bolts through the holes on your steering shaft with the eliminator in place. Make sure you put it back together the way it was.
If you painted it and forgot where you marked it, just look at your universal joints and match how they are in this picture:
Start all of your lock nuts on the bolts by hand. Then, while holding the head of the bolt with the wrench, tighten the lock nut down with the ratchet.
Make sure all four are as tight as you can get them. Once you're satisfied with it, it's time to finally get it in the car.
*Steering Shaft INSTALLATION*
What You'll Need:
- Lock-Tite
- Ratchet
- 11mm Socket
- Long Extension
- Breaker Bar
- Rubber Mallet
- Long Flat Head Screwdriver
- Jack w/ Jack-stands
- Flashlight
First, slide the top end of the shaft to the steering column.
Before replacing the top bolt, take some Lock-Tite and apply to the threads. Don't tighten down all the way yet.
Just do enough to keep it from falling off while you place the bottom end. Now, from under the car you should easily be able to grab the bottom of the steering shaft.
Slide the universal joint back onto the shaft to the rack. If you need so extra force, get your flat-head and mallet.
From above the car gently tap it down until it is fully in place. Apply Lock-Tite to the bottom bolt and place it back in the shaft.
With a ratchet and 11mm socket, get the two bolts good and tight. Use the extension to reach the top bolt.
Once both bolts are tight with the ratchet, take the breaker bar and make sure they're GOOD and tight.
After you're sure everything is tightened how it should be, take a jack and begin taking the stands out and lowering the car back down.
After that, she's good to roll!
All of my play was coming from my rag joint. This is definitely something you should look into first if you have some steering slop.

 08-26-2017, 02:52 PM
#4
Registered User
Join Date: Sep 2014
Location: Coupland, TX, USA
Posts: 121
Re: *LT1 Rag Joint Eliminator Guide*
Just finished this myself using the Unbalanced Engineering kit. Used a wire brush to clean 20 years of rust off then will paint it with engine paint.
I used a sawzall to cut the rivets then had to punch them out - not easy. Ended up drilling the rivets but eventually got them out.
I used a sawzall to cut the rivets then had to punch them out - not easy. Ended up drilling the rivets but eventually got them out.

Thread
Thread Starter
Forum
Replies
Last Post
PFYC
Supporting Vendor Group Purchases and Sales
0
08-07-2015 08:52 AM