
View Poll Results: I have/had... (note: choose two if you have used both stock/aftermarket amps on them)
EU-700s in the rear sails powered by the stock amp and am/was pleased with the results.


1
14.29%
EU-700s in the rear sails powered by stock amp and am/was NOT pleased with the results.


0
0%
EU-700s in the rear sails powered by an aftermarket amp and am/was pleased with the results.


2
28.57%
EU-700s in the rear sails powered by aftermarket amp and am/was NOT pleased with the results.


0
0%
been considering this upgrade.


4
57.14%
Multiple Choice Poll. Voters: 7. You may not vote on this poll
INSTALL GUIDE (w/ pics): upgrading factory Monsoon subs with 6.5" ones (ED eu700s)


Thread Starter
Registered User
Joined: Aug 2003
Posts: 1,397
From: Chicagoland, IL
INSTALL GUIDE (w/ pics): upgrading factory Monsoon subs with 6.5" ones (ED eu700s)
^^^ABOUT THE POLL: you may choose 2 answers-ex: you had them powered by the stock amp, was not happy so you powered them with and aftermarket amp and were then pleased-you would select the corresponding options, etc. *Think of pleased as comparison to the stock setup-if you had to live with one or the other..were/are you pleased with the difference the EU-700s made?..or not worth the money/time.
+++
The following was done on a '98 CAMARO.
+++
This thread is intended to help guide one through the process of effectively replacing the factory subs with better ones, while keeping everything else stock. Though this can never replace your typical amp/box/sub combo -- the improvement over factory is EXTREMELY SIGNIFICANT and a VERY good choice if you simply want fuller bass, want to maintain th stock look, do not want a boxed sub (including stealth)/additional amps, etc.... You may always choose to power them with a separate amp in the future for even more volume and clarity. Refer to the specs linked below for powering information.
The subs replacing factory subs are these, by *Elemental Designs:
http://www.edesignaudio.com/edv2/pro...products_id=33
--You will need two D4 (dual 4 Ohm voice coils)
***See post #14 for additional information on the eD Eu-700 sub***
*If you have no heard of Elemental Designs, they are a smaller company and have very nice products @ reasonable prices. This comment was intended solely to those who have never heard of ED and may look past them.
Other items needed for install:
- speaker wire
- Dynamat (or any sound deadener/dampener)
- something to act as a spacer to pull subs out more (greater than about .25" and at MOST .5")
- 8 steel screws, at least 1in in length
- a type of caulk or sealant or adhesive that will remain flexible (for between the spacer and sheet metal)
- whatever tools you need or method you can think of to create a hole at least an inch (preferably a little greater than) for behind the speaker for the speaker's port
- basic electrical tools/supplies needed for cutting/reconnecting wires (electrical tape, optional soldering gun, crimps, wire strippers/crimpers/needle nose pliers, etc...)
- wiring diagram...not necessary, but recommended.. I will not try to provide all of them because I do not want to confuse anyone and am unaware of the differences with TAs/etc...
- bass blockers for rear hatch (optional)
POWER INFO: If you plan on powering them separately, consult this chart on powering eu700s http://www.edesignaudio.com/edv2/ele..._7kv2chart.php
////////////////////////////////////////////////////////////////////////////////
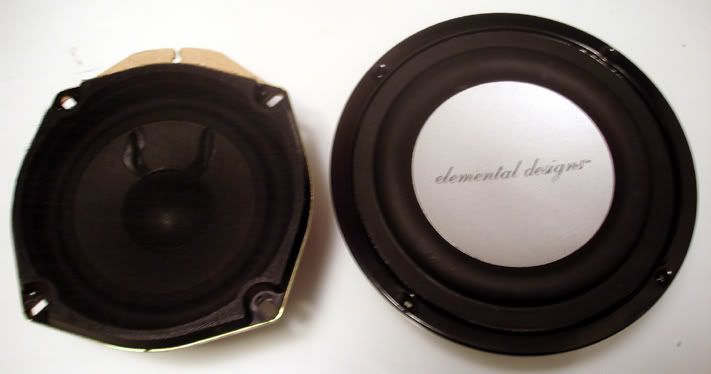
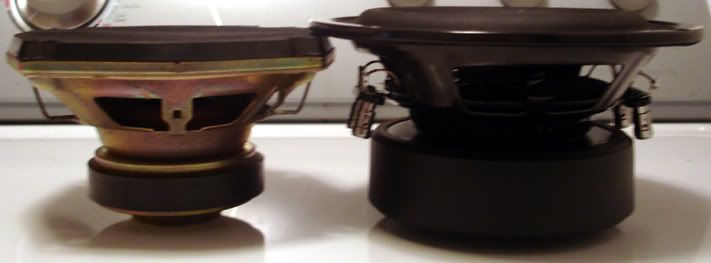
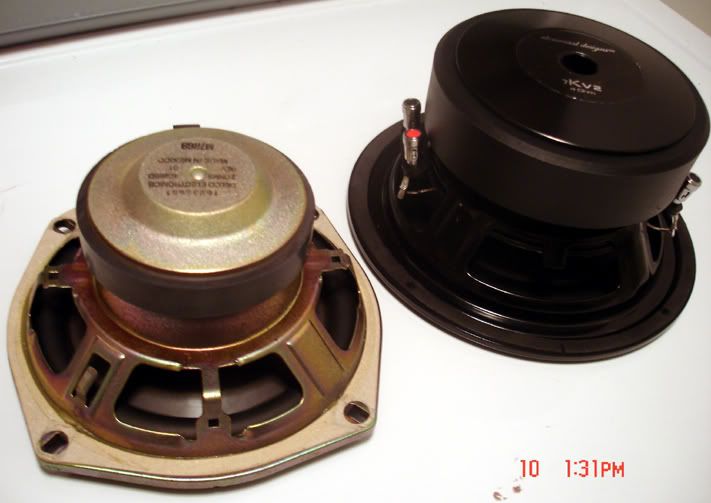
First, here are some comparison shots of the factory speakers and the new eu700s....notice especially the difference in mounting depth.
and here is the patient (bro's '98)...
***This "write-up" does not show all steps, and is incomplete in that you would probably have SOME trouble if you have ZERO idea what you are doing***
STEP 1: disconnect battery
---
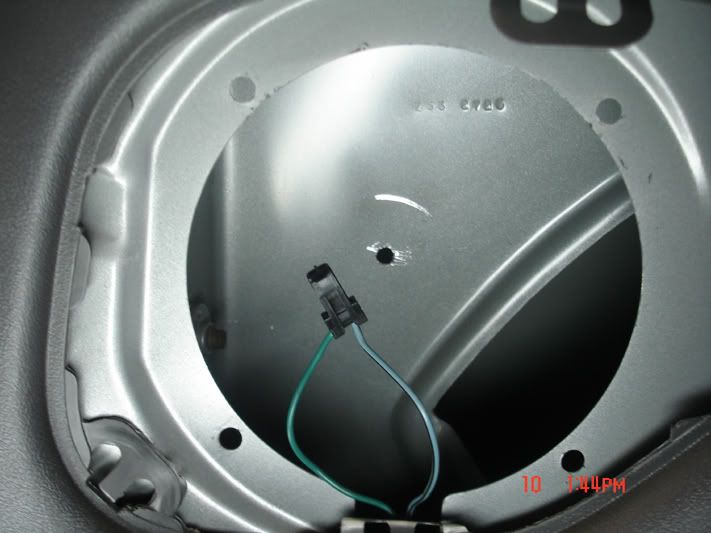
STEP 2: access and remove factory subs in rear panel...you should now see something like this (your wire colors may vary...USUALLY, the wire with a black like down the center along the length of the wire is the negative one -- in this case below, solid green was positive... -on the driver's side, the positive wire was not solid, and has a white stripe to indicate it... PLEASE refer to the wiring diagrams provided at the top of this page)
---
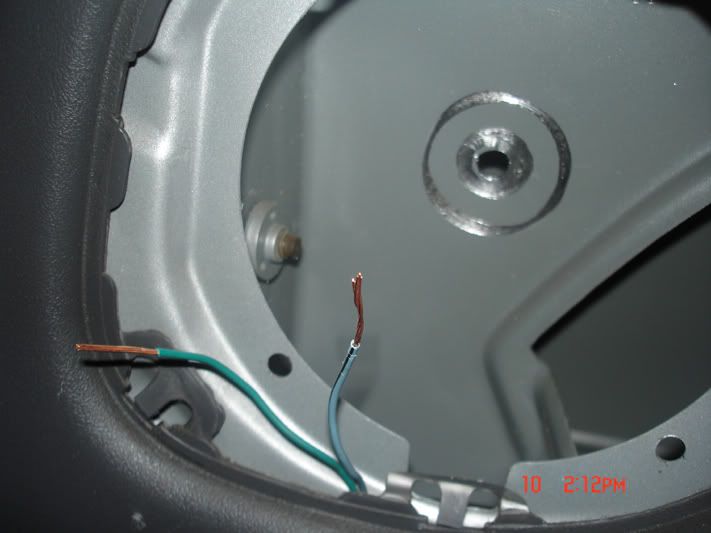
STEP 3: due to space limitations, I decided to simply cut off the factory harness... If you really want to have the option of going back to stock WITH the harness....obviously just tap into the line before it.
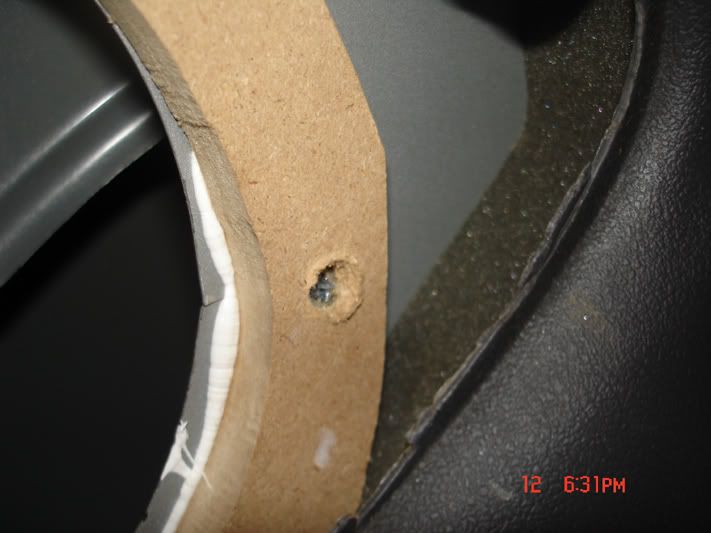
STEP 3 cont.: Now, create a 1-1.5" diameter hole in center of where sub will mount for the vented pole (see "PORT" in photo)...if you absolutely cannot do this, use the maximum .5" spacer (min. distance behind speaker suggested by eD tech is .25"),
*Note that the hole has not been completely cut here.
...as you can see, there isn't much wire here....so once stripped or tapped into, the FIRST thing I would do is extend the wires using a single piece of speaker wire....... this way, if you mess up or have to re-strip ends you can afford to do so.....plus it just makes life easier than messing with smaller wires.
All connections should ideally be soldered and covered in electrical tape or heat shrink tubing. If not, twist them damn well and use crimps/connectors/etc..
---
STEP 4: create a spacer that will be used to pull the speaker out (towards you) more and the magnet/port/rear of speaker off and away from the sheet metal behind it... Make it such that it fits the dimensions and lines of the previous mounting position. When installing, this is where you will use the adhesive/sealant of your choice that bonds to MDF/special wood/plastic/foam/WHATEVER you used to make your spacer and to the metal. Make sure the sealant you use will remain permanently flexible... I used a form of polyurethane caulk.
*Note that flat top screws should be used, or set them below the surface of the spacer so the sub can mount on a flatter surface... Be sure that once you mount the spacer, the wires are all BEHIND it... you may wish to cut a notch at the bottom of the spacer so the wires have more room (more obvious once you actually do and see this)... One or two screws at most should be enough to securely hold your spacer in - however, make sure that wherever you place these holes that you do not interfere with speaker holes (if you are picky about the orientation)...
***when drilling holes here, and ESPECIALLY when mounting the sub...it can be risk to just go drilling full speed with the screw penetrating the metal itself...you do NOT want to slip and damage your new speakers. I would first take a smaller bit suited for metal drilling, drill a hole first, then screw into that hole... whenever you are drilling, it is also a good idea to apply pressure IN AND OUT AWAY from the speaker a little, so that if you were to slip, hopefully you would miss the speaker.
---
STEP 5: Place Dynamat/sound dampening material in the area leaving holes for just the speaker...
*Note that there are no pics because I did NOT do this, but had planned on it... shipping delays prevented product from arriving while I was at home and able to complete the install... I plan on adding the Dynamat later, but for the time being...there were VERY surprisingly few things rattling...and the things that DID rattle, I'm not sure the Dynamat would help 100%...
---
STEP 6: Wire up your new eu700s! Since they are D4 Ohm speakers, and we want a 2 Ohm impedance...we wire in PARALLEL. Below its a diagram, which may be unclear to everyone but me since I created it....so let me know if it makes sense. It is NOT difficult at all, and if you didn't know anything besides POSITIVE and NEGATIVE and had no idea what parallel wiring meant and went ahead and "guessed".....you would probably "guess" right since it "looks" how you would expect it to...
*Note that here in the diagram the wires are "tapped" instead of the harness being cut... You can also see the port here that needs to breathe and shouldn't be right against a metal surface...
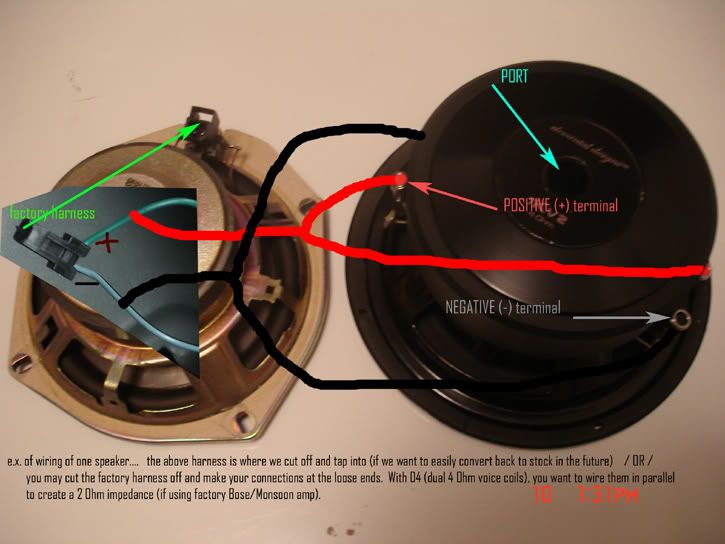
***All wiring was done on a '98 CAMARO....if you do this in a Firebird you will want to use all of the original wires since Firebirds have 4-ohm DVC (dual voice coil) subs from the factory***
---
STEP 7: Insert speakers. Now, we can slip our speakers into place! If you used a .5" spacer...this may take some patience, playing with angles, and pulling on the rear sails a bit. What worked for me was get the magnet in first, then slip the top part in, get it as flush as possible...and pull up on the plastic below until you can sip it in. You will NOT have to take off the panel, but me choose to just tug on the side molding by the door to give that extra cm you need...

---
STEP 8: If all appears well (seats well, wires behind speaker, nothing being completely smashed, speaker grille tabs not puncturing anything, etc), go ahead and screw them in. Remember to drill a small hole first to help guide the screw in easier and BE CAREFUL...
*Finished product:
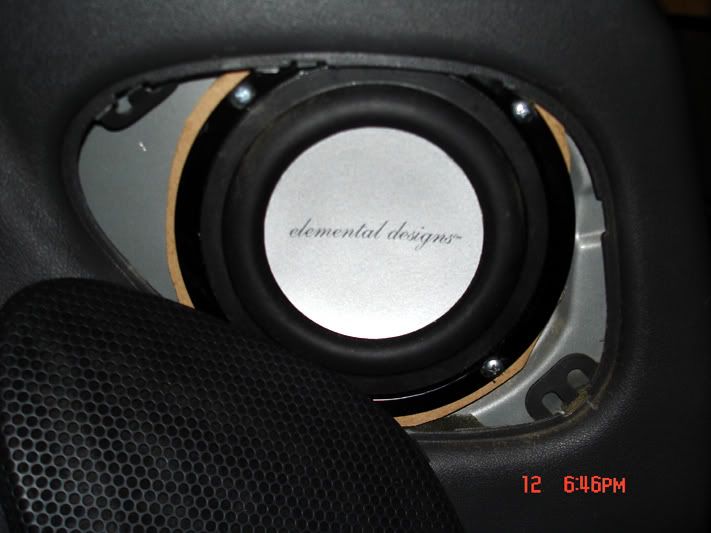
I was VERY surprised with the results... they sound incredible, even with the stock amp/HU! If you have a stealth box setup - this might also compliment that very nicely while maintaining factory appearance. There will be SOME vibrations, but nothing too disturbing, and can probably be taken care of with more Dyanamat/other misc. materials. It's as good as it gets for an infinite baffle application IMO.
+++
The following was done on a '98 CAMARO.
+++
This thread is intended to help guide one through the process of effectively replacing the factory subs with better ones, while keeping everything else stock. Though this can never replace your typical amp/box/sub combo -- the improvement over factory is EXTREMELY SIGNIFICANT and a VERY good choice if you simply want fuller bass, want to maintain th stock look, do not want a boxed sub (including stealth)/additional amps, etc.... You may always choose to power them with a separate amp in the future for even more volume and clarity. Refer to the specs linked below for powering information.
The subs replacing factory subs are these, by *Elemental Designs:
http://www.edesignaudio.com/edv2/pro...products_id=33
--You will need two D4 (dual 4 Ohm voice coils)
***See post #14 for additional information on the eD Eu-700 sub***
*If you have no heard of Elemental Designs, they are a smaller company and have very nice products @ reasonable prices. This comment was intended solely to those who have never heard of ED and may look past them.
Other items needed for install:
- speaker wire
- Dynamat (or any sound deadener/dampener)
- something to act as a spacer to pull subs out more (greater than about .25" and at MOST .5")
- 8 steel screws, at least 1in in length
- a type of caulk or sealant or adhesive that will remain flexible (for between the spacer and sheet metal)
- whatever tools you need or method you can think of to create a hole at least an inch (preferably a little greater than) for behind the speaker for the speaker's port
- basic electrical tools/supplies needed for cutting/reconnecting wires (electrical tape, optional soldering gun, crimps, wire strippers/crimpers/needle nose pliers, etc...)
- wiring diagram...not necessary, but recommended.. I will not try to provide all of them because I do not want to confuse anyone and am unaware of the differences with TAs/etc...
- bass blockers for rear hatch (optional)
POWER INFO: If you plan on powering them separately, consult this chart on powering eu700s http://www.edesignaudio.com/edv2/ele..._7kv2chart.php
////////////////////////////////////////////////////////////////////////////////
First, here are some comparison shots of the factory speakers and the new eu700s....notice especially the difference in mounting depth.
and here is the patient (bro's '98)...
~~~~~~~~~~~~~~~~~~~~~~~~~~~~~~~~~~~~~~~~
++++++++++++++++++++++++++++++++++++++++
~~~~~~~~~~~~~~~~~~~~~~~~~~~~~~~~~~~~~~~~
++++++++++++++++++++++++++++++++++++++++
~~~~~~~~~~~~~~~~~~~~~~~~~~~~~~~~~~~~~~~~
***This "write-up" does not show all steps, and is incomplete in that you would probably have SOME trouble if you have ZERO idea what you are doing***
STEP 1: disconnect battery
---
STEP 2: access and remove factory subs in rear panel...you should now see something like this (your wire colors may vary...USUALLY, the wire with a black like down the center along the length of the wire is the negative one -- in this case below, solid green was positive... -on the driver's side, the positive wire was not solid, and has a white stripe to indicate it... PLEASE refer to the wiring diagrams provided at the top of this page)
---
STEP 3: due to space limitations, I decided to simply cut off the factory harness... If you really want to have the option of going back to stock WITH the harness....obviously just tap into the line before it.
STEP 3 cont.: Now, create a 1-1.5" diameter hole in center of where sub will mount for the vented pole (see "PORT" in photo)...if you absolutely cannot do this, use the maximum .5" spacer (min. distance behind speaker suggested by eD tech is .25"),
*Note that the hole has not been completely cut here.
...as you can see, there isn't much wire here....so once stripped or tapped into, the FIRST thing I would do is extend the wires using a single piece of speaker wire....... this way, if you mess up or have to re-strip ends you can afford to do so.....plus it just makes life easier than messing with smaller wires.
All connections should ideally be soldered and covered in electrical tape or heat shrink tubing. If not, twist them damn well and use crimps/connectors/etc..
---
STEP 4: create a spacer that will be used to pull the speaker out (towards you) more and the magnet/port/rear of speaker off and away from the sheet metal behind it... Make it such that it fits the dimensions and lines of the previous mounting position. When installing, this is where you will use the adhesive/sealant of your choice that bonds to MDF/special wood/plastic/foam/WHATEVER you used to make your spacer and to the metal. Make sure the sealant you use will remain permanently flexible... I used a form of polyurethane caulk.
*Note that flat top screws should be used, or set them below the surface of the spacer so the sub can mount on a flatter surface... Be sure that once you mount the spacer, the wires are all BEHIND it... you may wish to cut a notch at the bottom of the spacer so the wires have more room (more obvious once you actually do and see this)... One or two screws at most should be enough to securely hold your spacer in - however, make sure that wherever you place these holes that you do not interfere with speaker holes (if you are picky about the orientation)...
***when drilling holes here, and ESPECIALLY when mounting the sub...it can be risk to just go drilling full speed with the screw penetrating the metal itself...you do NOT want to slip and damage your new speakers. I would first take a smaller bit suited for metal drilling, drill a hole first, then screw into that hole... whenever you are drilling, it is also a good idea to apply pressure IN AND OUT AWAY from the speaker a little, so that if you were to slip, hopefully you would miss the speaker.
---
STEP 5: Place Dynamat/sound dampening material in the area leaving holes for just the speaker...
*Note that there are no pics because I did NOT do this, but had planned on it... shipping delays prevented product from arriving while I was at home and able to complete the install... I plan on adding the Dynamat later, but for the time being...there were VERY surprisingly few things rattling...and the things that DID rattle, I'm not sure the Dynamat would help 100%...
---
STEP 6: Wire up your new eu700s! Since they are D4 Ohm speakers, and we want a 2 Ohm impedance...we wire in PARALLEL. Below its a diagram, which may be unclear to everyone but me since I created it....so let me know if it makes sense. It is NOT difficult at all, and if you didn't know anything besides POSITIVE and NEGATIVE and had no idea what parallel wiring meant and went ahead and "guessed".....you would probably "guess" right since it "looks" how you would expect it to...
*Note that here in the diagram the wires are "tapped" instead of the harness being cut... You can also see the port here that needs to breathe and shouldn't be right against a metal surface...
***All wiring was done on a '98 CAMARO....if you do this in a Firebird you will want to use all of the original wires since Firebirds have 4-ohm DVC (dual voice coil) subs from the factory***
---
STEP 7: Insert speakers. Now, we can slip our speakers into place! If you used a .5" spacer...this may take some patience, playing with angles, and pulling on the rear sails a bit. What worked for me was get the magnet in first, then slip the top part in, get it as flush as possible...and pull up on the plastic below until you can sip it in. You will NOT have to take off the panel, but me choose to just tug on the side molding by the door to give that extra cm you need...
---
STEP 8: If all appears well (seats well, wires behind speaker, nothing being completely smashed, speaker grille tabs not puncturing anything, etc), go ahead and screw them in. Remember to drill a small hole first to help guide the screw in easier and BE CAREFUL...
*Finished product:
I was VERY surprised with the results... they sound incredible, even with the stock amp/HU! If you have a stealth box setup - this might also compliment that very nicely while maintaining factory appearance. There will be SOME vibrations, but nothing too disturbing, and can probably be taken care of with more Dyanamat/other misc. materials. It's as good as it gets for an infinite baffle application IMO.
Last edited by fredmr39; Jan 25, 2007 at 09:24 PM.
Registered User
Joined: Mar 2003
Posts: 1,495
From: Westmont, IL
Nice writeup Fred, just replacing those factory "subs" with some Digital Audio Mid-Bass speakers myself made a big difference for me, although I had them powered by an aftermarket amp, although not getting NEARLY enough power. I didn't drill a hole in my sheetmetal when I put mine in, but now you have me thinking that maybe i should, cuz the DA's are pretty big.


I actually took these out this break though, because I finally got around to getting a subthump stealthbox and putting my sub in the car. While I was very impressed with the Mid-Basses, they were nothing compared to a proper sub in your car. I do however plan on getting some different Amps for my car and putting these back in and bandpassing them from 100-300hz and having my sub for below 100hz.
I actually took these out this break though, because I finally got around to getting a subthump stealthbox and putting my sub in the car. While I was very impressed with the Mid-Basses, they were nothing compared to a proper sub in your car. I do however plan on getting some different Amps for my car and putting these back in and bandpassing them from 100-300hz and having my sub for below 100hz.
Registered User
Joined: Sep 2004
Posts: 2,595
From: Lenexa, KS
Curious, was this done with the stock monsoon sound system or whatever? I'm considering doing it in my 1997 Camaro Z28. You just cut off the wiring harness, stripped the cover for the positive and negative and connected it to your sub and mounted it using a .5" MDF board as a spacer to pull it away from the outside of the car?
Thread Starter
Registered User
Joined: Aug 2003
Posts: 1,397
From: Chicagoland, IL
Curious, was this done with the stock monsoon sound system or whatever? I'm considering doing it in my 1997 Camaro Z28. You just cut off the wiring harness, stripped the cover for the positive and negative and connected it to your sub and mounted it using a .5" MDF board as a spacer to pull it away from the outside of the car?
but yea you basically summarized my post in a sentence -- I just had random pics and wanted to try to make something out of them

the main points of the post are:
- there are 6.5" replacements
- since they are DVC 4 Ohm, they can be wired in parallel to work well with factory amp
- you will need a spacer (MIN=.25", MAX=.5")
- it IS a big improvement
-------------------------------------------
Matt -- where did you purchase those DA subs? They look large/deep...however, you didnt need a spacer or anything? Is the back touching metal or Dynamat or anything? Just curious....that might be a more simple alternative -- what options do they have as far as voice coils and impedances?
Registered User
Joined: Mar 2003
Posts: 1,495
From: Westmont, IL
Got those off of ebay. They are the same as Audiobahn's I think, just a different brand name. As far as I know, there is only one type available, and thats a 3-ohm single voice coil. They are very deep, but dont hit the sheet metal back there, but its real close, because they can basically support themselves in the opening without any screws just because of the magnet attraction. Putting a spacer in there would help though I think and would also give me much better mounting pressure. Like I said earlier, I only used them with an aftermarket amp and they sounded good but only had about 65watts going to them and I believe they can handle up to 200watts, so I plan on nearly doubling the watts going to them this summer.
Thread Starter
Registered User
Joined: Aug 2003
Posts: 1,397
From: Chicagoland, IL
cool, here is a power summary of the eu700s....as you can see....they would love more than the stock amp can dream of.... http://www.edesignaudio.com/edv2/ele..._7kv2chart.php
At least those DAs are 3Ohms and not 4 unlike most SVC subs I looked at that may fit (which wasn't many)
At least those DAs are 3Ohms and not 4 unlike most SVC subs I looked at that may fit (which wasn't many)
 Definitely a nice upgrade for someone wanting to stick with Monsoon for a while.

Thread Starter
Registered User
Joined: Aug 2003
Posts: 1,397
From: Chicagoland, IL
So for those reasons, a new set of fronts will be going in shortly as well as a new HU.
Registered User
Joined: Sep 2003
Posts: 1,327
From: Hartford, CT
Anyone ever listen to a set up as described in this thread compared to a single 10" sub? I have a full aftermarket system.... components up front, 2 ways in the rear and a 10" sub out back in a small box. If replacing my rear speakers with these 6.5" woofers would give similar bass to my 10" rockford, I'd really consider ditching the box.
Registered User
Joined: Mar 2003
Posts: 1,495
From: Westmont, IL
Will not compare to a 10" sub. They work well for filling in bass, but cannot hit those low notes or hit as hard as the 10". As shown earlier in this thread, I have some similar speakers that I used before I got my sub in the car. They worked well, but just dont compare to a real sub. I will however be using them for Mid-Basses soon. And by that I mean having my sub low passed at 100hz, those speakers for 100hz-300hz and then my regular speakers for above 300hz.
Thread Starter
Registered User
Joined: Aug 2003
Posts: 1,397
From: Chicagoland, IL
I agree they really just can't compare... In my car I have a single 10", only about 300wrms, and those eD's in my brother's car. My brother was extremely happy with them though.
I think they would be a EXCELLENT addition to a stealth box like setup without a doubt.
I believe it is also VERY possible to get these speaker's to perform very very well if one were to amp them with an aftermarket amp, and take more care in dynamatting the area better, etc.... it just takes more work to make an infinite baffle application work as well/efficient... Also, the physical limitations of the speaker hurt it's potential compared to a 10"...
This idea though is best if you wish to run them as mid-bass speakers, do not want an aftermarket amp/sub combo, or want to add additional bass to an existing "stealth" box type setup. I personally will be picking up a pair of these to add to the 10" I have.

Registered User
Joined: Feb 2004
Posts: 751
From: Leesburg, VA
The only drawback I can see when going with aftermarket amps, midbasses and a sub is much more complicated bandpass crossover setup, which is not offered in a majority of amps/HU's. There are amps though with ability to tune LP and Sub-sonic filters in a pretty wide range - that will work and it will be cheapest way to make it clean and loud without active filters/sound processors.
Thread Starter
Registered User
Joined: Aug 2003
Posts: 1,397
From: Chicagoland, IL
************************************************
************************************************
*********ADDITIONAL eD Eu-700 INFORMATION*********
************************************************
************************************************
************************************************
VENTED POLE / SPACE BEHIND SPEAKER
Drilling the hole as illustrated in the pictures above is NOT necessary. The minimum required space that there should be behind this port, or "vented pole", is .25". If you use a .25" spacer, that is not enough room.....however, if you use a .50" spacer, there is obviously at least .25" of space behind the speaker. IF you for some reason CANNOT use a .5" spacer or drill a hole with a smaller spacer...do the best you can. Drill at least a small hole, and space it as far as possible.
^NOTE: Having LESS than .25" of space behind the speaker, or even completely plugging up the port will NOT cause any physical damage to the speaker. The only thing that would/could suffer is sound quality. Plugging it entirely can create some odd back pressure that would DEFINITELY be noticeable in a ported box, and may actually end up being audible in a sealed enclosure as well. I do not know how it would affect the sound in an infinite baffle application.
***Pole vents are commonly used as means of cooling (speaker motion dissipates heat away from the voice coil and magnet steel). Pole vents also are the most common method for relieving pressure buildup (under a dust cap/diaphragm). The latter reason is why it can affect sound...and though it WOULD aid in heat dissipation, heat is dissipated other ways and on this particular speaker, according to eD, it shouldn't make a difference as far as heat dissipation.
---
FREQUENCY RESPONSE
Frequency response on the drivers is 20Hz~500Hz.
If you plan to use them as a dedicated midbass - I would cross them over somewhere around 250Hz.
---
SENSITIVITY
SPL: 85 dB is @ 1W/1m
Last edited by fredmr39; Jan 26, 2007 at 12:07 AM.
