Timing Cover Seal Question
 04-17-2008, 07:39 AM
#1
Registered User
Thread Starter

Join Date: Mar 2003
Posts: 53
Timing Cover Seal Question
Bought a Fel-Pro tinming cover gasket set for a 1995 LT1 engine. At the top of the little instruction sheet under Distributor shaft seal it says "IMPORTANT: This PTFE seal must be installed dry. Do not lubricate seal lip or sealing surface." At the bottom of the sheet it says "IMPORTANT: Do not install any seal without break-in lubricant protection." So what is a person to do?
 04-17-2008, 07:55 AM
#2
Registered User

Join Date: Oct 2004
Location: Houston, TX
Posts: 809
Bought a Fel-Pro tinming cover gasket set for a 1995 LT1 engine. At the top of the little instruction sheet under Distributor shaft seal it says "IMPORTANT: This PTFE seal must be installed dry. Do not lubricate seal lip or sealing surface." At the bottom of the sheet it says "IMPORTANT: Do not install any seal without break-in lubricant protection." So what is a person to do?
 05-26-2009, 12:01 PM
#4
Registered User
Join Date: Aug 2002
Location: Indianapolis, IN
Posts: 3,650
Old thread, I know, but I'm getting ready to do this myself on my 1996 LT1 Camaro. I'm not pulling the hub and doing the crank seal (which may or may not be leaking a bit). Obviously I'm also not pulling the front cover itself and replacing that gasket. But I have my (failed) water pump off, and I'm installing a new OEM Delphi vented Optispark (from thepartsladi) since the original is at 107k and took a bath in coolant, I'm sure (and oil...).
I bought the Fel-Pro timing gasket set as well, and I too was confused by the warnings on the box. I've been trying to search, as I've seen some say "DRY" and others say use oil. Can anyone clarify for me (and others who will undoubtedly search in the future)? I'm a newbie at doing this procedure...
Inner rubber lip that goes over the water pump drive shaft = ??
Is it correct to leave this dry, or should one apply a thin coating of oil to the lip? Then use some special Kent Moore tool / cut Sharpie / socket / other means (along with extreme care, which means I'm sure I'll tear it somehow...). I understand that the lip needs to point "inward" toward the engine, not the front of the car. Anyone have any tips for doing this without the Kent Moore specialty tool? I've seen talk of a cut sharpie marker, but without good description of how it was made.
Inner rubber lip = ??
Should this also be dry? Or is it better to use some oil? Is this the teflon-coated seal? Or does that go for both this and the water pump seal?
I plan to use Permatex Form a Gasket (#2) on both sides of the water pump gaskets. I think I have everything I need to start installing stuff, save for a seal puller and a tool / trick to do the water pump drive shaft seal. I need to install my new plug wires while I've got all this stuff out of the way, but to be honest I'm dreading doing these two seals, primarily because I keep seeing warnings about the tricky water pump drive shaft seal...
Any help is much appreciated!!
EDIT: Anyone in the Indy area have the tool to do the water pump drive shaft seal install?
Last edited by 96_Camaro_B4C; 05-26-2009 at 01:22 PM.
05-26-2009, 10:22 PM
#5
Registered User
Join Date: Dec 1969
Location: Little Rock, AR
Posts: 27,709
05-26-2009, 10:43 PM
#6
Registered User
Join Date: Aug 2002
Location: Indianapolis, IN
Posts: 3,650
Thanks Shoebox.  I actually have that thread saved and have referenced it many times. The post with the close up of the tool itself is missing the picture, but I guess it does have a decent description of how he made it (including the important diameter dimension).
What about oil vs. no oil for the seals? (He used oil, but farther down in the thread, RJI comments about using the factory tool and specifically talks about NOT using oil... hence my confusion). I'm not even 100% sure the current ones were leaking, though I have to believe at least the wp drive shaft seal was leaking because the back of the water pump is pretty coated in black ****. I'd hate to get this thing all back together and discover a leak b/c I did the wrong / less correct thing on the seals.
What about some other lube that would be teflon-safe but would aid in sliding the seal on?
I actually have that thread saved and have referenced it many times. The post with the close up of the tool itself is missing the picture, but I guess it does have a decent description of how he made it (including the important diameter dimension).What about oil vs. no oil for the seals? (He used oil, but farther down in the thread, RJI comments about using the factory tool and specifically talks about NOT using oil... hence my confusion). I'm not even 100% sure the current ones were leaking, though I have to believe at least the wp drive shaft seal was leaking because the back of the water pump is pretty coated in black ****.
I'd hate to get this thing all back together and discover a leak b/c I did the wrong / less correct thing on the seals.What about some other lube that would be teflon-safe but would aid in sliding the seal on?
 05-27-2009, 08:56 AM
#8
Registered User
Join Date: Aug 2002
Location: Indianapolis, IN
Posts: 3,650
ACE1252, in that pic (thanks for that, by the way), it looks as though the marker is slightly smaller in diameter than the shaft. It seems like that would invite the lip of the seal to catch on the shaft, which is what the tool is supposed to be preventing. I guess the marker is close enough that it works? I'm thinking of trying the wp coupling as well (see Hal's pics in this thread on the same topic).
I'm still wondering about using oil on the seal to guide it on the tool (and onto the shaft). From what I've read, the seal should be installed dry, yet I keep seeing people using oil on the tool.
I spent ~3 hours last night pulling my spark plug wires (except #7; can't SEE the bolt to loosen the braket holding #7 wire against the block) and installing / routing the passenger side wires behind the damn ps pump. I just want to drive my freaking car!!
05-27-2009, 11:15 AM
#9
Registered User

Join Date: Jun 2008
Location: Chesterfield, MI
Posts: 19
I originally installed the Opti seal in with lubricant around the inner ring and it once again started to leak, I replaced it with a new seal and did not lubricate the inner ring and the oil leak has stopped. Hope this helps.
05-27-2009, 12:02 PM
#11
Registered User

Join Date: Dec 2007
Location: Richmond,Va.
Posts: 14
Yea installing the opti seal dry causes the seal to wear against the opti drive and create a tighter sealing surface, that is why you don't lube that one.and the best tool I have found is a 1/4 drive 13 mm sockwr that the inside fits over the w/p drive splines.
05-27-2009, 05:48 PM
#12
Registered User
Join Date: Mar 1999
Location: Kernersville, NC
Posts: 2,058
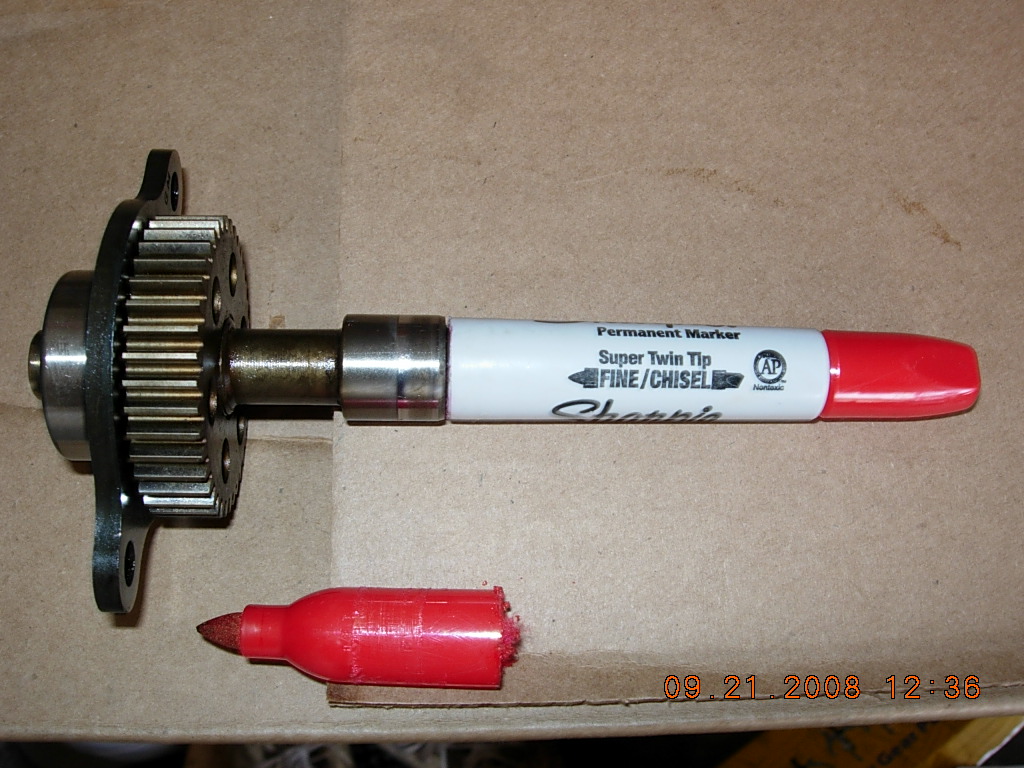
The water pump drive shaft is tapered at the end. The marker matches up good with it(right click and view full picture). It's critical that you cut the marker flush. Don't angle the cut. Also, using that marker...just cut off the colored end. Don't get into the gray. Take some emery cloth to the marker to smooth it up(don't go crazy). Using motor oil, lightly lube the mark, seal, and water pump drive shaft. Apply pressure to keep the marker seated against the shaft. Slide the seal onto the water pump drive shaft. Then using a socket, squarely drive the seal in until it seats.
I lubed all the seals(inside edges) for the front cover and have had no leaks. The only seal I have never lubed is the rear main. It comes with quite a bit of grease, pre-installed, in the grooves.
Last edited by ACE1252; 05-27-2009 at 10:33 PM.
05-27-2009, 09:15 PM
#13
Registered User
Join Date: Aug 2002
Location: Indianapolis, IN
Posts: 3,650
Thanks for the detailed info, Jim Rockford and ACE!
Interesting that some have been OK with lubing the seals, while others have had problems. I suppose it make sense that the WP seal might need some lube, as you are pushing the seal ONTO the shaft. In the case of the opti seal, however, the seal is already facing inward toward the engine, and you are sliding the shaft INTO the seal in the same direction (so there is no force trying to push the seal the wrong direction against the sealing surface, as is the case with the WP seal).
I appreciate all the help.
P.S. I looked briefly again tonight, and I still cannot for the life of me see the bolts I need to undo to get the number 7 plug wire out.  At this point I am about ready to just leave it in there and call it good! (The car was running perfectly fine when I parked it b/c of the failed water pump, and the wires I have removed all look pretty decent to me. Dirty on the outside, but not corroded or rubbed through anywhere) *sigh* [/P.S.]
Interesting that some have been OK with lubing the seals, while others have had problems. I suppose it make sense that the WP seal might need some lube, as you are pushing the seal ONTO the shaft. In the case of the opti seal, however, the seal is already facing inward toward the engine, and you are sliding the shaft INTO the seal in the same direction (so there is no force trying to push the seal the wrong direction against the sealing surface, as is the case with the WP seal).
I appreciate all the help.
P.S. I looked briefly again tonight, and I still cannot for the life of me see the bolts I need to undo to get the number 7 plug wire out.
At this point I am about ready to just leave it in there and call it good! (The car was running perfectly fine when I parked it b/c of the failed water pump, and the wires I have removed all look pretty decent to me. Dirty on the outside, but not corroded or rubbed through anywhere) *sigh* [/P.S.]
01-11-2017, 04:22 AM
#14
Registered User

Join Date: Jan 2017
Posts: 1
Re: Timing Cover Seal Question
What they are talking about is install the timing cover gasket (paper) with no RTV as they suggest, but it's up to you as some do and some don't. The break in lube is supposed to be applied to the Opti/Distributer seal (round seal in the timing cover behind the Opti). Just put some oil on your finger and apply it to the complete surface of the gasket (inside lip) before you remount the Opti. This keeps the gasket from wearing out sooner as when you first crank it friction can put wear and tear on the seal. Same goes for the Crank seal if you do that one as well. Good luck as it's not too fun to do this as I just did it about a month ago and let me know if you need any advise.
01-11-2017, 10:35 AM
#15
Registered User

Join Date: Jun 2003
Posts: 1,083
Re: Timing Cover Seal Question
Some use the spline coupler itself or a socket but since those don't have a tapered end like the Sharpie pen cap or the manufactured tool the inside lip of the seal can fold over on itself sliding it on...and the seal will immediately 100% leak
Also the WP drive seal and Opti seal DO NOT grease or oil on install. They are PTFE seals, no oil
So using a tool rotate and slide the seal on at the same time. Put tool on the wp drive spline and push onto the spline by hand to just get it started. Then use a deep socket to gently tap in the seal
Even experienced mechanics can FU this seal but using some form of tool is necessary

Thread
Thread Starter
Forum
Replies
Last Post
oldschool
Parts For Sale
16
02-09-2016 09:21 PM