Restoration complete - and how I did it (detailed)
 05-14-2009, 09:54 PM
#1
Registered User
Thread Starter

Join Date: May 2002
Location: Dallas, Texas
Posts: 5,556
Restoration complete - and how I did it (detailed)
Okay, it didn't exactly take a lot of work to 'restore' our Z28, but now the car is back to pretty close to perfect. Sure, it has its share of body damage that will one day be addressed, but now the hood fits better and the car looks just like it did from the factory, with no damaged or missing parts under the hood.  As an added bonus, one of the wires from the junction block must lead to the keyless entry device, because now that I cleaned the wires, my keyless entry works every single time!
Things I needed:
Things you might need, that I ended up not needing:
Note: The part numbers for the hood adjustment bumpers above are what GM currently offers. These are NOT factory replacement ones. Most Camaro owners (including me in this case) don't care that they aren't exactly what came on the car, because the new part is better. But if you are a person reading this who REALLY wants exactly what came on the car... my parts manual lists #10157703 for all four bumpers. This part has been discontinued though, probably because they weren't up to the task of supporting the hood. As you'll see below, the one I took a picture of was completely rotten and the other one was so rotten it broke into 3 pieces when I removed it.
How difficult was this to do on a scale of 1 to 10, where 10 is so hard you need a mechanic: 1
How long did it take? Could have been done without cleaning and without concern for the car in a matter of several minutes, however I spent 2+ hours, which included cleaning, adjusting the hood, and slightly adjusting the driver's side fender.
Let's get started...
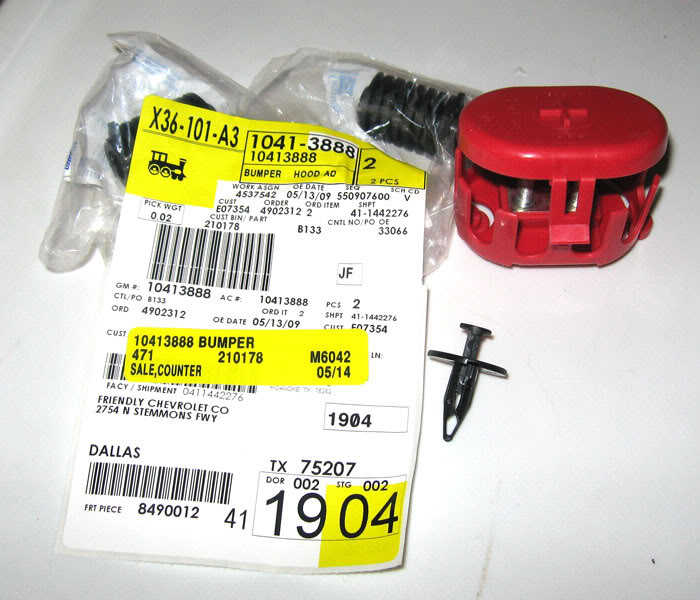
Parts: I got them from a dealership, because gmpartsdirect charges a minimum of $12 shipping, and I didn't have enough parts to make their cheaper prices beneficial. From the dealership, they totalled up to be $27.46 which is totally expensive, but for the satisfaction they gave me once on the car, I think they may have been worth it. One other thing to note, is that if you order from GMpartsdirect, you'll have to buy the caps and retainer in sets of 10, which is very expensive. $19 for 10 caps when you will only need 4 isn't cool.
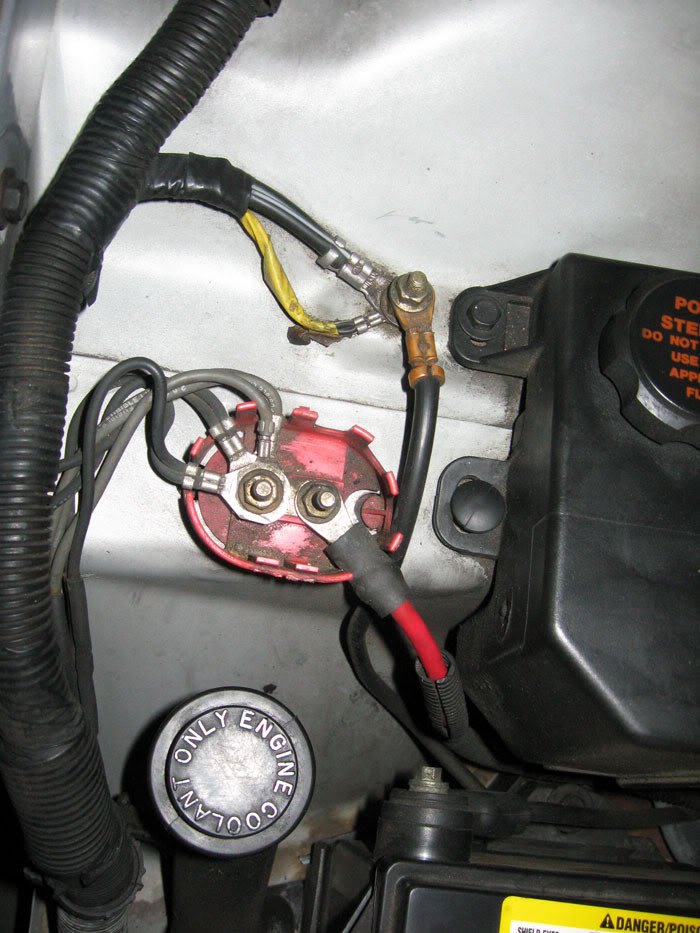
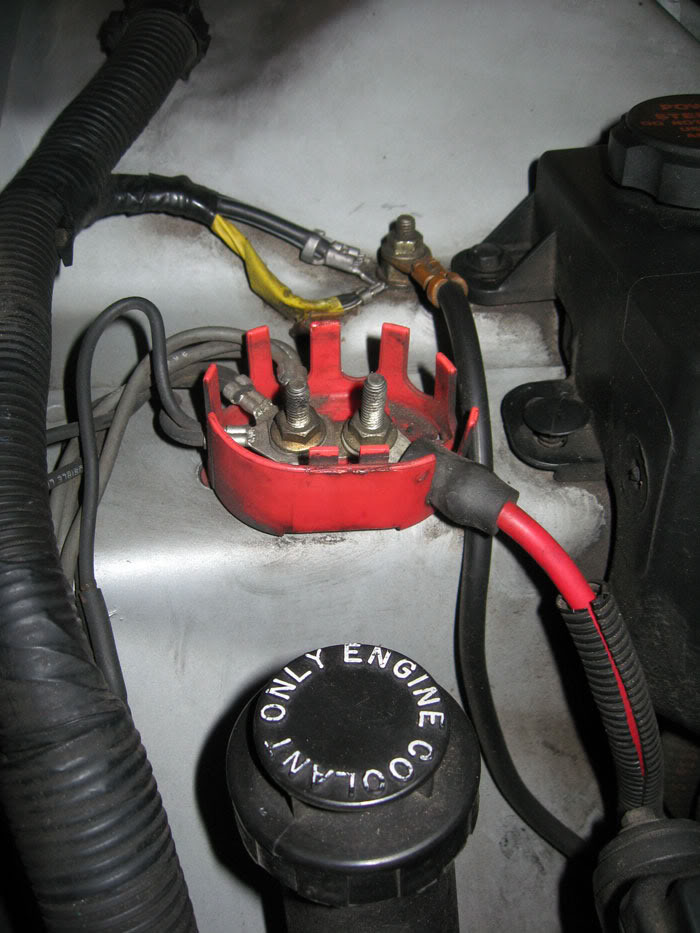
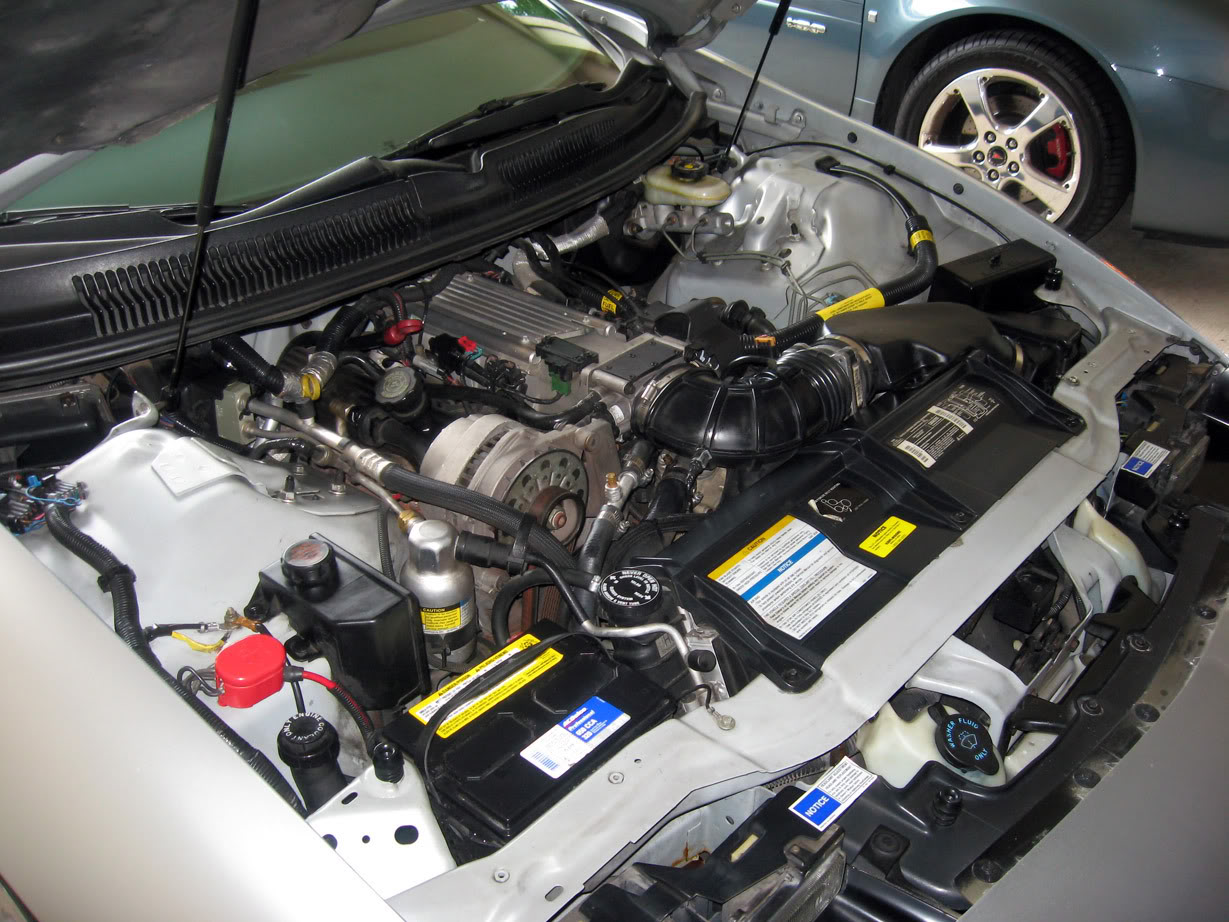
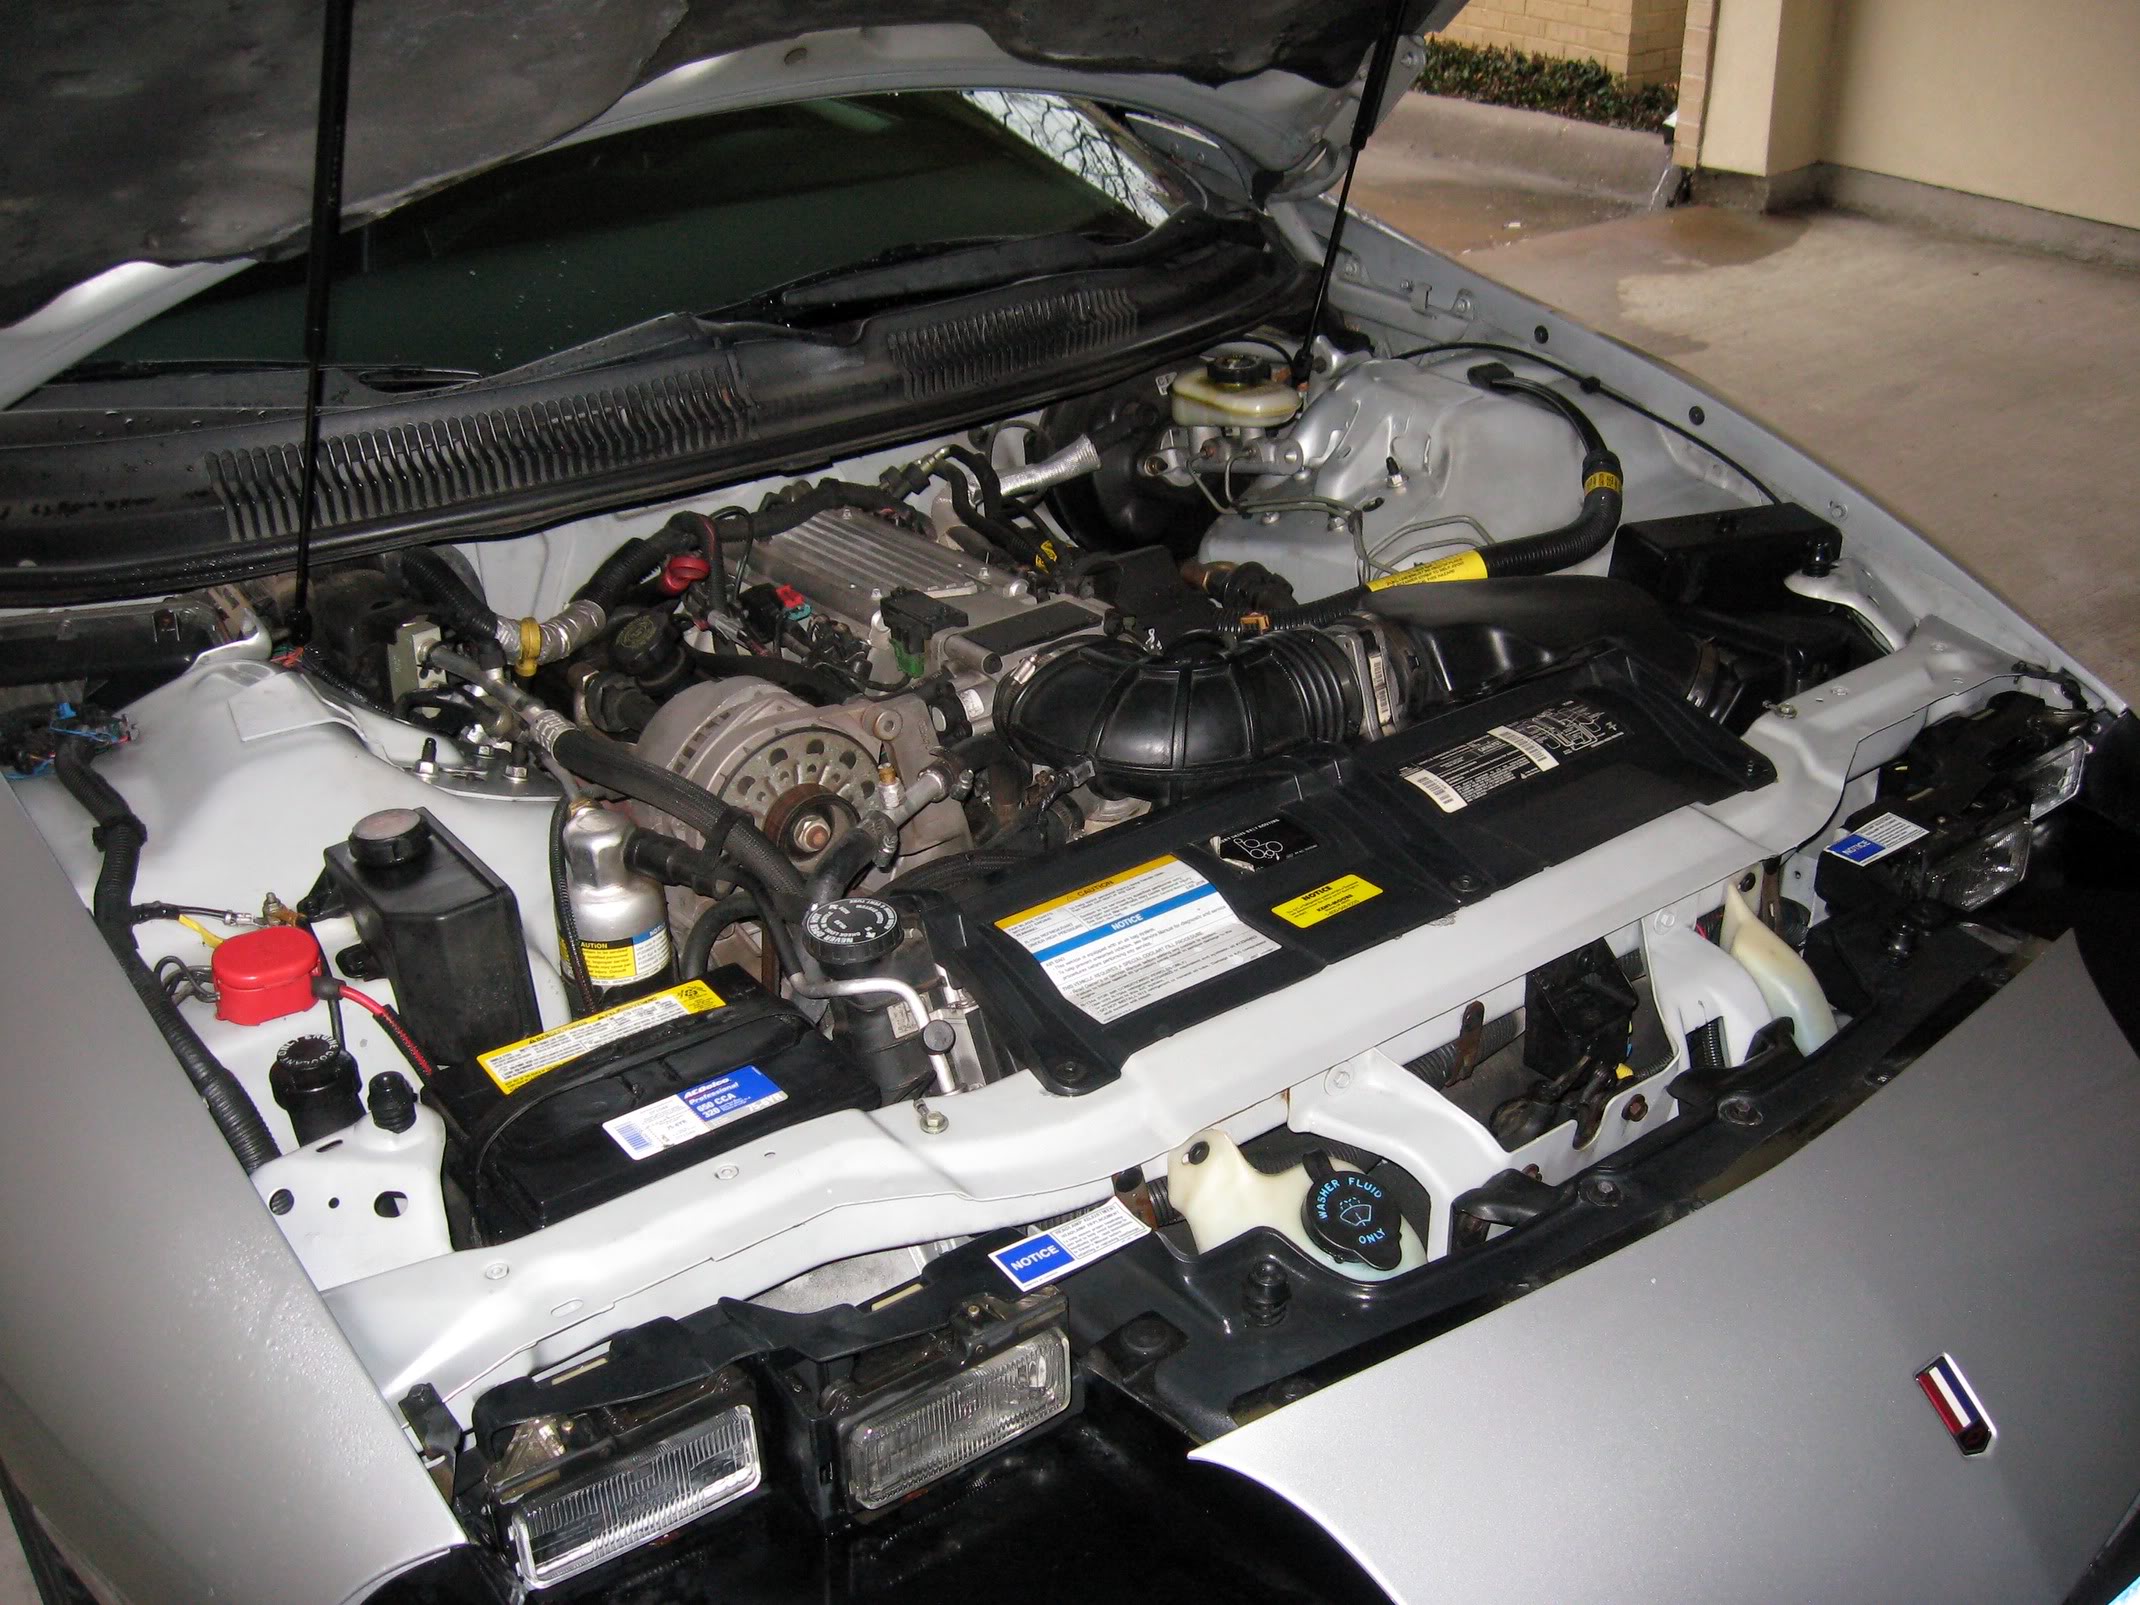
This is how disgusting the broken junction block looked on the car:
First things first. If you're going to be cleaning this area, you need to disconnect the negative battery cable now. This will require a metric wrench, and if I remember correctly, it was 8mm. It's very easy to remove, just loosen it, then use your fingers to loosen it off the battery and move the cable to the other side of the power steering fluid box and keep it away from the wires you'll be removing from the old junction block. If you're going to be cleaning this area, you might as well prevent any risk of shock.
There tends to be a power down time that usually applies to the airbags. I believe it's a capacitor that doesn't discharge for about 5 minutes. Whatever, it doesn't matter, just don't start cleaning yet--do something else--and you won't get shocked.
Start by removing the rotten old bumpers by untwisting them by hand or using an adjustable wrench. You will know you have factory original bumpers on the corner areas if they have overspray on them. I verified this by looking at them on our SS, which has red overspray on them. I don't know if the same is true for the front ones, because I wasn't paying attention to them.
From years of shutting the hood, my bumpers were crap. Oddly enough, the front two are perfect still. Take note of how the new ones have a thicker screw to them.
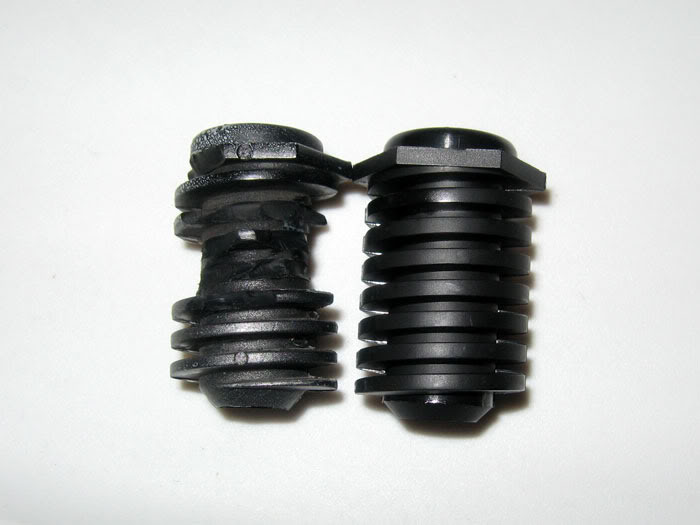
Remove the caps by pulling them off the bumpers. Mine were in perfect shape, so I just washed them and put them on the new bumpers. Spray the new bumpers with silicone to help lubricate them, and put them back where they came from. You will almost definitely need an adjustable wrench to turn them. I couldn't have done it without one. Do it slowly and don't strip your new $4.46 plastic screws...
Stop when you can only see 4 rows of screw left and try closing the hood gently. Lower the hood and apply enough force with your hand to see if the hood will close. Adjust accordingly until your hood fits right. (Sidenote: BOY OH BOY did this ever help with the appearance of our Z28!!!). I had to adjust and repop the hood about 7 times. Adjust the front bumpers if necessary. The front bumpers don't seem to do much honestly...
If you are going to be adjusting your quarter panel for any reason like I did, you'll need to loosen but not remove the 10mm bolts on the inner side of the engine bay, and then there is another one hidden behind the mirror. You will need to open your door all the way and use a 10mm socket, a socket extender, and a ratchet to loosen this. Good luck reaching it without a flexible ratchet or a small one. Mess around until you think you've done something (I couldn't get the quarter panel to move much at all), and then retighten the bolts. Don't overtighten or you'll crack the plastic.
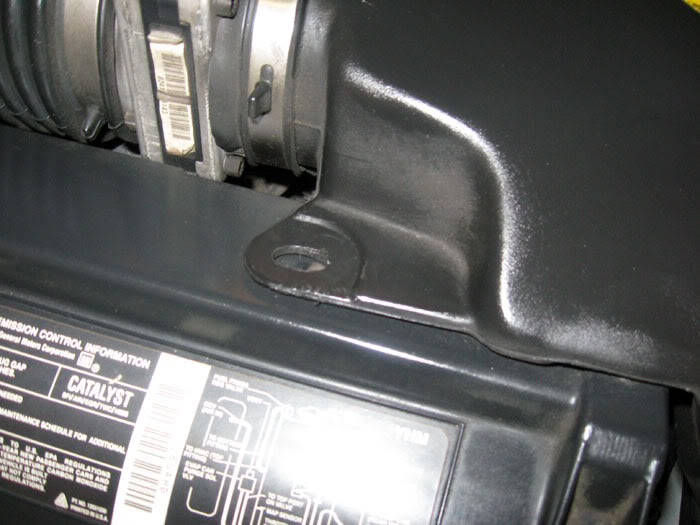
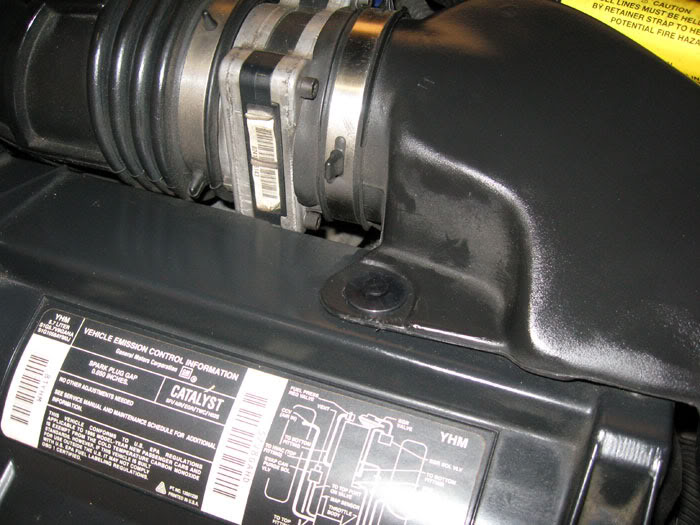
Next, putting the new retainer in is a snap. The retainer honestly isn't a necessary piece, but I was tired of the darn hole there, so I had to get one. Just put it in the hole and push the pin in.
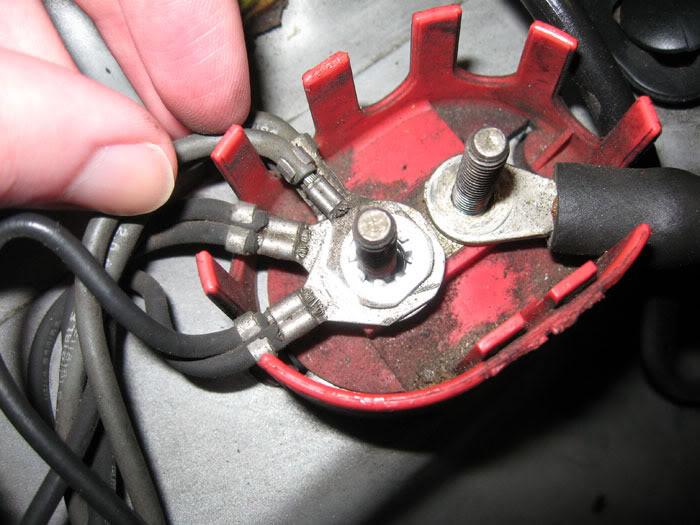
By now the car is safe to clean and mess with. The wires going into the old junction block are all positive +. The three above the junction block are negative -. You undid the battery cable so you wouldn't accidentally touch the positive to the negative. If you want to get really technical, only one is positive and only one is negative, but I know next to nothing about electronics, so better safe than sorry.
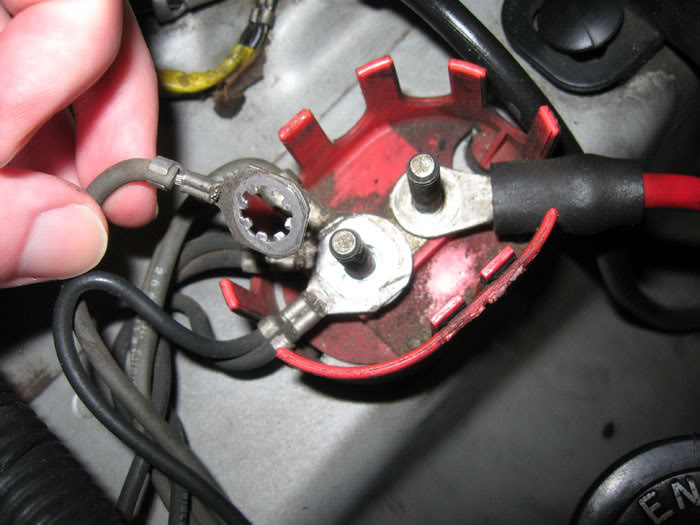
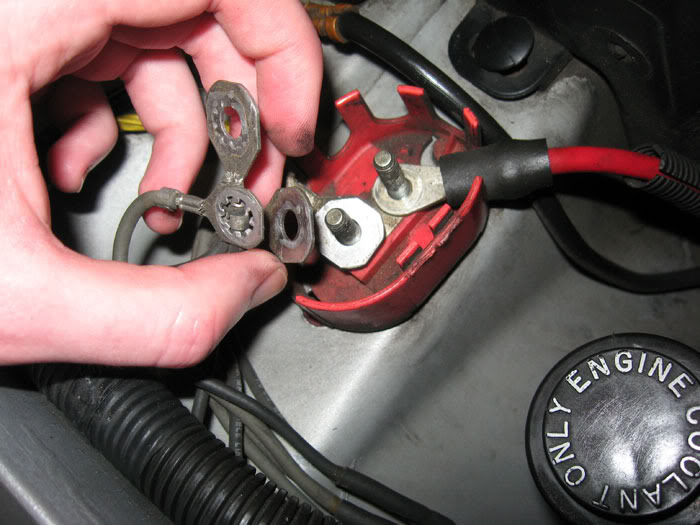
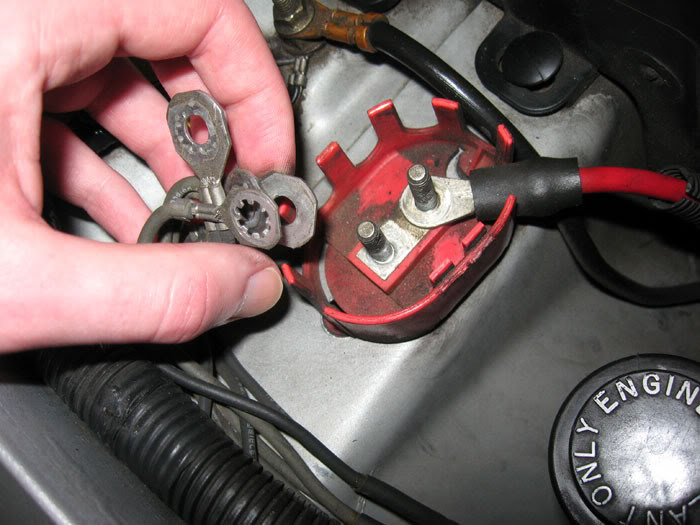
First remove the two nuts holding the wires to the old junction block. You'll use a 10mm socket. Take them the rest of the way off with your fingers. I took pictures of the order the wires were in, so I'd get them back on correctly. Do the reverse of these pics when installing the new block:
As an added bonus, one of the wires from the junction block must lead to the keyless entry device, because now that I cleaned the wires, my keyless entry works every single time! Things I needed:
- part #12186586, $15.35, junction block
- part #10413888, $4.46 each (you need two), hood adjustment bumper for corners of the hood
- part #12551599, $1.09, push-in retainer for outlet duct of the air intake
- adjustable wrench
- metric sockets and wrenches (8mm and 10mm if I remember right)
- Palmolive/Dawn soap
- toothbrush
- q-tip
- water spray bottle
- baby wipes
- paper towels
- silicone spray
Things you might need, that I ended up not needing:
- part #14093705, $2.70 each (you need four), caps for the hood adjustment bumpers
- part #10309494, $4.39 each (you need two), hood adjustment bumper for the front of the hood
Note: The part numbers for the hood adjustment bumpers above are what GM currently offers. These are NOT factory replacement ones. Most Camaro owners (including me in this case) don't care that they aren't exactly what came on the car, because the new part is better. But if you are a person reading this who REALLY wants exactly what came on the car... my parts manual lists #10157703 for all four bumpers. This part has been discontinued though, probably because they weren't up to the task of supporting the hood. As you'll see below, the one I took a picture of was completely rotten and the other one was so rotten it broke into 3 pieces when I removed it.
How difficult was this to do on a scale of 1 to 10, where 10 is so hard you need a mechanic: 1
How long did it take? Could have been done without cleaning and without concern for the car in a matter of several minutes, however I spent 2+ hours, which included cleaning, adjusting the hood, and slightly adjusting the driver's side fender.
Let's get started...
Parts: I got them from a dealership, because gmpartsdirect charges a minimum of $12 shipping, and I didn't have enough parts to make their cheaper prices beneficial. From the dealership, they totalled up to be $27.46 which is totally expensive, but for the satisfaction they gave me once on the car, I think they may have been worth it. One other thing to note, is that if you order from GMpartsdirect, you'll have to buy the caps and retainer in sets of 10, which is very expensive. $19 for 10 caps when you will only need 4 isn't cool.
This is how disgusting the broken junction block looked on the car:
First things first. If you're going to be cleaning this area, you need to disconnect the negative battery cable now. This will require a metric wrench, and if I remember correctly, it was 8mm. It's very easy to remove, just loosen it, then use your fingers to loosen it off the battery and move the cable to the other side of the power steering fluid box and keep it away from the wires you'll be removing from the old junction block. If you're going to be cleaning this area, you might as well prevent any risk of shock.
There tends to be a power down time that usually applies to the airbags. I believe it's a capacitor that doesn't discharge for about 5 minutes. Whatever, it doesn't matter, just don't start cleaning yet--do something else--and you won't get shocked.
Start by removing the rotten old bumpers by untwisting them by hand or using an adjustable wrench. You will know you have factory original bumpers on the corner areas if they have overspray on them. I verified this by looking at them on our SS, which has red overspray on them. I don't know if the same is true for the front ones, because I wasn't paying attention to them.
From years of shutting the hood, my bumpers were crap. Oddly enough, the front two are perfect still. Take note of how the new ones have a thicker screw to them.
Remove the caps by pulling them off the bumpers. Mine were in perfect shape, so I just washed them and put them on the new bumpers. Spray the new bumpers with silicone to help lubricate them, and put them back where they came from. You will almost definitely need an adjustable wrench to turn them. I couldn't have done it without one. Do it slowly and don't strip your new $4.46 plastic screws...
Stop when you can only see 4 rows of screw left and try closing the hood gently. Lower the hood and apply enough force with your hand to see if the hood will close. Adjust accordingly until your hood fits right. (Sidenote: BOY OH BOY did this ever help with the appearance of our Z28!!!). I had to adjust and repop the hood about 7 times. Adjust the front bumpers if necessary. The front bumpers don't seem to do much honestly...
If you are going to be adjusting your quarter panel for any reason like I did, you'll need to loosen but not remove the 10mm bolts on the inner side of the engine bay, and then there is another one hidden behind the mirror. You will need to open your door all the way and use a 10mm socket, a socket extender, and a ratchet to loosen this. Good luck reaching it without a flexible ratchet or a small one. Mess around until you think you've done something (I couldn't get the quarter panel to move much at all), and then retighten the bolts. Don't overtighten or you'll crack the plastic.
Next, putting the new retainer in is a snap. The retainer honestly isn't a necessary piece, but I was tired of the darn hole there, so I had to get one. Just put it in the hole and push the pin in.
By now the car is safe to clean and mess with. The wires going into the old junction block are all positive +. The three above the junction block are negative -. You undid the battery cable so you wouldn't accidentally touch the positive to the negative. If you want to get really technical, only one is positive and only one is negative, but I know next to nothing about electronics, so better safe than sorry.
First remove the two nuts holding the wires to the old junction block. You'll use a 10mm socket. Take them the rest of the way off with your fingers. I took pictures of the order the wires were in, so I'd get them back on correctly. Do the reverse of these pics when installing the new block:
 05-14-2009, 09:55 PM
#2
Registered User
Thread Starter
Join Date: May 2002
Location: Dallas, Texas
Posts: 5,556
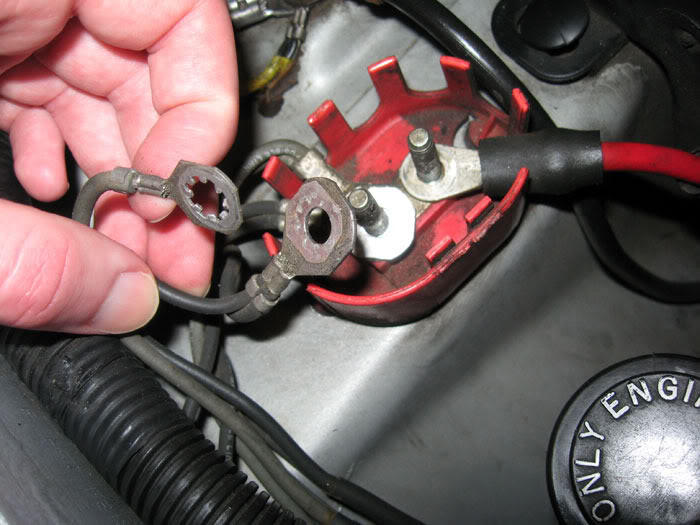
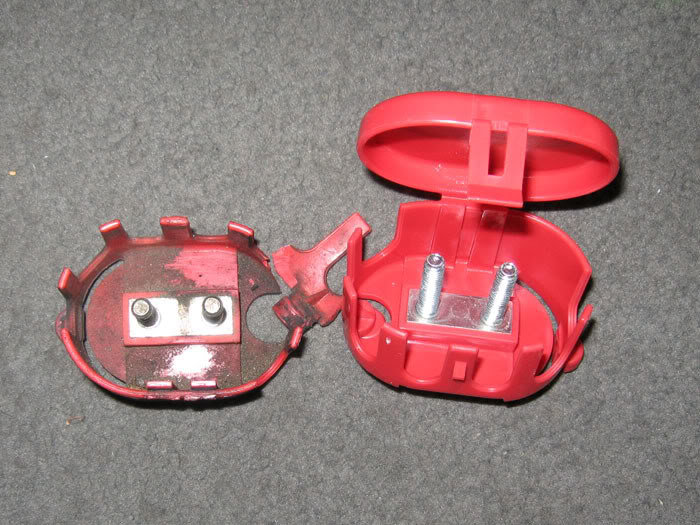
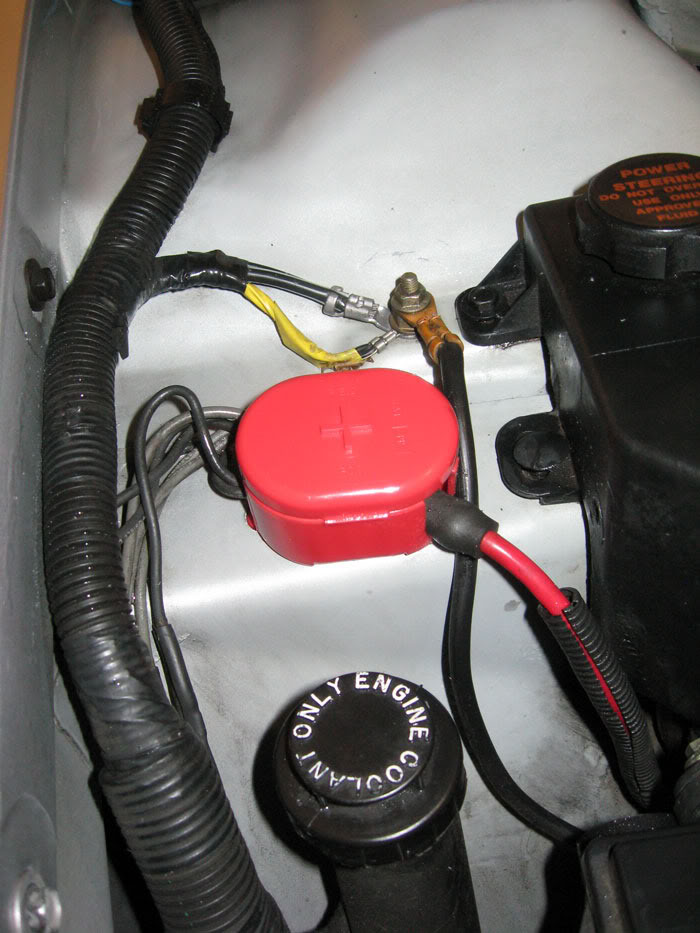
Remove the old junction block by sliding it to the right (driver's side) and pulling up. Mine broke when I did this. Gotta love old plastic:
Go wash the nuts you removed with palmolive dishwashing soap to remove the grease and grime. Spray some water on the wires from a Windex bottle or something. Wash the wires with the soap and a toothbrush and then use your fingers to really get them rubbed clean. No need to dilute it, unless you use Dawn which is really, really really soapy and produces a lot of bubbles. Palmolive brand is what I used, and it wasn't very soapy. Make sure you don't use Dawn with bleach. Just use Palmolive original like I did; it's green. Spray them with some water to get them rinsed a bit and use a paper towel to dry them.
In my case, I had to clean the rest of the area, because the grime was making me sick and embarrassed at car shows. The nut holding the negative wire on was stuck to the one on the wire, so I couldn't remove it. I just did the best I could with a toothbrush, q-tip, soap, and even baby wipes. I used soap and baby wipes instead of Simple Green or another cleaner because there's no real urgent need to rinse soap and mild baby wipe chemicals off your car any time soon. If you use Simple Green, you MUST rinse it thoroughly.
Dry the areas with paper towels. If you had to clean grime off like I did, you might as well do the other wheel hump too. After drying the wires thoroughly and drying the painted surfaces and other items lightly, put your new junction block on the car. Just set it in the holes and gently slide to the left. Replace the wires in the reverse order of what I showed above. Put the nuts on and tighten them. Close the lid. These suckers are notorious for having the darn lids break off, so don't play with it, and never open it ever again unless you have to. The part is expensive for what it is, and it's poorly designed (way taller than necessary, and the wire holes are too big and let in lots of dirt). I didn't do this, but you might want to put some tape or plastic wrap or something on the inside to block some of the dirt that can come in the gigantic holes.
After putting this on and closing the lid, reconnect the negative cable to your battery after making sure it isn't wet, and take your silicone spray and lightly spray everything rubbery or plastic under the hood that you got soap on. The silicone will help moisturize these pieces so the soap doesn't rot the materials, and you'll get years and years out of your beautiful Camaro. Silicone spray will not damage your paint, and it doesn't need to be wiped off. It will produce a black soot, so if you want to wipe it off, go ahead.
I don't recommend driving the car until the next day, so the silicone has time to evaporate.
The End
So happy the car looks great again!

Comparison:
Last edited by Brangeta; 05-14-2009 at 09:59 PM.


 05-15-2009, 04:46 PM
#6
Registered User

Join Date: Jul 2006
Posts: 430
i had those exact same issues with mine a couple years ago. the junction box top was missing and the little hood supports were disintigrating. i bought 2 of the hood pieces from the dealer and then later 2 from GMPD once i go the part no's (the dealer only had 2 in stock) I think i paid around $45 for all 8 pieces (4 plastic screw peices and 4 rubber bumper tops) and then i got the junction box from somewhere for around $16. i was really shocked to find out that the battery piece was only $16
(you can see the bumpers i replaced better in the second pic)
(you can see the bumpers i replaced better in the second pic)
Last edited by 1995blackttopta; 05-15-2009 at 04:53 PM.
05-15-2009, 07:18 PM
#8
Registered User
Thread Starter
Join Date: May 2002
Location: Dallas, Texas
Posts: 5,556
LOL, nice.
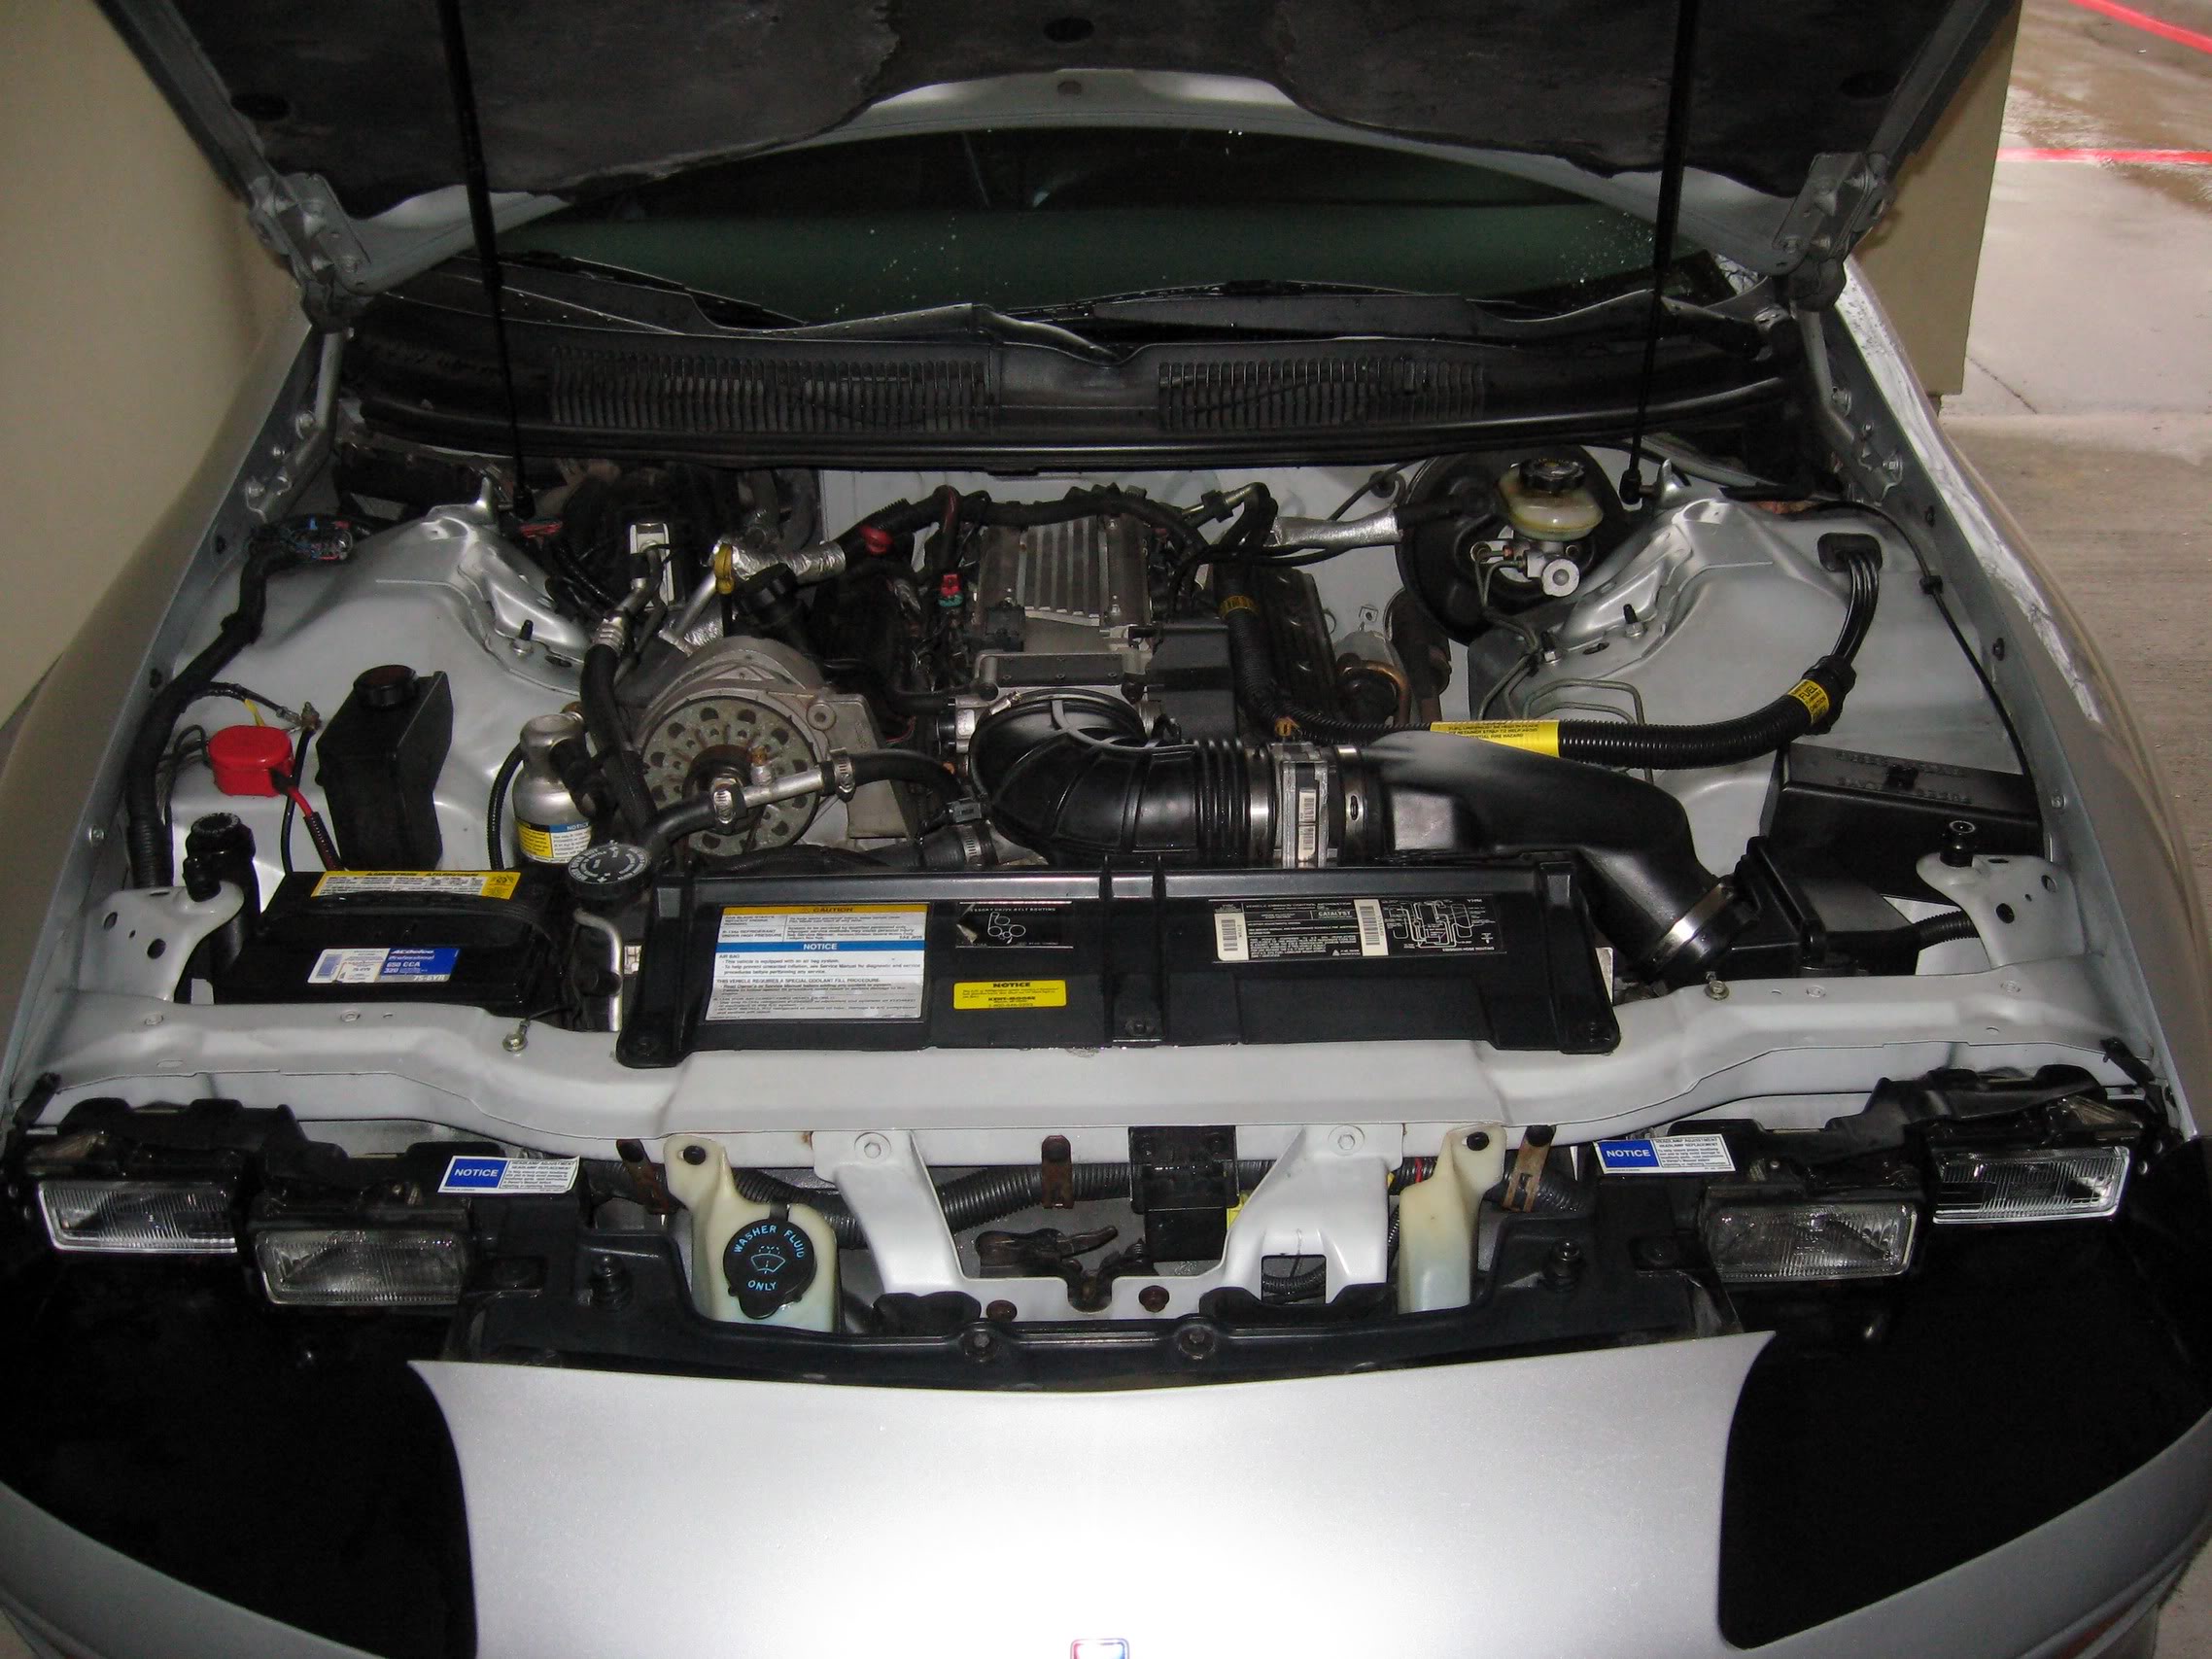
I backed the car out and used two pitchers of water to slowly rinse everything off in case the soap would damage the wire casing or anything else. Surprisingly, Palmolive soap must not be anything like Dawn, because I didn't see suds or anything. I rinsed everything in the wheel hump areas, and the radiator cover forward. Avoided the engine for the most part.
I then dried everything with a towel the best I could, and wiped some crud from areas I didn't wash (top of the engine for example) and cleaned that stuff up a bit.
After that, I sprayed silicone on every single piece of plastic or rubber under the hood that I could. I used to use tirefoam to do this, but it makes way too much black soot, which is likely the crap I've been attempting to clean off. I left the hood open for about an hour to let it air dry, and it's been sitting outside ever since with the hood down.
It's not perfectly clean, but it looks pretty decent. I'll post pics of it in awhile, right now I'm going to go drive it if it'll still start...
05-15-2009, 07:25 PM
#9
Banned

Join Date: Mar 2004
Location: Sandy VJJville
Posts: 3,584
Tire foam does leave an awful grunge behind when you use it to shine plastics under the hood. My method of choice is to spray it on a rag and then wipe the individual parts down. You get a matte shine without all the messy residue.
05-15-2009, 08:54 PM
#10
Registered User
Thread Starter
Join Date: May 2002
Location: Dallas, Texas
Posts: 5,556
Well, the car started right up after a second or two of choking . And by choking, I just mean it didn't fire right up, but that isn't uncommon.
I drove it around, goosed it a bit, and am wickedly surprised! The car SOUNDS and RUNS better (more smoothly) than it was doing before I changed the old junction block out and cleaned things. The car has been having the service engine soon light come on every once in awhile (nearly every drive according to my sister) for about a year now. It's come on every single time I've driven the car, which isn't very often.
I was driving it pretty enthusiastically from stoplight to stop sign for about a total of 7 miles and had no SES light whatsoever. No unusual engine sounds. The idle was smoother. I'm going to have to look in my haynes manual and parts manual and see what in the world those wires are that lead from the junction block to see if this "new car feel" is due to cleaning those, or if it was from cleaning something else.
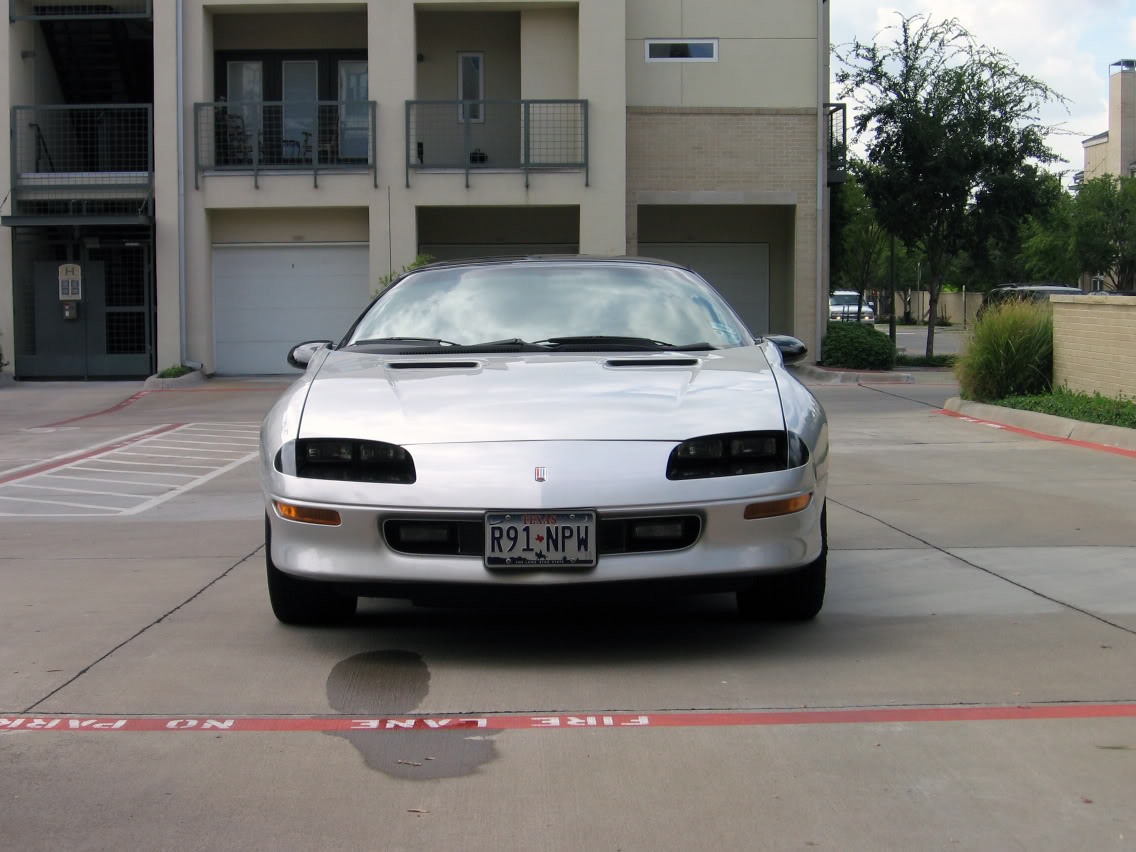
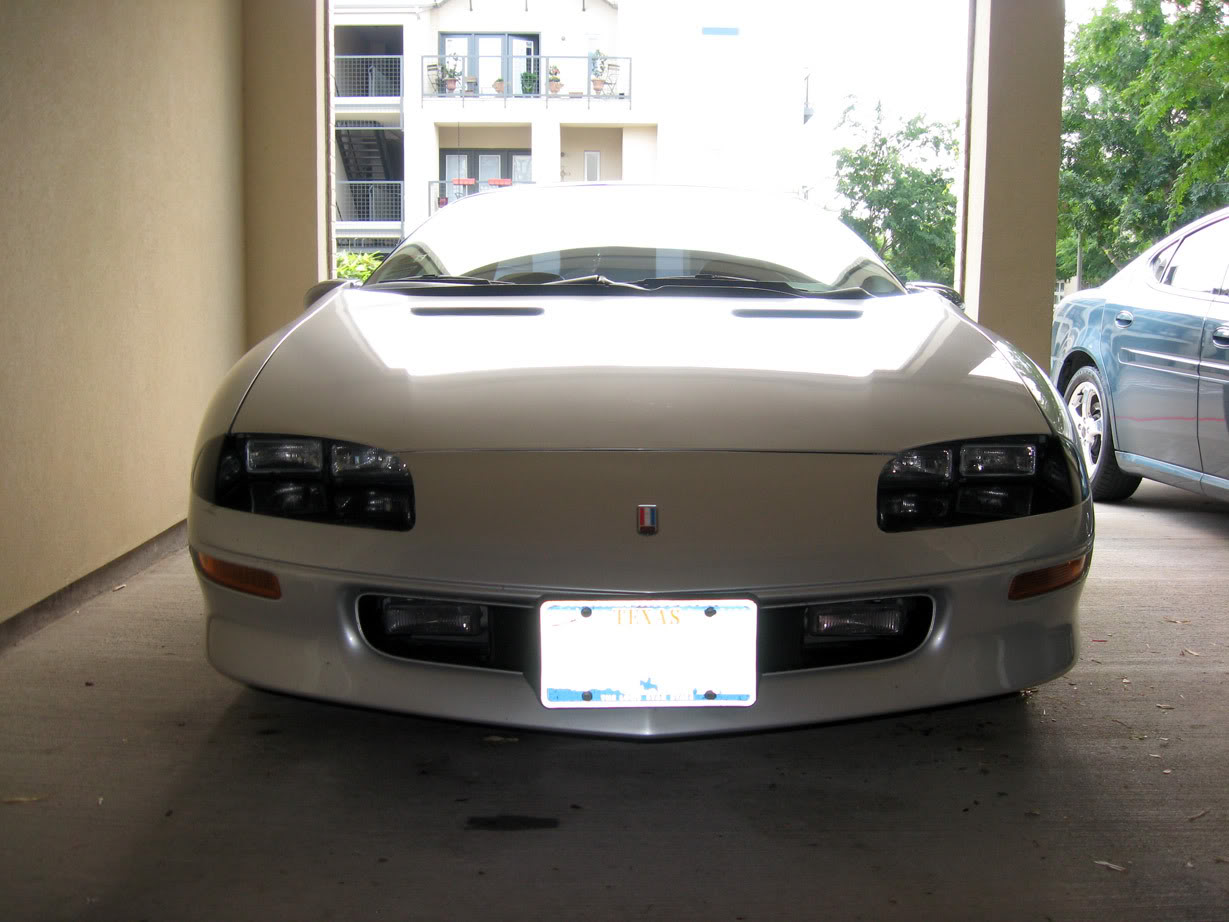
The keyless entry definitely works better. Thanks to the hood bumpers, the hood fits just about right too. The car has been hit once on both sides in nearly the same place on each side, so it isn't a perfect fit, but much better than it was!
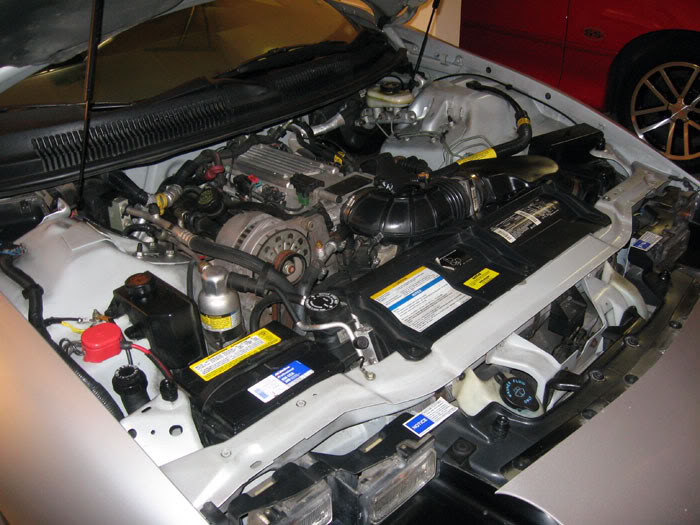
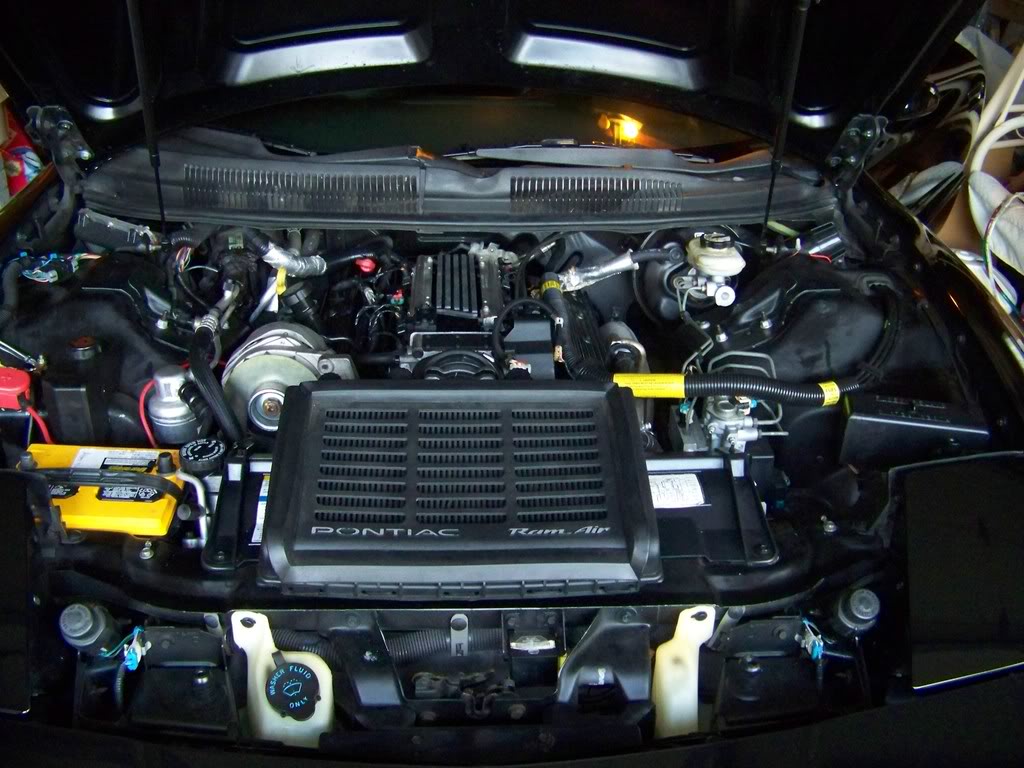
After rinsing, drying and siliconing it looks pretty good! It isn't spotless, but better than it was:
Old pic with hood alignment problems b/c of bad hood bumpers (I guess they were bad back then, this pic may be too old):
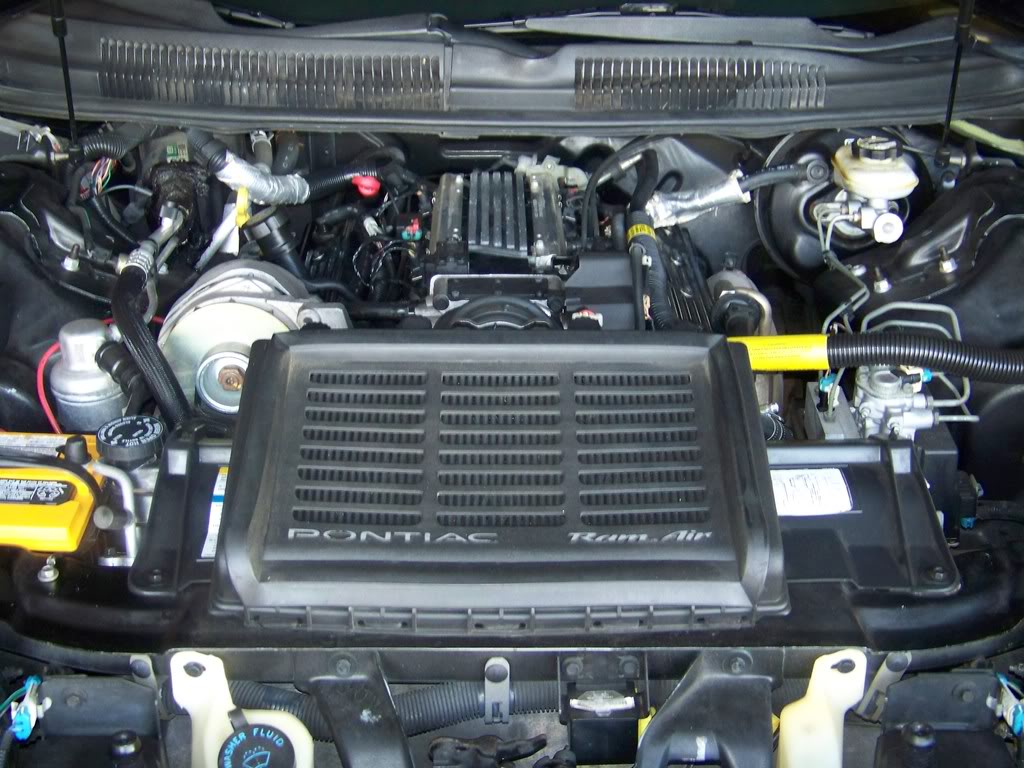
New pic:
. And by choking, I just mean it didn't fire right up, but that isn't uncommon.I drove it around, goosed it a bit, and am wickedly surprised! The car SOUNDS and RUNS better (more smoothly) than it was doing before I changed the old junction block out and cleaned things. The car has been having the service engine soon light come on every once in awhile (nearly every drive according to my sister) for about a year now. It's come on every single time I've driven the car, which isn't very often.
I was driving it pretty enthusiastically from stoplight to stop sign for about a total of 7 miles and had no SES light whatsoever. No unusual engine sounds. The idle was smoother. I'm going to have to look in my haynes manual and parts manual and see what in the world those wires are that lead from the junction block to see if this "new car feel" is due to cleaning those, or if it was from cleaning something else.
The keyless entry definitely works better. Thanks to the hood bumpers, the hood fits just about right too. The car has been hit once on both sides in nearly the same place on each side, so it isn't a perfect fit, but much better than it was!
After rinsing, drying and siliconing it looks pretty good! It isn't spotless, but better than it was:
Old pic with hood alignment problems b/c of bad hood bumpers (I guess they were bad back then, this pic may be too old):
New pic:
Last edited by Brangeta; 05-15-2009 at 11:48 PM.
05-16-2009, 08:36 PM
#11
Registered User

Join Date: Jul 2005
Location: Hammer down!
Posts: 563
Here is a helpful trick I learned for underhood detailing... furniture polish (like Pledge) does an awesome job of giving a long lasting shine to plastics/paint and doesn't leave residues behind or anything.
05-16-2009, 08:56 PM
#12
Banned
Join Date: Mar 2004
Location: Sandy VJJville
Posts: 3,584
Never heard that one before. My biggest issue is keeping the white paint under the hood white. It gets dirty so fast under there.
03-07-2010, 08:41 PM
#14
Registered User
Thread Starter
Join Date: May 2002
Location: Dallas, Texas
Posts: 5,556
Update:
This car was recently discovered to have a whole bunch of rusty gunk in the radiator from some coolant somehow going bad. We were advised by our mechanic to get a different car for a daily driver, or fix the problems the car has. Because we're wanting to keep the car in the family, we've decided that we're going to take the car in to get a little more of a restoration than the simple cosmetic restoration I did previously.
Going to have the intake manifold gasket replaced, oil pan gasket, the cooling system completely washed out thoroughly and taken apart (and likely rehosed), spark plugs changed, fluids all changed, and whatever else needs to be done at the same time. The car is showing its age in certain areas (leaking gaskets in particular), but the interior is like brand new as is the exterior except for a couple of minor flaws. It'd be really silly to replace the car after all of these years of spending a lot of money keeping it garaged its entire life.
This will probably prove to be really expensive, about as much as it is to buy a whole 'nother '95 Z28. Hopefully a lot of unexpected problems don't pop up.
Anyway, to prepare the car for its visit to the "doctor," I decided to clean the engine bay once again. I only did the painted areas, because I didn't want to hide possible leaks--just get some of the black gunk off the car. What causes this black gunk anyway? I haven't ever really figured that out. Perhaps it is a result of the tirefoam I clean the rubber stuff with....
I used store brand orange multipurpose cleaner, a toothbrush, and rinsed with water in a spray bottle. After rinsing, I used a towel and dried everything off. As in the past, this worked fairly well with no drawbacks. It doesn't get rid of everything, but that's perhaps mostly due to a toothbrush not being very flexible.
Here are the results. As I said, I only focused on the painted engine bay parts, though I also did the radiator cover as well.
high res here: http://i985.photobucket.com/albums/a...8/IMG_0049.jpg
high res here: http://i985.photobucket.com/albums/a...8/IMG_0053.jpg
If I'm able to get some pictures from the 'restoration' which might better be called the 'this stuff needs to be done to get rid of the leaks, rusty gunk, and quirks the car has developed' I'll post them in this topic.
Last edited by Brangeta; 03-07-2010 at 08:48 PM.
03-08-2010, 02:01 AM
#15
Registered User
Join Date: Jul 2006
Posts: 430
GL with all that stuff. I have had most of it done to mine in the last few years as well. I got the intake manifold gasket, valve cover gaskets and oil pan gasket changed in the summer of 08. the radiator was replaced a few months before those items and then last sumemr my waterpump started leaking so its been changed now too. Also they flushed the cooling system and reverted it back to green (it had previously been dex cool. i was kind of suprised to open the radiator and see green) my 99 malibu on the other hand with the infamous 3100 which has now had 2 seperate lower intake manifold gasket replacements (one @ 70k and one @ 102k) was filled back up with dex cool after the last shop changed the second intake gasket.
Yours is looking good. I can't wait for the rains this week to wash away all the road salt so i can get my car out again. it's been covered in the garage for over 4 months now.
Yours is looking good. I can't wait for the rains this week to wash away all the road salt so i can get my car out again. it's been covered in the garage for over 4 months now.

