How-to-Mount 88-98 C/K Truck Headlights in your 93-97 Camaro
 05-24-2010, 11:52 PM
#1
Registered User
Thread Starter

Join Date: Dec 2005
Posts: 907
How-to-Mount 88-98 C/K Truck Headlights in your 93-97 Camaro
Well I am going to try my best to show how I put a set of headlights originally intended for the 88-98 full-size pickups into my 94 Camaro. This write-up will hopefully show I did it and will help guide you thru an installation as well. I am open to suggestions and will post other hints and tips that anyone else finds while attempting to do it on their car.
**This is for informational use only!! Doing this conversion requires cutting of the factory headlight header panel which will prevent you from mounting stock headlights back in your car should you choose to go back. In addition this method also requires cutting of the bracket that comes with new headlights that will also render it unusable on a truck. With all that said...lets begin!
Tools you will need-
-Basic wrenches, sockets, extensions, screwdriver set ect...
-Dremel tool with cut-off discs and a carbide bit
-Tape measure/ straight edge
-Sharpie marker
Optional-
-Plasma cutter-(not necessary but makes cutting the metal a lot easier!)
-4" grinder with thin metal blade
-Sawzall with metal blade
I am not going to go into detail with how to remove the bumper- If you are attempting this I'm going to assume that you can figure out how to take the bumper off.
First thing to do is remove the bumper and all the factory headlights- including all the brackets and springs that are surrounding the headlights. Should look something like this when you are done-
factoryremoved.jpg?t=1274720185
Before you remove the header bracket go thru and mark where the bolts mount and where it sits in relation to the metal bracket in front of the hood latch. It might not matter on all cars but it will ensure that its mounted back where it originally was so that your bumper cover will not have a different gap between it and the hood. Next remove all the bolts holding the header bracket and remove it from the car. You might not think this will be necessary but will keep a HUGE mess from cutting the plastic out of the car. Trust me- even a few of the small cuts I did with it in the car made a huge mess.
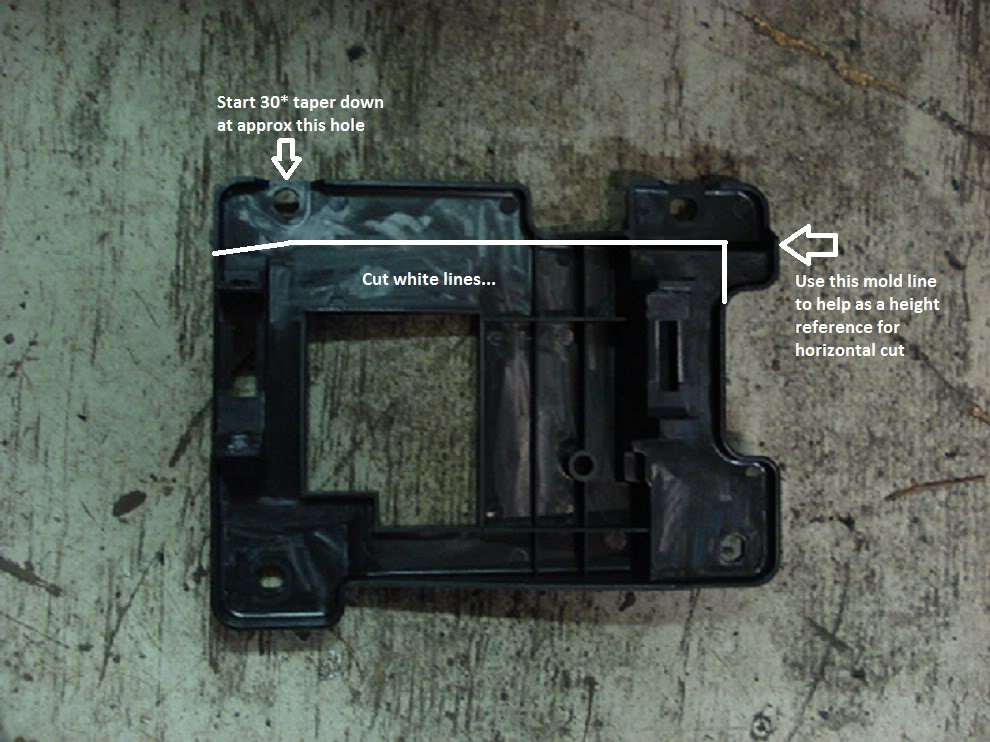
Once you have the header bracket removed you can start marking out where you need to cut. Here are some pictures with different angles to show what needs to be removed and where. These should get you really close- every car is different and depending on what style of lights you bought you might need to take a little more in some places- this is what worked for me. I used a 4" Grinder with a thin-metal cutting blade to cut the plastic- it cuts thru like butter...
passengersideheaderpanel.jpg?t=1274720365
passengersideheaderpanelcut.jpg?t=1274720401

After you have braved the storm and cut-up your bracket almost beyond recognition its time to loosely mount it back on the car and move onto modifying the brackets that hold the headlights to the car. For simplicity sake I will be referring to them as the 'truck bracket'.
Again- here are some pictures to use as a guide for measuring and cutting them. There isn't nearly the same amount of cutting involved with these but it is pretty straight forward.
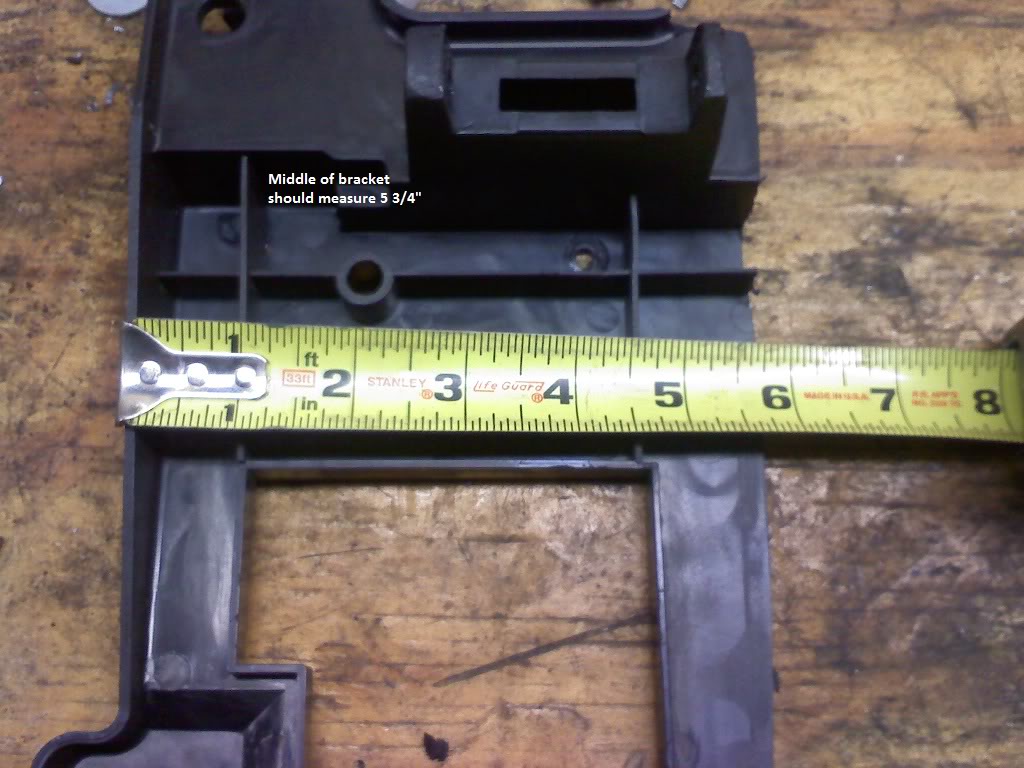
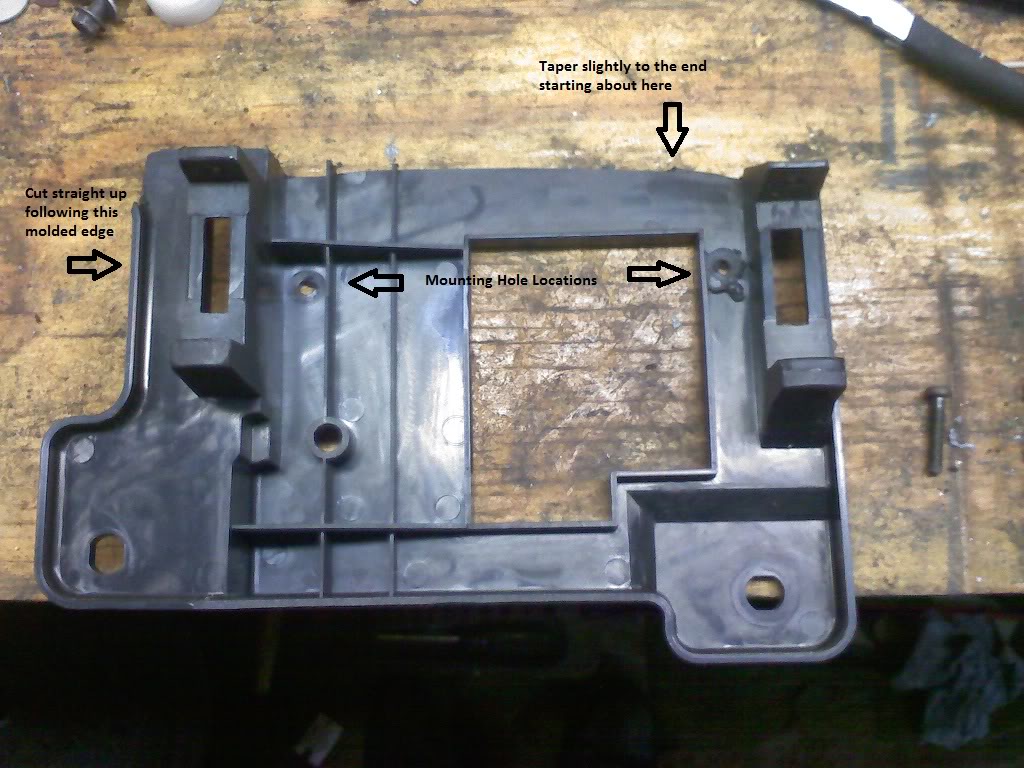
Both brackets should mirror each other. Once you have them close use this picture as a reference to ensure that it will be close for the final fitment of the headlights. The truck bracket I mounted with 2-1" course thread zip-in screws. You might not think that will be enough be actually once the headlights are in the brackets they are very tight and can hardly move since the headlight is so close to the hood and they touch the bumper cover. The measurements I used should get your brackets to be mount tight to the underside of the radiator support. They should obviously be level- you will have a LITTLE play if they aren't perfect but always try your best.
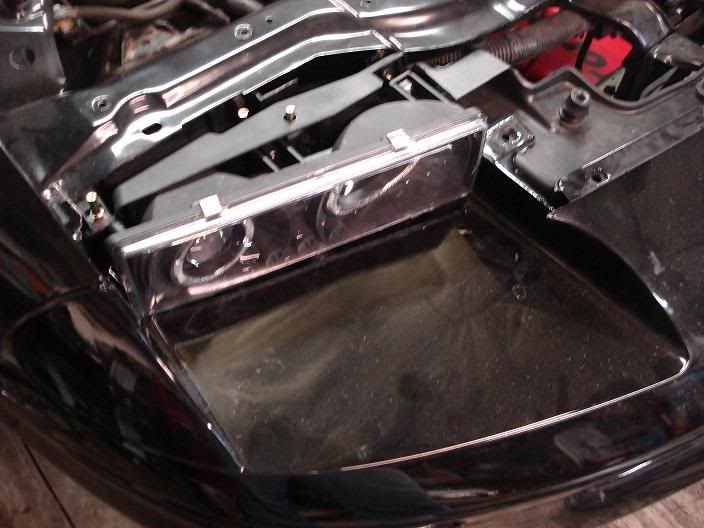
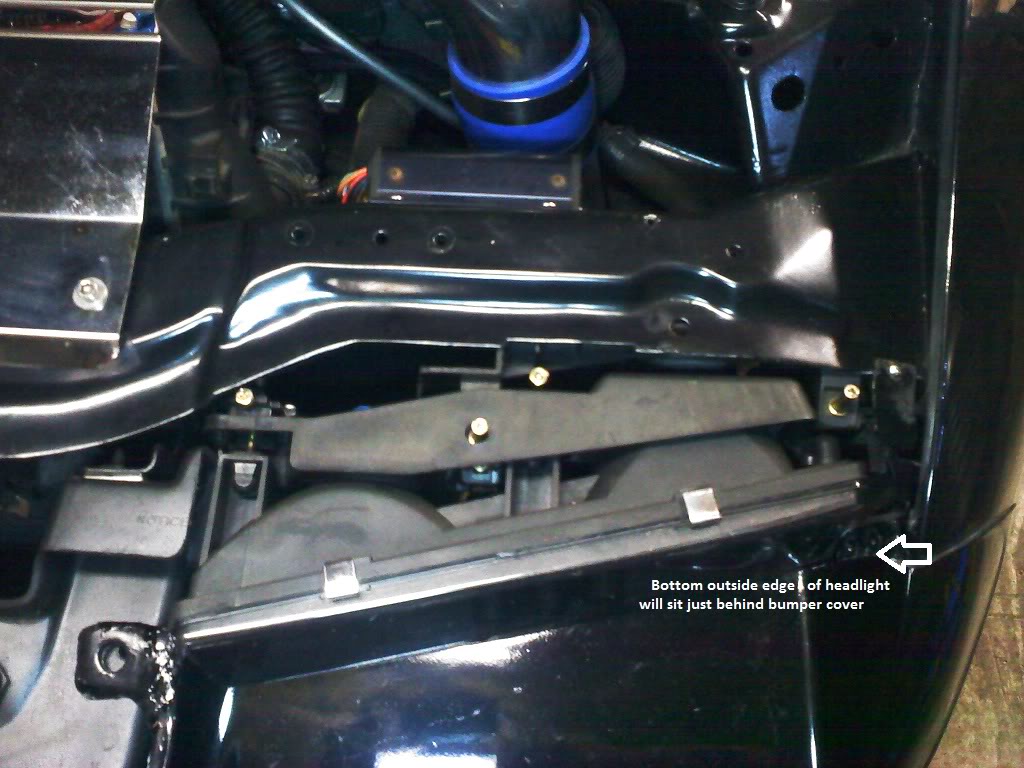
Now comes the tricky part. If you have decided to go with the 'projector style' headlight you are going to need to clearance the radiator support to allow room for the rear of the projector housing. This is rather simple and you can be a little more liberal with your cuts here if you wish since they can't be seen once everything is mounted. If you have bought a different style headlight simply mount the truck bracket to the radiator support and see if the headlight fits. If it does you can skip the next step.
I used the plasma here because I have one but you could use a dremel with cut-off wheels or a 4" grinder probably just the same, just will take a little longer. Use this picture as a reference as to how much space you will need to cut-out to allow clearance. Once you have marked where you need to cut pull the header panel back off quick to give you plenty of room for making your cuts and to ensure you don't damage it.
reliefcut.jpg?t=1274759925
Once you have made your clearance cut in the radiator support on both sides go ahead and start re-assembling things. Throw the header panel back on loosely, attach the truck brackets to the radiator support and then throw the bumper back on making sure everything is going to fit at this point.
**This is for informational use only!! Doing this conversion requires cutting of the factory headlight header panel which will prevent you from mounting stock headlights back in your car should you choose to go back. In addition this method also requires cutting of the bracket that comes with new headlights that will also render it unusable on a truck. With all that said...lets begin!
Tools you will need-
-Basic wrenches, sockets, extensions, screwdriver set ect...
-Dremel tool with cut-off discs and a carbide bit
-Tape measure/ straight edge
-Sharpie marker
Optional-
-Plasma cutter-(not necessary but makes cutting the metal a lot easier!)
-4" grinder with thin metal blade
-Sawzall with metal blade
I am not going to go into detail with how to remove the bumper- If you are attempting this I'm going to assume that you can figure out how to take the bumper off.
First thing to do is remove the bumper and all the factory headlights- including all the brackets and springs that are surrounding the headlights. Should look something like this when you are done-
factoryremoved.jpg?t=1274720185
Before you remove the header bracket go thru and mark where the bolts mount and where it sits in relation to the metal bracket in front of the hood latch. It might not matter on all cars but it will ensure that its mounted back where it originally was so that your bumper cover will not have a different gap between it and the hood. Next remove all the bolts holding the header bracket and remove it from the car. You might not think this will be necessary but will keep a HUGE mess from cutting the plastic out of the car. Trust me- even a few of the small cuts I did with it in the car made a huge mess.
Once you have the header bracket removed you can start marking out where you need to cut. Here are some pictures with different angles to show what needs to be removed and where. These should get you really close- every car is different and depending on what style of lights you bought you might need to take a little more in some places- this is what worked for me. I used a 4" Grinder with a thin-metal cutting blade to cut the plastic- it cuts thru like butter...
passengersideheaderpanel.jpg?t=1274720365
passengersideheaderpanelcut.jpg?t=1274720401
After you have braved the storm and cut-up your bracket almost beyond recognition its time to loosely mount it back on the car and move onto modifying the brackets that hold the headlights to the car. For simplicity sake I will be referring to them as the 'truck bracket'.
Again- here are some pictures to use as a guide for measuring and cutting them. There isn't nearly the same amount of cutting involved with these but it is pretty straight forward.
Both brackets should mirror each other. Once you have them close use this picture as a reference to ensure that it will be close for the final fitment of the headlights. The truck bracket I mounted with 2-1" course thread zip-in screws. You might not think that will be enough be actually once the headlights are in the brackets they are very tight and can hardly move since the headlight is so close to the hood and they touch the bumper cover. The measurements I used should get your brackets to be mount tight to the underside of the radiator support. They should obviously be level- you will have a LITTLE play if they aren't perfect but always try your best.
Now comes the tricky part. If you have decided to go with the 'projector style' headlight you are going to need to clearance the radiator support to allow room for the rear of the projector housing. This is rather simple and you can be a little more liberal with your cuts here if you wish since they can't be seen once everything is mounted. If you have bought a different style headlight simply mount the truck bracket to the radiator support and see if the headlight fits. If it does you can skip the next step.
I used the plasma here because I have one but you could use a dremel with cut-off wheels or a 4" grinder probably just the same, just will take a little longer. Use this picture as a reference as to how much space you will need to cut-out to allow clearance. Once you have marked where you need to cut pull the header panel back off quick to give you plenty of room for making your cuts and to ensure you don't damage it.
reliefcut.jpg?t=1274759925
Once you have made your clearance cut in the radiator support on both sides go ahead and start re-assembling things. Throw the header panel back on loosely, attach the truck brackets to the radiator support and then throw the bumper back on making sure everything is going to fit at this point.
 05-24-2010, 11:54 PM
#2
Registered User
Thread Starter
Join Date: Dec 2005
Posts: 907
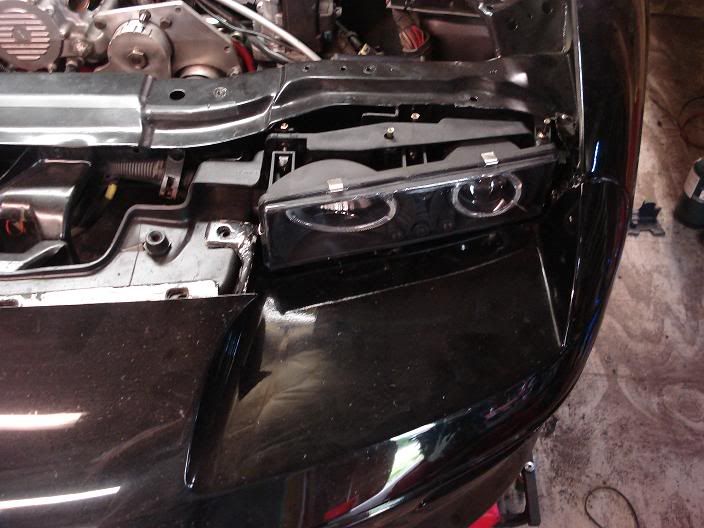
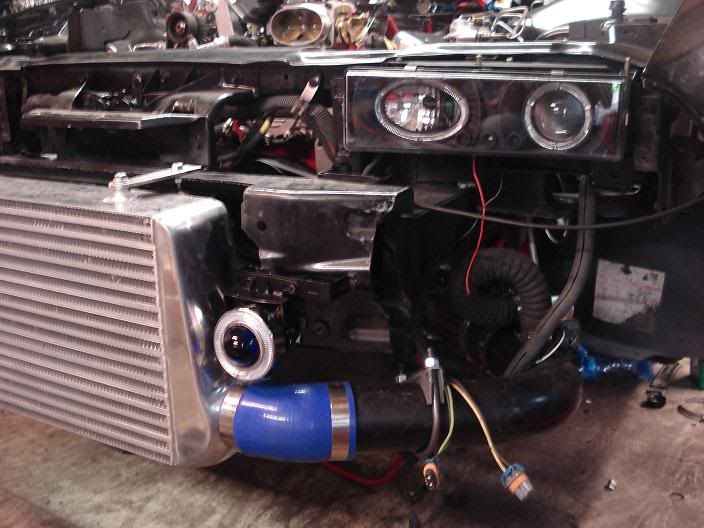
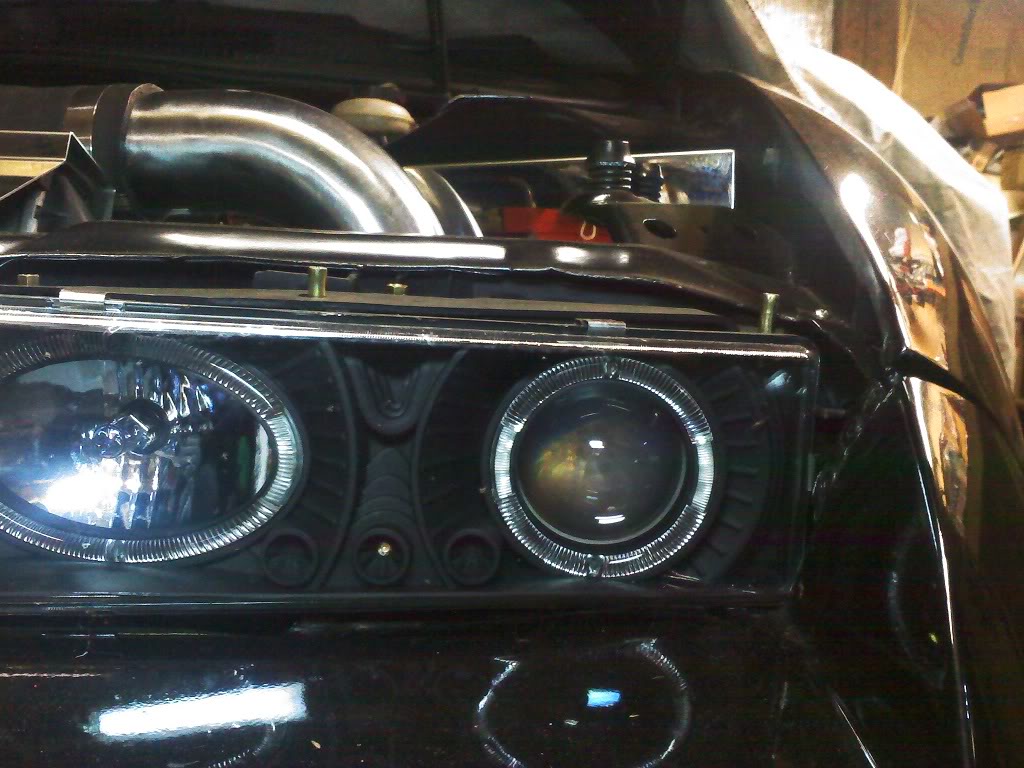
If you are good to go at this point drop in your headlights and see how they fit in reference to the bumper cover. Should look like this-
mount2.jpg?t=1274760408
mountedpicture.jpg?t=1274760554
frontview.jpg?t=1274760708
Once you feel that the headlights fit in there snugly carefully close the hood and make sure that there isn't any interference. Be prepared that these headlights are a tight fit and they need to be almost perfectly in position so that they cover the bumper sections from the factory headlights, and aren't so forward that they don't hit the hood when it is closed. You may need to do a little adjusting of the truck brackets to make sure they are in the right spot.
Once everything fits and the hood closes without interference go back and tighten everything back up. Before you install the headlights you are going to need to put in the bulbs. As far as bulbs go simply use whatever style of 9006 low-beam and 9006 high-beam bulbs. I used Silverstars in my car but in hindsight I would have put in a set of HID's in the low-beams. To install the bulbs you just need to cut the ribs off on the inside of your factory plugs. The clips will still hold the bulbs so don't be concerned.
As far as the Halo's go its your choice- I simply spliced them into the factory parking light wiring since it was easy to get to since it runs right below the headlights. If you choose to put them on a switch its simple since the halo's have their own red/black wiring that you hook up however you please.
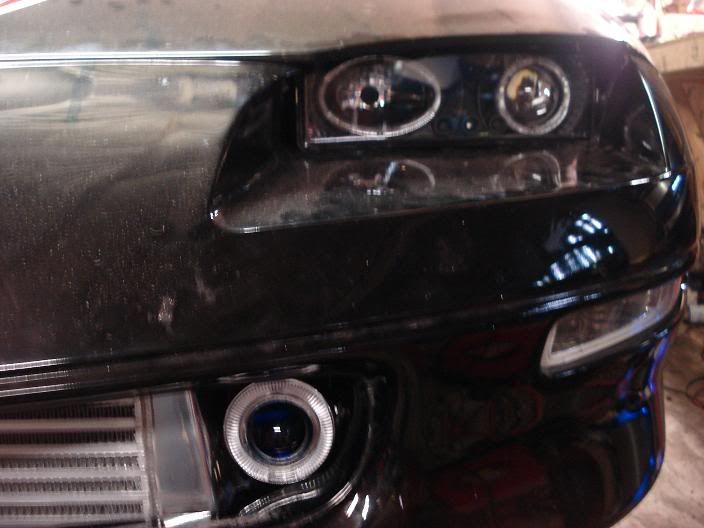
halolitup-1.jpg?t=1274762676
Once the bulbs and wiring is all completed check all the bulbs and halos to make sure they work- if everything is a go- install the headlights for the final time, close the hood and step back and enjoy your work...
halodone.jpg?t=1274762708
Please feel free to post additional questions and if you have tried this yourself and had success post pics of your finished project- Also any tips or tricks you learned along the way or anything you to add...
mount2.jpg?t=1274760408
mountedpicture.jpg?t=1274760554
frontview.jpg?t=1274760708
Once you feel that the headlights fit in there snugly carefully close the hood and make sure that there isn't any interference. Be prepared that these headlights are a tight fit and they need to be almost perfectly in position so that they cover the bumper sections from the factory headlights, and aren't so forward that they don't hit the hood when it is closed. You may need to do a little adjusting of the truck brackets to make sure they are in the right spot.
Once everything fits and the hood closes without interference go back and tighten everything back up. Before you install the headlights you are going to need to put in the bulbs. As far as bulbs go simply use whatever style of 9006 low-beam and 9006 high-beam bulbs. I used Silverstars in my car but in hindsight I would have put in a set of HID's in the low-beams. To install the bulbs you just need to cut the ribs off on the inside of your factory plugs. The clips will still hold the bulbs so don't be concerned.
As far as the Halo's go its your choice- I simply spliced them into the factory parking light wiring since it was easy to get to since it runs right below the headlights. If you choose to put them on a switch its simple since the halo's have their own red/black wiring that you hook up however you please.
halolitup-1.jpg?t=1274762676
Once the bulbs and wiring is all completed check all the bulbs and halos to make sure they work- if everything is a go- install the headlights for the final time, close the hood and step back and enjoy your work...
halodone.jpg?t=1274762708
Please feel free to post additional questions and if you have tried this yourself and had success post pics of your finished project- Also any tips or tricks you learned along the way or anything you to add...
Last edited by Procharged94Lt1; 05-24-2010 at 11:56 PM.

 05-25-2010, 06:41 PM
#5
Registered User
Join Date: Nov 2007
Posts: 32
Very nice writeup! I'm interested to see some pictures of your beam pattern to see how the projector's location interacts with the headlight cubbies as well as some pictures of the car with the halos and such off. In any case, love the idea and it looks like you executed it very well!
06-05-2010, 08:18 AM
#6
Registered User
Join Date: May 2010
Location: Las Vegas
Posts: 6
If you are good to go at this point drop in your headlights and see how they fit in reference to the bumper cover. Should look like this-
.................................
.............................
Please feel free to post additional questions and if you have tried this yourself and had success post pics of your finished project- Also any tips or tricks you learned along the way or anything you to add...
.................................
.............................
Please feel free to post additional questions and if you have tried this yourself and had success post pics of your finished project- Also any tips or tricks you learned along the way or anything you to add...
06-26-2010, 07:31 PM
#9
Registered User

Join Date: Jan 2000
Location: Canada
Posts: 98
I too heard about this from the podcast and had to check it out. Very nice work.
I put similar lights in my LS1, and I found that I had to run a bead of silicone along the top of each headlight to keep the moisture out. Watch for that.
I put similar lights in my LS1, and I found that I had to run a bead of silicone along the top of each headlight to keep the moisture out. Watch for that.
06-28-2010, 06:47 AM
#11
Registered User
Thread Starter
Join Date: Dec 2005
Posts: 907
There was a lot of interest intially when I put these lights in. I did this as a quick tuturial for people who wanted another option for lights in their 93-97 Camaro. And as I stated earlier- there are a lot of headlight options for the pick-up trucks so consider each one of them an option for your car as well. I threw in a set of the halo-headlights but even in the last year SO MANY people have been putting them in all sorts of cars that I am already considering taking them out and swapping them out for a different style.
The biggest reason for doing this is you know can use regular headlight bulbs and swap them out easily without having to deal with the silicon in your old sealed beams. And the light output is obviously much better.
The biggest reason for doing this is you know can use regular headlight bulbs and swap them out easily without having to deal with the silicon in your old sealed beams. And the light output is obviously much better.
06-28-2010, 11:45 AM
#12
Registered User

Join Date: May 2002
Location: Dallas, Texas
Posts: 5,556
If you go back to stock-style lamps, can you do a write up with pics for taking apart the stock-style lamps, changing the bulbs, and sealing them up?
I'm not a headlight enthusiast, and know nothing about HIDs, Xenon, etc. and don't really care to learn all that stuff. I'm just a guy who has a couple of dead bulbs in lamps I've been saving. I just want something a LITTLE brighter, not massively. If the stock bulbs in the '98-'02 lights are better, I'd rather just use something like that.
I'm not a headlight enthusiast, and know nothing about HIDs, Xenon, etc. and don't really care to learn all that stuff. I'm just a guy who has a couple of dead bulbs in lamps I've been saving. I just want something a LITTLE brighter, not massively. If the stock bulbs in the '98-'02 lights are better, I'd rather just use something like that.
07-06-2010, 10:03 AM
#13
Registered User
Join Date: Aug 2006
Posts: 922
I kind of like this. I don't like it enough to actually do it but it looks very clean and well done!
the original thread has more pics...
the original thread has more pics...
Ok- here are some pics I snapped quick today of the headlight install I'm doing. It took a lot of cutting and measuring, but the finished product is well worth it IMO. Like I posted in another thread, these are headlights that are designed for 88-98 GM Full-Size trucks. I have seen a lot of people throw the question around, but have yet to see anyone do it...if someone did and already posted my apologies..
Here are the benefits to the way I did it-
1.) Maintains the some of factory bracket for the truck headlight which means you still have screw adjustment for pitch and side to side adjustment. 2.) Most of the Camaro headlight bucket bracket is still there so you maintain all the connection points for the bumper cover.
3.) Stock wiring plugs into low beam, just have to get appropriate bulb for the high beam to plug into stock wiring (does not come with light)
4.) Still uses the bolts designed to hold the headlight to the mounting bracket that comes with them that you would bolt to the truck. Headlight come out in as much time as it take you take out two bolts per.
5.) I think the halos and projectors look sweet...they fit in the bucket, match the front bumper profile almost like they were made by the same engineer that made the Camaro headlights...lol
The only downside to this is I'm not sure if a factory hood will clear these lights. Depending on how the front underside is profiled it might not clear the front inner corner of them. As they sit in my car they barely touch the underside of the hood when its closed. I haven't profiled the bumper cover to the headlights and if I did you could drop them another prolly another 3/16" down to give them more hood clearance.
Check out the pics- like I said I can't say how they perform on the street as the car isn't totally together yet, and until I wash the car these are all the pics you get...
Let me know if you guys want a full write-up on this. It was a major PITA to figure out taking the headlight bracket on and off 20 times along with the bumper cover but the final product was well worth it, and I'm willing to share how I did it. I have learned a lot from this site so I will be more than willing to help someone else out...

ps- sorry about them being a little blurry...didn't notice till I tried to upload them...apparently my coffee and mt dew had caught up a little...lol
Here are the benefits to the way I did it-
1.) Maintains the some of factory bracket for the truck headlight which means you still have screw adjustment for pitch and side to side adjustment. 2.) Most of the Camaro headlight bucket bracket is still there so you maintain all the connection points for the bumper cover.
3.) Stock wiring plugs into low beam, just have to get appropriate bulb for the high beam to plug into stock wiring (does not come with light)
4.) Still uses the bolts designed to hold the headlight to the mounting bracket that comes with them that you would bolt to the truck. Headlight come out in as much time as it take you take out two bolts per.
5.) I think the halos and projectors look sweet...they fit in the bucket, match the front bumper profile almost like they were made by the same engineer that made the Camaro headlights...lol
The only downside to this is I'm not sure if a factory hood will clear these lights. Depending on how the front underside is profiled it might not clear the front inner corner of them. As they sit in my car they barely touch the underside of the hood when its closed. I haven't profiled the bumper cover to the headlights and if I did you could drop them another prolly another 3/16" down to give them more hood clearance.
Check out the pics- like I said I can't say how they perform on the street as the car isn't totally together yet, and until I wash the car these are all the pics you get...
Let me know if you guys want a full write-up on this. It was a major PITA to figure out taking the headlight bracket on and off 20 times along with the bumper cover but the final product was well worth it, and I'm willing to share how I did it. I have learned a lot from this site so I will be more than willing to help someone else out...
ps- sorry about them being a little blurry...didn't notice till I tried to upload them...apparently my coffee and mt dew had caught up a little...lol

 07-24-2011, 04:35 PM
#15
Registered User

Join Date: Jul 2005
Location: Lakeview Chicago
Posts: 241
Re: How-to-Mount 88-98 C/K Truck Headlights in your 93-97 Camaro
just wondering what is in the missing picture. i'm super impressed at the way this looks and am very interested in doing this over the winter. if not sooner.