Convertible Top Replacement Step by Step (lots o pics)

 01-17-2010, 10:44 AM
#17
Registered User

Join Date: Nov 2005
Posts: 238
Hey thanks for taking the time to do this write up. This should be a sticky as I did a search and did not find it, had to write my own post and someone refered me. I plan on buying a top and doing this in the next few months so I may have a ton of questions then.
Just one question for now, after doing this would you recommend replacing the tackstrips that the top got stapled to? After a quick read it looks like only the rear bows get staples. All the websites recommend replacing these (and the cables) but they sell for all cars and may be just trying to make some more money. Where your cables in good shape?
Oh and did you ever get some pictures of the finished job?
Thanks ~ Erik
05-12-2011, 10:30 AM
#18
Registered User

Join Date: Sep 2002
Posts: 112
Re: Convertible Top Replacement Step by Step (lots o pics)
I am almost done this job and would also like to extend my thanks to the original poster for the very helpful "how-to". Without the instructions, I would probably be handing the job off to somebody else, 2 to 3 grand poorer and looking as a fairly mediocre job.
From my experience, there are a couple of additional tricks that I found to be fairly helpful. When I was trying to perfect the positioning of the window section on the rear bow, I found it very useful to mark the window section when I liked the fit, then after removing the nuts that hold the rear bow in place I would re-align the window section on the bow and clamp the fabric to the bow using a number of one to two-inch "C" clamps. Since I was doing this job alone, that was the only way to put the fabric in the exact position then go outside the car and staple the whole window section to the bow. Also, I found it helpful to use some duct tape to ensure that the short section of fabric that extended below the bow did not get caught on the "drip gutter" and pull the fabric off the rear bow when I was repeatedly removing the bow throughout the process.
Using the clamps on the front bow was also helpful, though I fabbed-up some 2" by 2" wood blocks to spread the load of the clamps and covered them in white hockey tape so as not to mark the top
Along those lines, it appears to me based on the way the main top stayed in place (on the rear bow - with only the nuts holding the top in place) while under some pretty good tension, that the stapling of the main top to the rear bow may not be all that critical. Unless I miss my guess (somebody please correct me if I am off-base here) but I believe that the shop that does the convertible car conversion pre-assembles the convertible top off the car then installs the whole top as an assembly, bolting the rear bow directly into the car but not doing any stapling of the top while the convertible frame is attached to the actual vehicle. i.e. the stapling to the rear bow is mainly to ensure that the overall alignment of the two tops and the rear bow is maintained while the whole top is put on the car at once.
Anyway, my point is the rear bow seems to hold the main top in place perfectly without a whole bunch of staples so my plan is to follow the procedure outlined in this post, staple only where the two tops overlap, bolt the rear bow in place then as a final step to take the small section of fabric that extends below the rear bow, fold it up around the front of the rear bow and put six or so short screws (with large washers) through it and into the bow - just as a safety measure.
This should be much easier than my attempt to try and staple the main top to the rear bow all the way around to the area down below the sail panel. Doing that particular feat, particularly with the stretching involved, awkward location and being a one-man crew has proven to be virtually impossible. Perhaps I just need more friends.
Also, has anyone used a hair dryer to help get out the last couple of creases? I know time, sun and tension will probably work to some extent but I thought I might hurry the process along.
Also, I have one area (directly over each door, outside the outer top seam) that is slightly less than perfect (mild ripple - the rest of the top is tight as a pin). I am wondering what others have done in this area. It seems that if those two cables were tighter, that would probably solve the problem, or perhaps if I was to un-stick the two front bow corner sections, pull and re-adhere them, I might be able to improve it. Also the hair dryer and a little bit of judicious tension might do the trick.
Any ideas?
By the way, for those considering this project, this is a pretty challenging job (mind you, I am not the most experienced guy on this board, for sure - and I am cursed with being pretty "fussy" when it comes to this kind of stuff).
Merci. Bonne Chance.
03-25-2012, 06:58 PM
#19
Registered User

Join Date: Aug 2011
Posts: 2
Re: Convertible Top Replacement Step by Step (lots o pics)
sorry to post in an old thread, but I looked for a couple of years for a pic like the one I'm about to post here - I hope it's useful for someone else in the future
this is the rear side of the cast white metal sail panel insert on a 95 Z'r convertible - there are two 5/32" hex head screws that thread into the tapped holes on the backside of it that need to be removed before the triangular panel can be removed
this relates directly to post #4 in this thread and specifically where the author made an apology for the poor pic
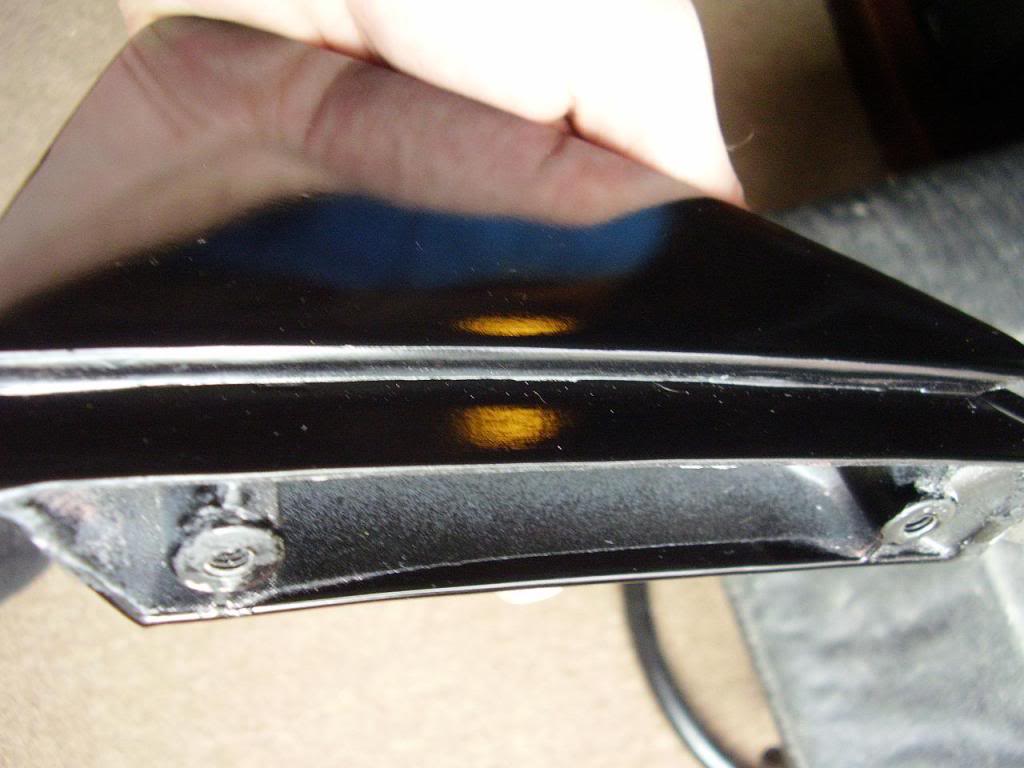
- best of luck
this is the rear side of the cast white metal sail panel insert on a 95 Z'r convertible - there are two 5/32" hex head screws that thread into the tapped holes on the backside of it that need to be removed before the triangular panel can be removed
this relates directly to post #4 in this thread and specifically where the author made an apology for the poor pic
- best of luck
04-03-2012, 11:20 AM
#20
Registered User

Join Date: Jan 2011
Posts: 37
Re: Convertible Top Replacement Step by Step (lots o pics)
listen man ..... U ARE A GOD!!!!!!!!!!! i had my 97 back window blow out in a hail storm last week and ordered a new top. i got 700 to 1200 dollar quotes untill...... i ran across your post. it took one night(4 to 11pm) to take it off and one day(1pm to 11pm) to install. im a perfectionest and let me tell u, its a perfect top!!!!!!!!! thanks bud 4 this post.............
and btw is this a stiky?!?!?!?!? if not it should be!!!!
and btw is this a stiky?!?!?!?!? if not it should be!!!!

 05-03-2012, 03:02 AM
#22
Registered User
Join Date: Aug 2006
Location: Orem, UT
Posts: 1,497
Re: Convertible Top Replacement Step by Step (lots o pics)
wtf... My top was $600 online (stayfast canvas) and the quote to install it by a upholstery guy was $300... But I still did mine myself anyways.
05-14-2013, 10:03 AM
#23
Registered User

Join Date: May 2013
Posts: 2
Re: Convertible Top Replacement Step by Step (lots o pics)
Awesome write up. Just fabulous. I read a few other how-toos and this one was hands down the best, the pictures are great.
I folded the fabric over the two intermediate bows instead of under. Seemed like there would be more slack when the top gets folded that way.
I did the rear tack strip a little differently. After the other sections were stapled, glued and clipped down, I cut notches in the back of the main top corner pannels approximatly where the studs would be based on the old top, leaving an inch or so more to cut. With the top down and latched, pulled with my fingers each notch to the respective stud and cut to that position (or almost). After all the notches were cut, tacked the top to the bar with a few staples, unlatched the top, installed the tack bar with a nut every other stud and then relatched the top to check for tightness. After three trials I got the top nice and snug, added a bunch more staples, trimmed some of the excess materials and bolted everything snug with some lock tight on the nuts.
I also went ahead and replaced the elastic reinforcement over the rear window with some non-rolling 1-1/4 inch elastic from the fabric store, about 28 inches long. With the top halfway down you can lift the sail panels from outside and sew the elastic on to one webbing pad where the old elastic was, then pull the elastic through the slots on the new top with a wire and sew it on the other webbing pad. No clue if regular elastic will hold up to the elements, or if that was the right length, but I figured that was better than nothing, and if I need to I can always replace that.
My old white vinyl top, (18 years old 1995 Camaro 3.4L) was brittle, cracking and in one spot, developed a 2 inch hole that was temporarly patched. I'm amazed it lasted that long. The new top is a Stayfast black top with a back glass window from Auto Tops Direct (Sierra).
Thanks again for the awesome post.
05-14-2013, 10:19 AM
#24
Registered User
Join Date: May 2013
Posts: 2
Re: Convertible Top Replacement Step by Step (lots o pics)
Anyway, my point is the rear bow seems to hold the main top in place perfectly without a whole bunch of staples ...
Also, I have one area (directly over each door, outside the outer top seam) that is slightly less than perfect (mild ripple - the rest of the top is tight as a pin). I am wondering what others have done in this area. It seems that if ... if I was to un-stick the two front bow corner sections, pull and re-adhere them, I might be able to improve it.
Any ideas?
Regarding the sag over the windows, I would guess that you need to pull tighter at the front toward the corners. I pulled everything tight over the front first, then lifted the edge near the sides, pulled tucked and glued the little side flaps around the front re-gluedt hen reglued the front side edges back down. Seemed to keep uniformily snug.
Last edited by Queso_Caliente; 05-14-2013 at 10:20 AM. Reason: spellcheck errors
05-26-2013, 09:57 PM
#25
Registered User
Join Date: Mar 2007
Location: South East
Posts: 74
Re: Convertible Top Replacement Step by Step (lots o pics)
Awesome thread sir. Sticky this mo fo.
About 5 years ago i got my top replaced, $600 top $600 labor for a total of $1200.
The guy that did the work was in Charleston WV and was recomended to be from a vette owner at a car show. The guy that did the work was a little skinny veteran and had a leg issue so I felt good about giving him work.
The top never fit right. He blamed it on me converting the top to manual instead of electric...long story.
Over the years a rock stabbed it in the front, it was super loose in the front and center, the back showed a strip of black above the rear glass (tan top, black strip looks horrible), then a few months ago the top mysteriously ripped on the passenger C pillar area.
So I need to do this soon and was hoping to save money, and you sir just saved me $600.
05-22-2014, 02:04 PM
#26
Registered User

Join Date: Aug 2013
Posts: 28
Re: Convertible Top Replacement Step by Step (lots o pics)
Thanks for this write up! I just did the top myself on my 96. Everything is right where the write up says it should be. I would say I am a average do-it-yourselfer and I was comfortable with about 90% of this project. The OP is right, the last step is a major beeeyotch!
I just trimmed out where the posts would go little by little, stapled it to the bar and then test fit.
when it was too loose i just cut a little bit more and after a bit of time, i got it where it should be. (if that makes sense) I bought a $350 ebay top, so I wasnt expecting an exact copy of the old top, but now that it is all on and tight, it looks great!
mega props to the OP!!!!
10-25-2014, 06:59 PM
#27
Registered User

Join Date: Feb 2000
Location: Seattle, WA
Posts: 1,445
Re: Convertible Top Replacement Step by Step (lots o pics)
Excellent sticky.
There are some YouTube videos showing some of these repairs and this is very informative.
One thing I noticed with OTHER convertible tops (like Audi) is that they use a one-piece top unlike our 2-piece (top and rear window separate) design. On those cars you will see the TOP glued to the rear window all the way around. It appears some people thought our cars were supposed to be glued there around the glass... but they are not! It is totally normal to have the glass only bonded to the INNER canvas piece.
This step-by-step clearly shows why. So if you're trying to fix a leaky 4th gen top, don't panic and try to seal the outside canvas layer to the glass rear window.
After 18 years, by 1997 Trans Am vert had a small leak dripping water into the rear passenger seat foot well. I realized I had pinched the passenger door's rear-vertical weatherstripping-seal when reinstalling the plastic door trim earlier. Once I fixed the seal, wet-vac'd the water out of the rear seat well I thought I was done.... nope.
The water was still there, and a lot of it. After removing the rear seats (a single bolt for each lower seat, and a few bolts for the rear seat back) I found the water was also under the rear seats... and the seat foam was soaked. :-/ I found that directly behind the front seatbelt mounts are drain holes that water will follow from the outside of the top, down the side sail panels, and down into a drain that empties into the rear wheel well. I had years of pine needles and some gunk in there clogging the 2" wide drain hole. The water was backing up the "rain channel" and overflowing to the rear seat, under the carpet and below the padding. once the seat well fills up, it'll overflow forward to the rear seat foot well.... and you'll finally see it!
Convertible owners with leaks:
1) check the INSIDE canvas seal to the window (I'm told you could try cleaning it off with a razor blade and mineral spirits, then using marine grade 100% silicone sealant to bind it back together).
2) check the rain gutter behind the front seat-belt mount (with the top up but unlatched for a little slack, reach behind the interior's felt/headliner right above the rear seat plastic fascia to get to the gutter). I didn't even know this rain channel existed, but that's where the rain drains when it gets past the rubber seal between the rear quarter panels and the top.
3) check the WINDOW seals (make sure they both seal to the windows, but also are sealed to the top frame bow(s) when unlatched and pulled back a bit. (black silicone can seal weatherstripping to the frame temporarily, but replacing it outright is the best, and easiest option). Conditioning all exposed weatherstripping yearly with a small amount of silicone grease is useful in keeping it pliable.
4) Looks for top leaks. This is the worst case scenario, but its not the end of the world. The black tops like mine are canvas, and there are several ways to fix these. Vinyl is also patch-able, both in small holes or long cuts but with different patch material/sealant. Small pin-holes can be fixed with a small adhesive patch like Tear Aid, or by using a small black canvas patch held on with a black or clear adhesive glue like Tear Mender or whatever your local body shop or boat dealer recommends for canvas repair.
05-16-2015, 08:46 AM
#28
Registered User
Join Date: Aug 2013
Posts: 1
Re: Convertible Top Replacement Step by Step (lots o pics)
Man, I was about to pay $2,800 for a top replacemet! Glad and thankful I found this. I prefer to do any work I can on my car, so, I'm going to put my new top on myself.
Thanks to the original poster, for taking the time to post this. He may have replaced his top, again, since he posted this and there's cheaper tops available now.
Over & Out!
Thanks to the original poster, for taking the time to post this. He may have replaced his top, again, since he posted this and there's cheaper tops available now.
Over & Out!
08-11-2015, 11:19 PM
#29
Former Vendor

Join Date: Jun 2015
Location: Sarasota, Florida
Posts: 69
Re: Convertible Top Replacement Step by Step (lots o pics)
07-18-2018, 12:55 PM
#30
Registered User

Join Date: Jul 2018
Posts: 1
This was a brilliant write up. Thank you. After careful consideration, I am going to be taking my 02 Z28 vert to a shop. I am way to unorganized and clumsy to be trying this at home. :-)
I do hope anyone else who has read your piece has had luck. Thanks!
I do hope anyone else who has read your piece has had luck. Thanks!